Practice
After watching Plan, the player prepares for Practice
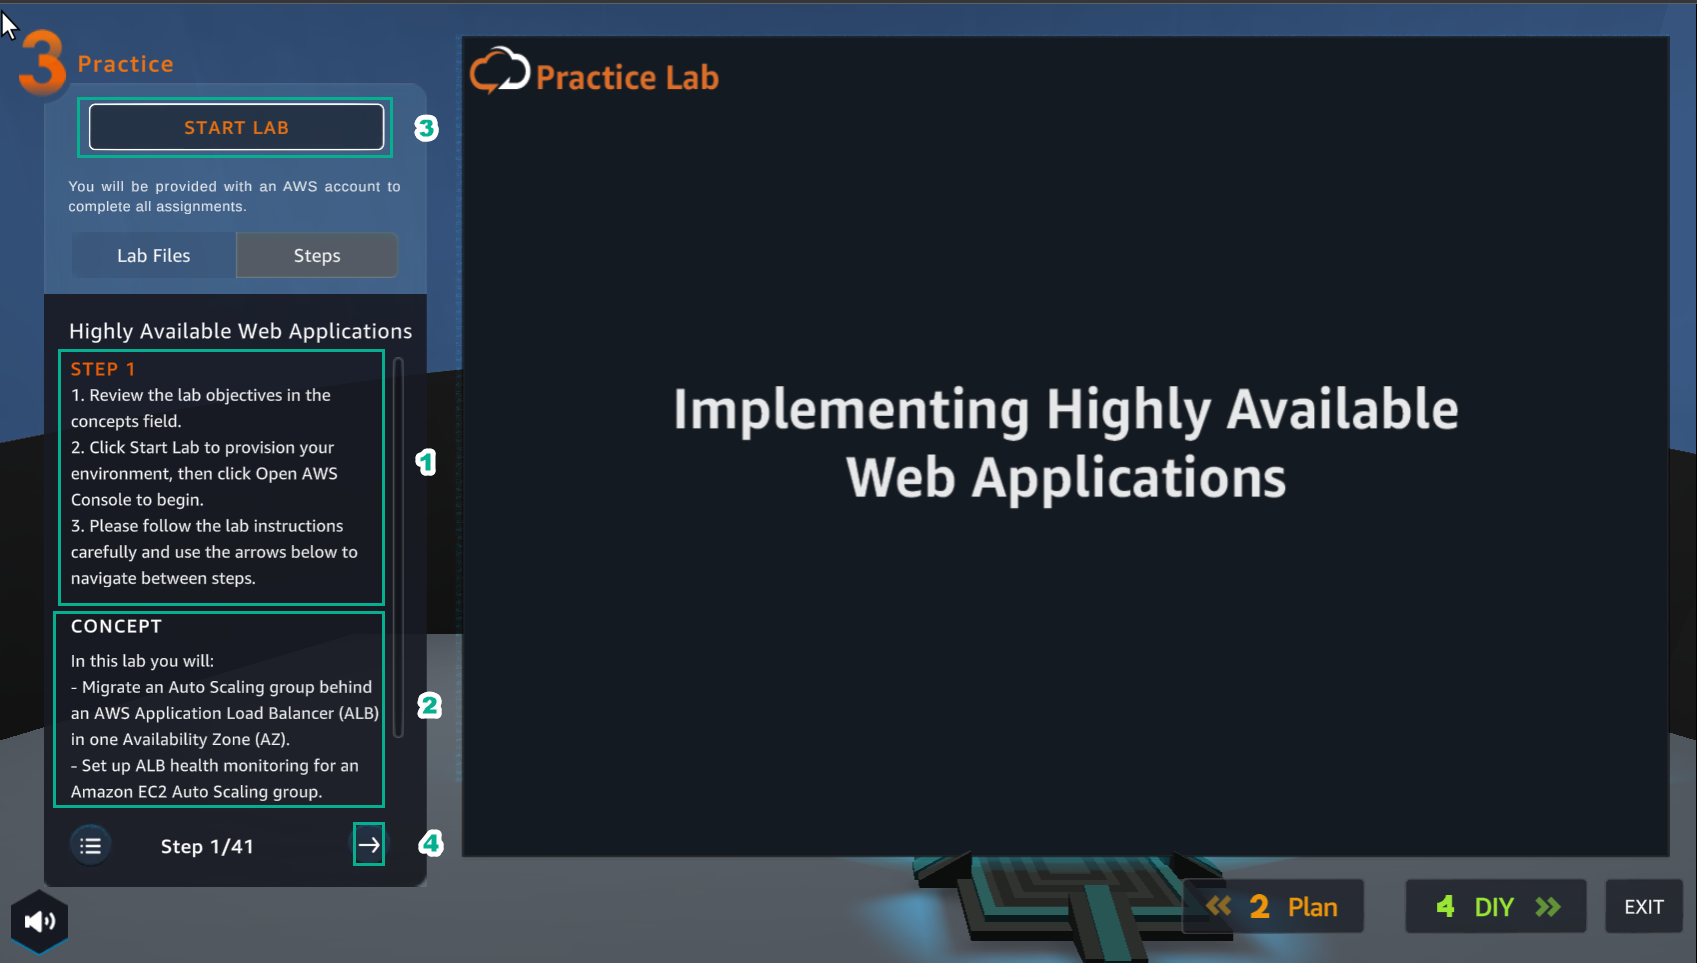
- In the Practice interface
- Read step 1 of Highly Available Web Applications
- Read CONCEPT
- Select START LAB
- Select the arrow to the right to see the next steps
- In the Practice interface
- Read step 2 of Highly Available Web Applications
- Read CONCEPT
- Select Open AWS Console
- Select the arrow to the right to see the next steps
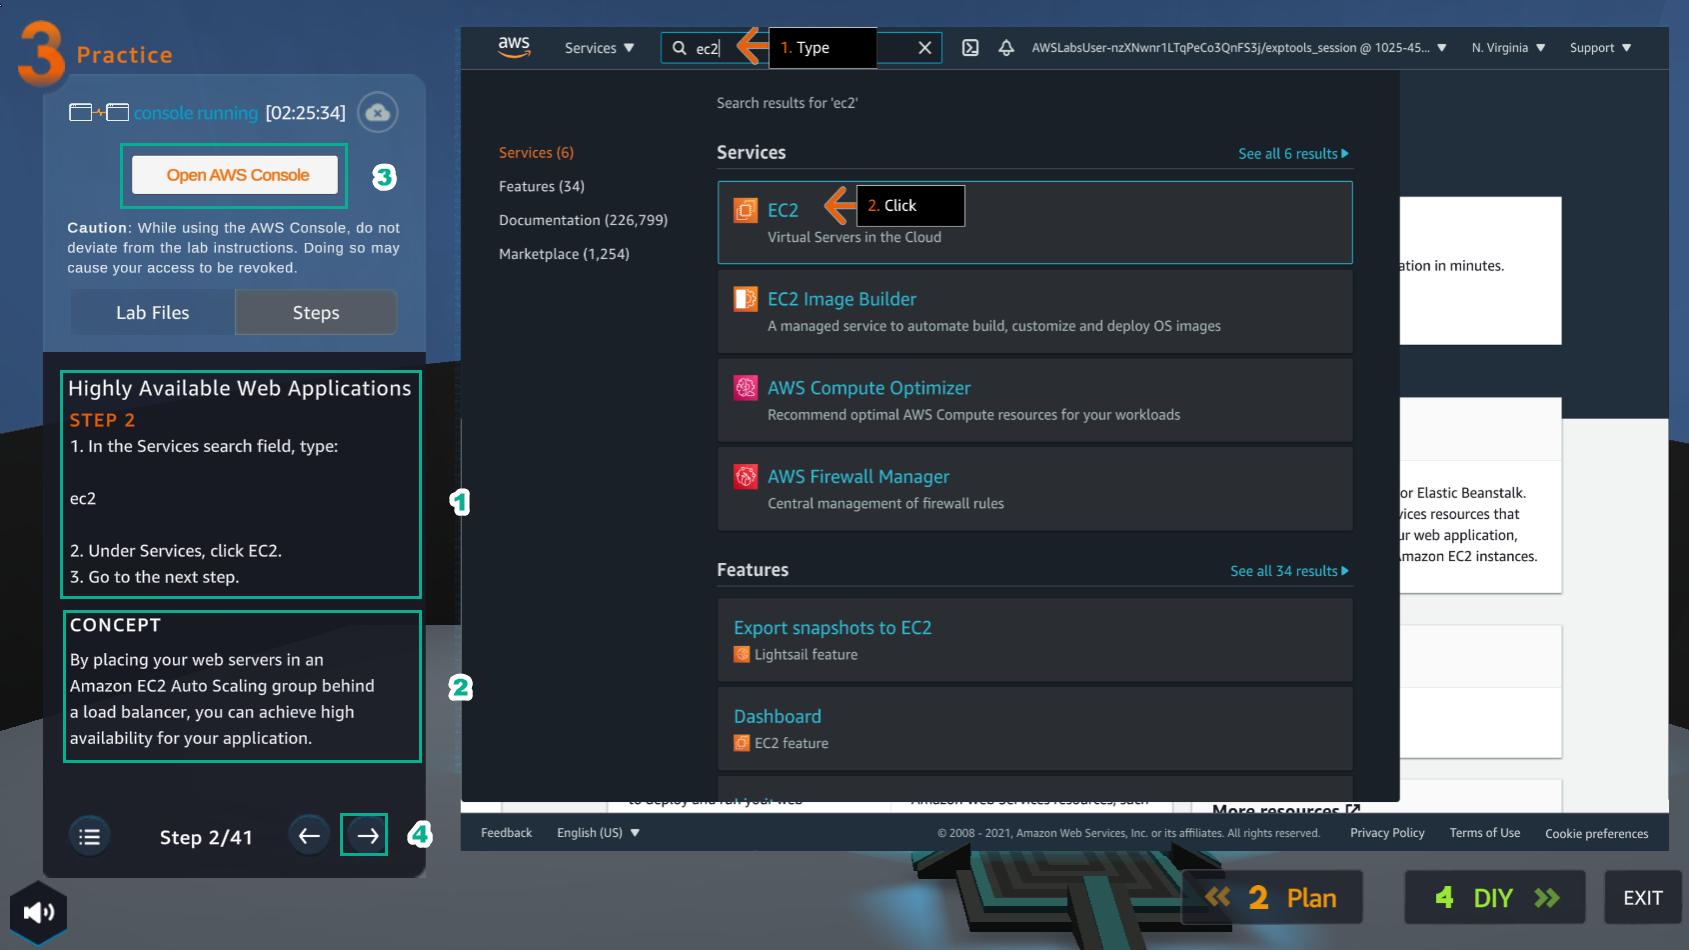
- In the AWS Console interface
- Find EC2
- Select EC2
- In the Practice interface
- Read step 3 of highly Available Web Applications
- Read CONCEPT
- Select the arrow to the right to see the next steps
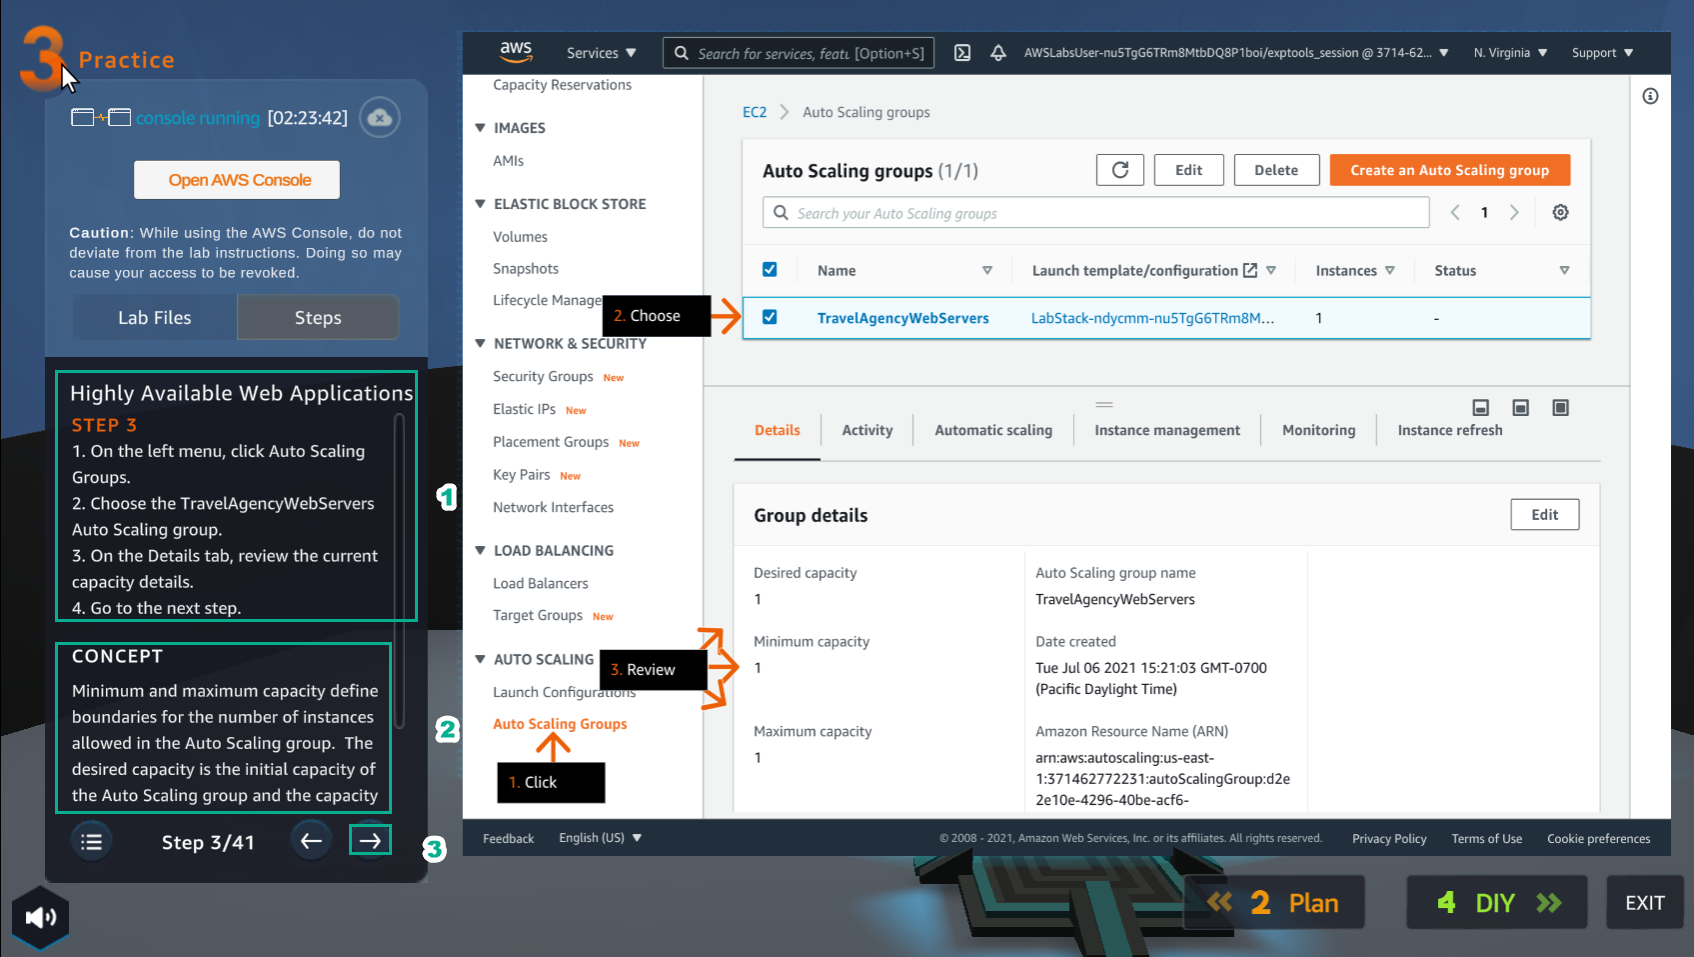
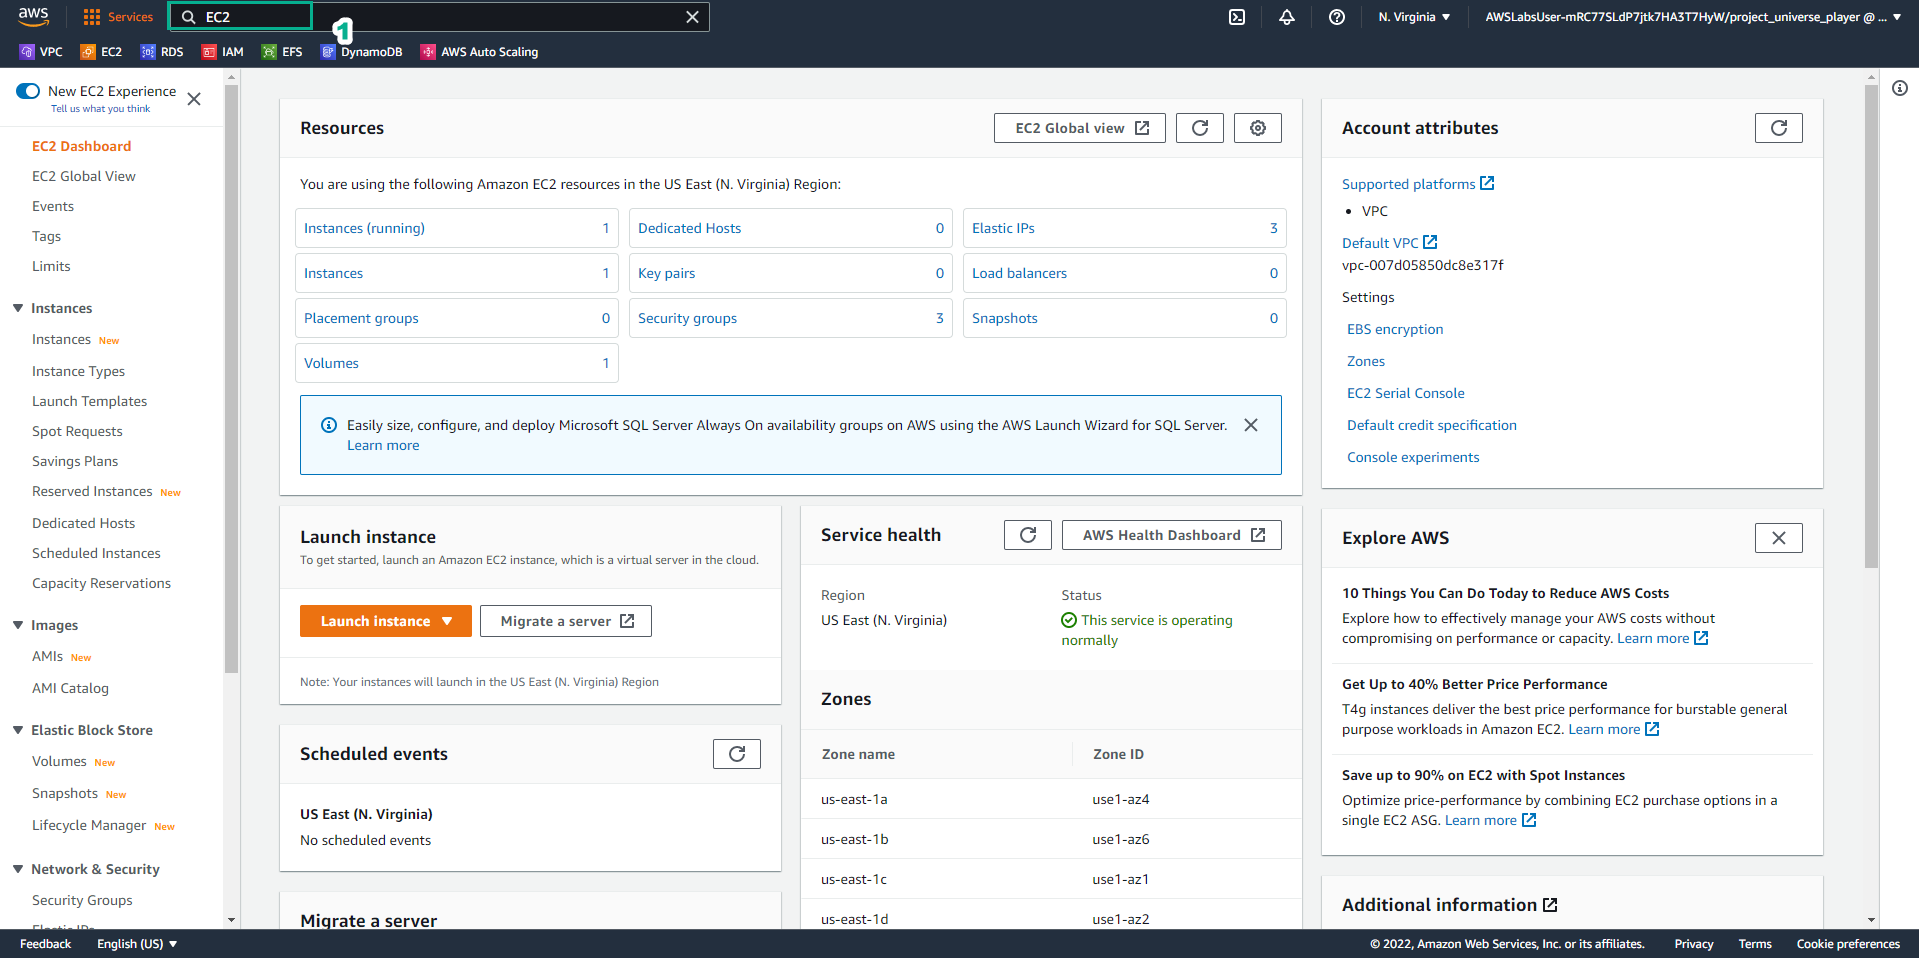
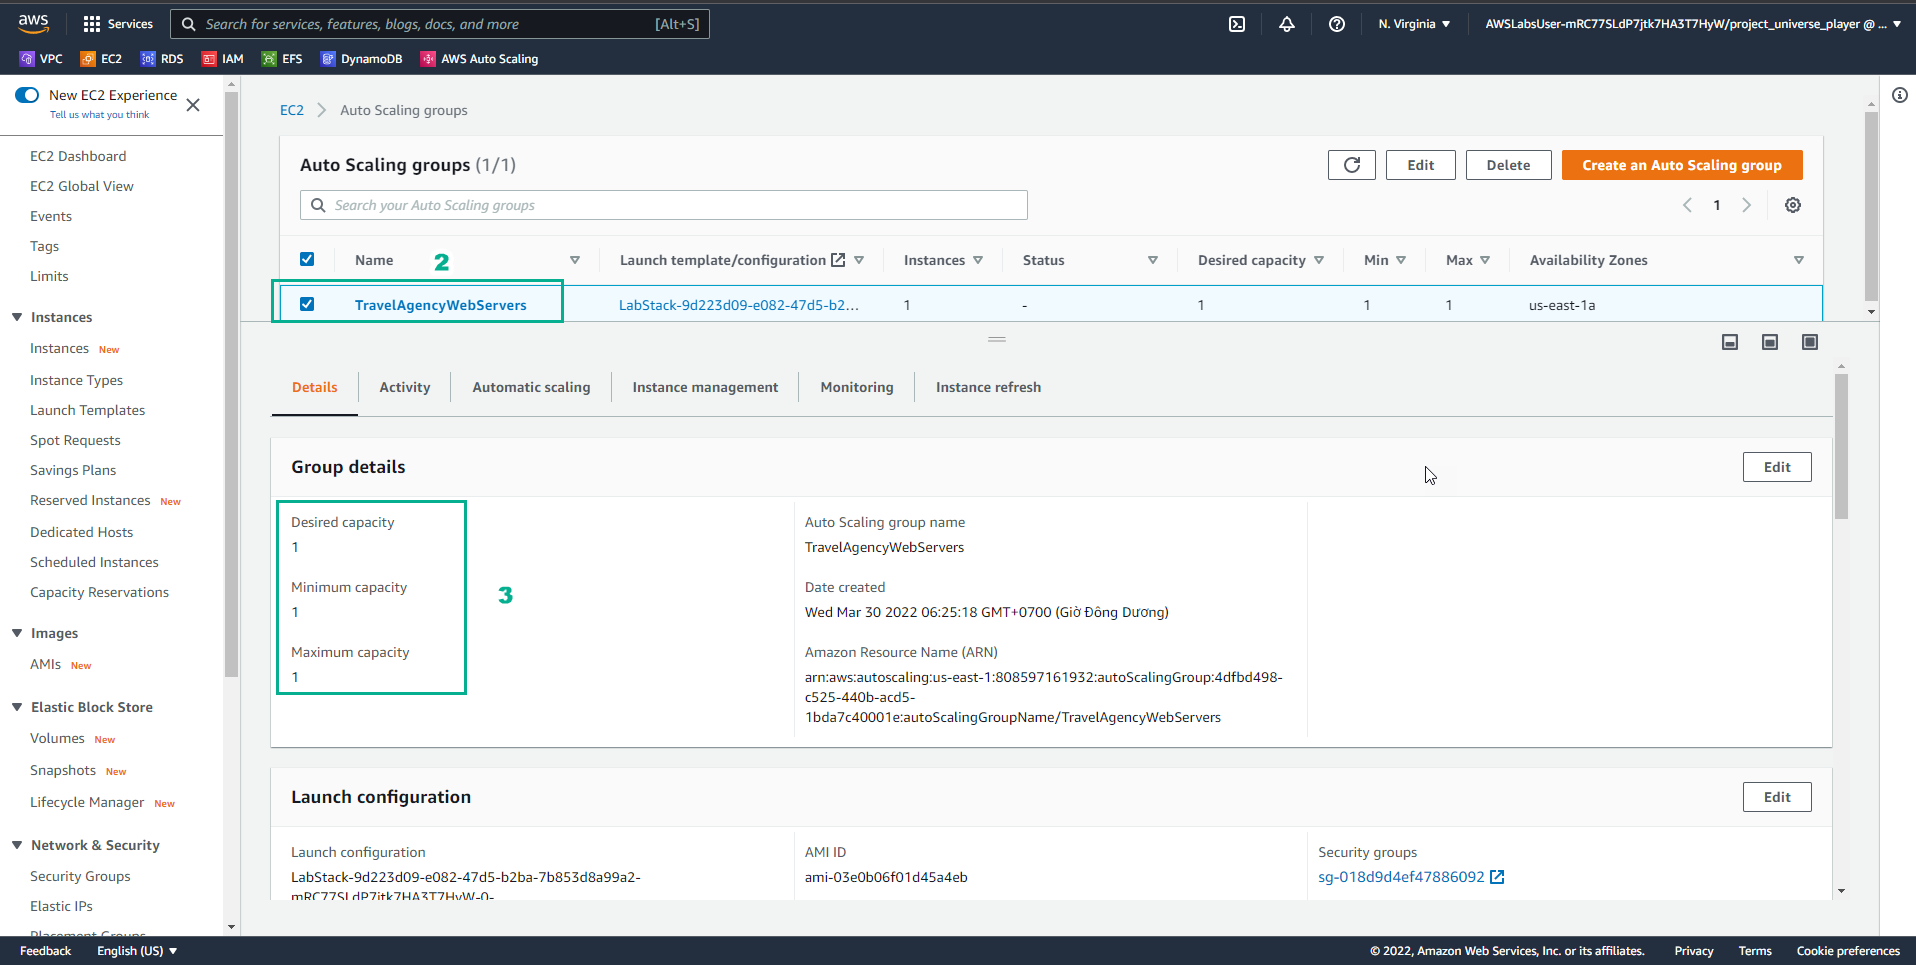
- In the EC2 interface
- Select Auto Scaling Groups
- Select TravelAgencuWebServers
- View details of Desired capacity, Minimum capacity, Maximum capacity
- In the Pracitce interface
- Read step 4 of highly Available Web Applications
- Read CONCEPT
- Select the arrow to the right to see the next steps
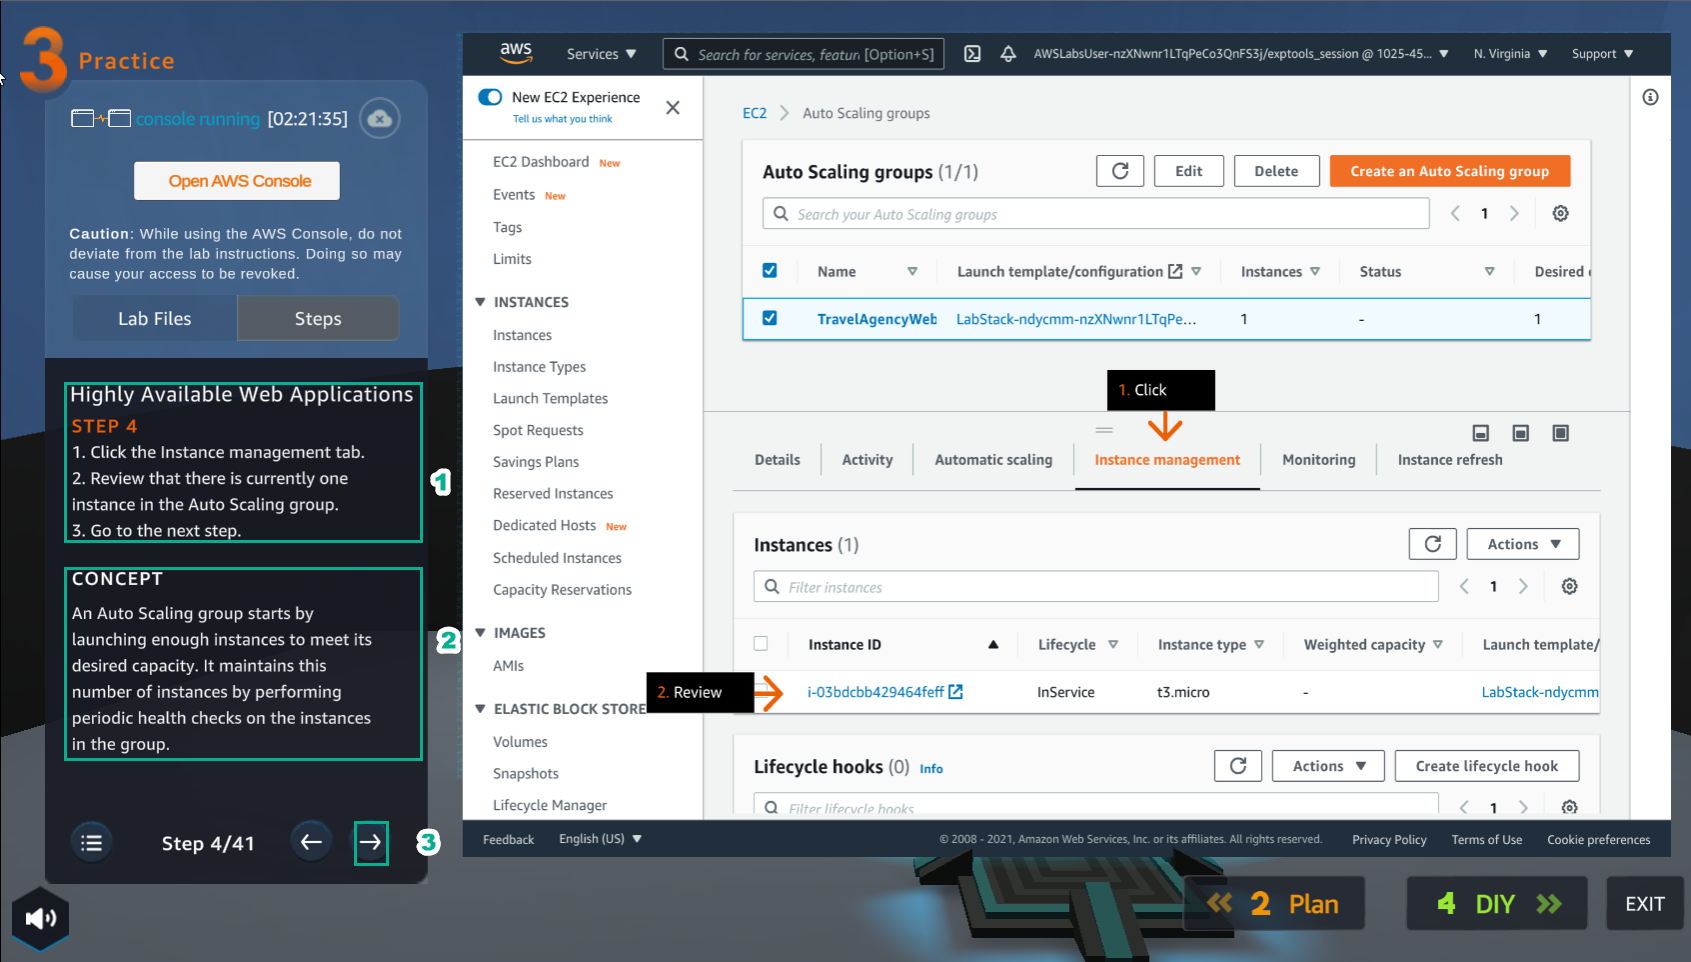
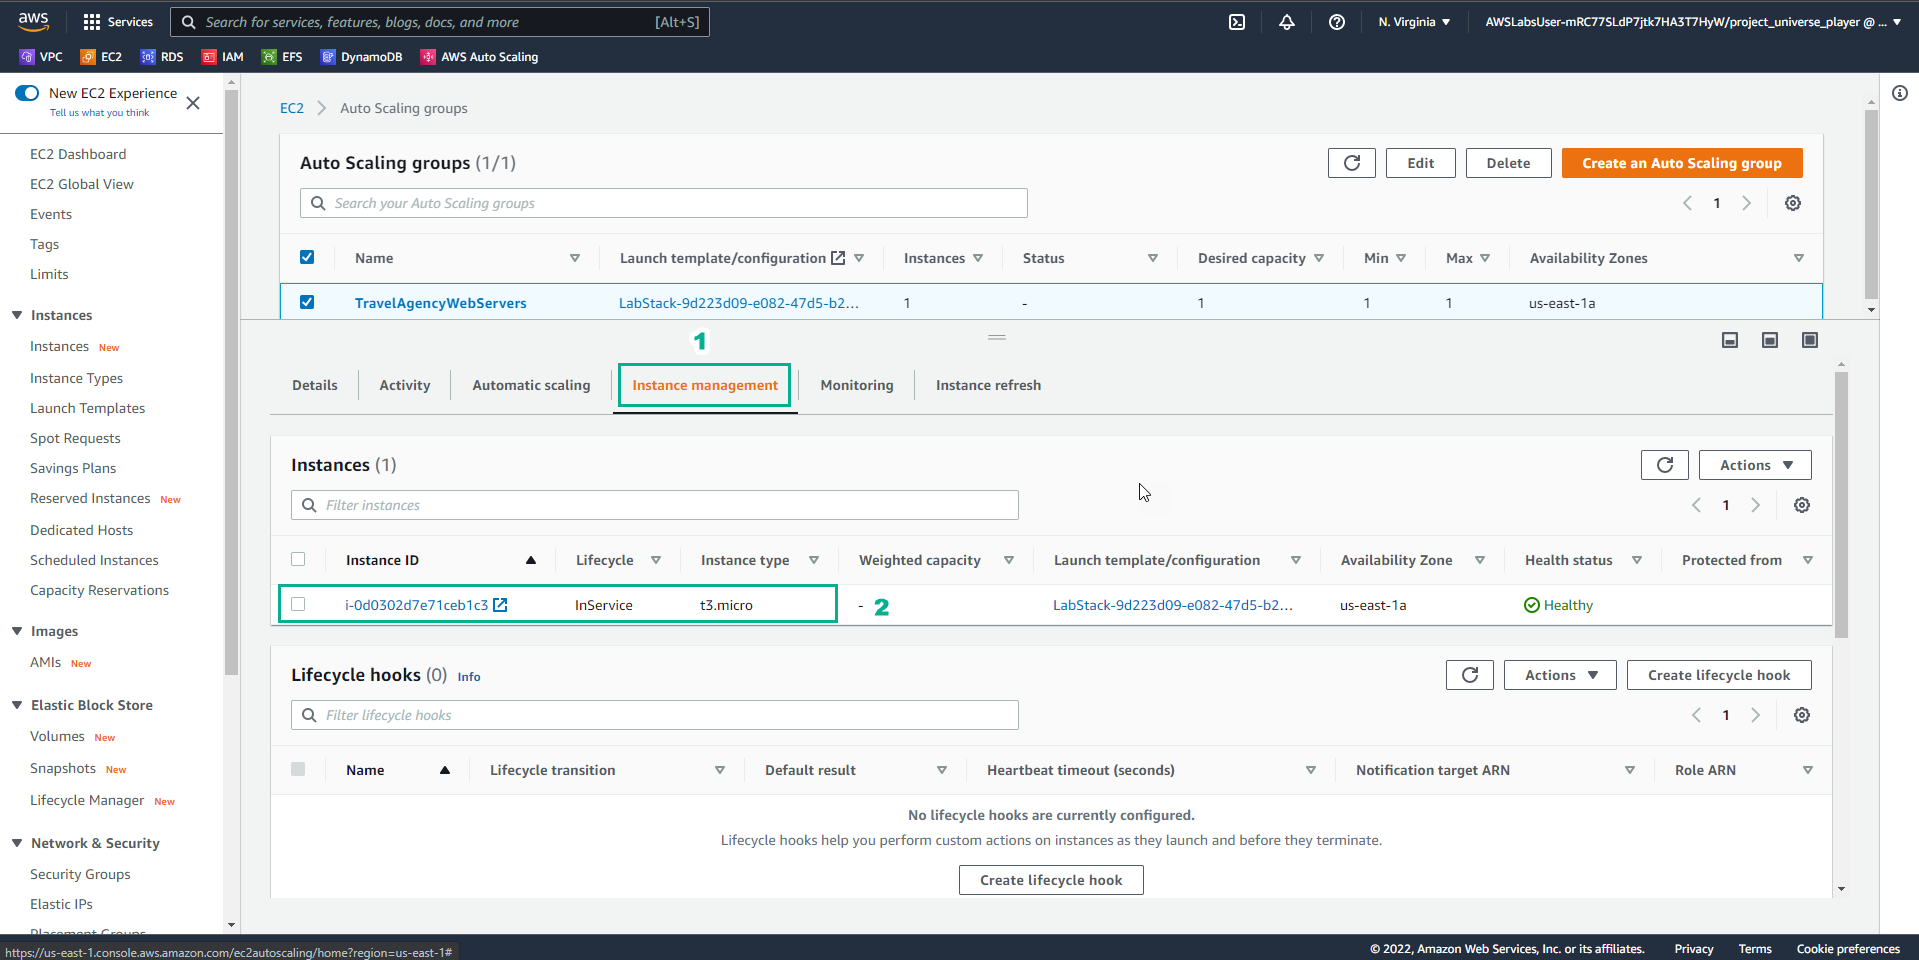
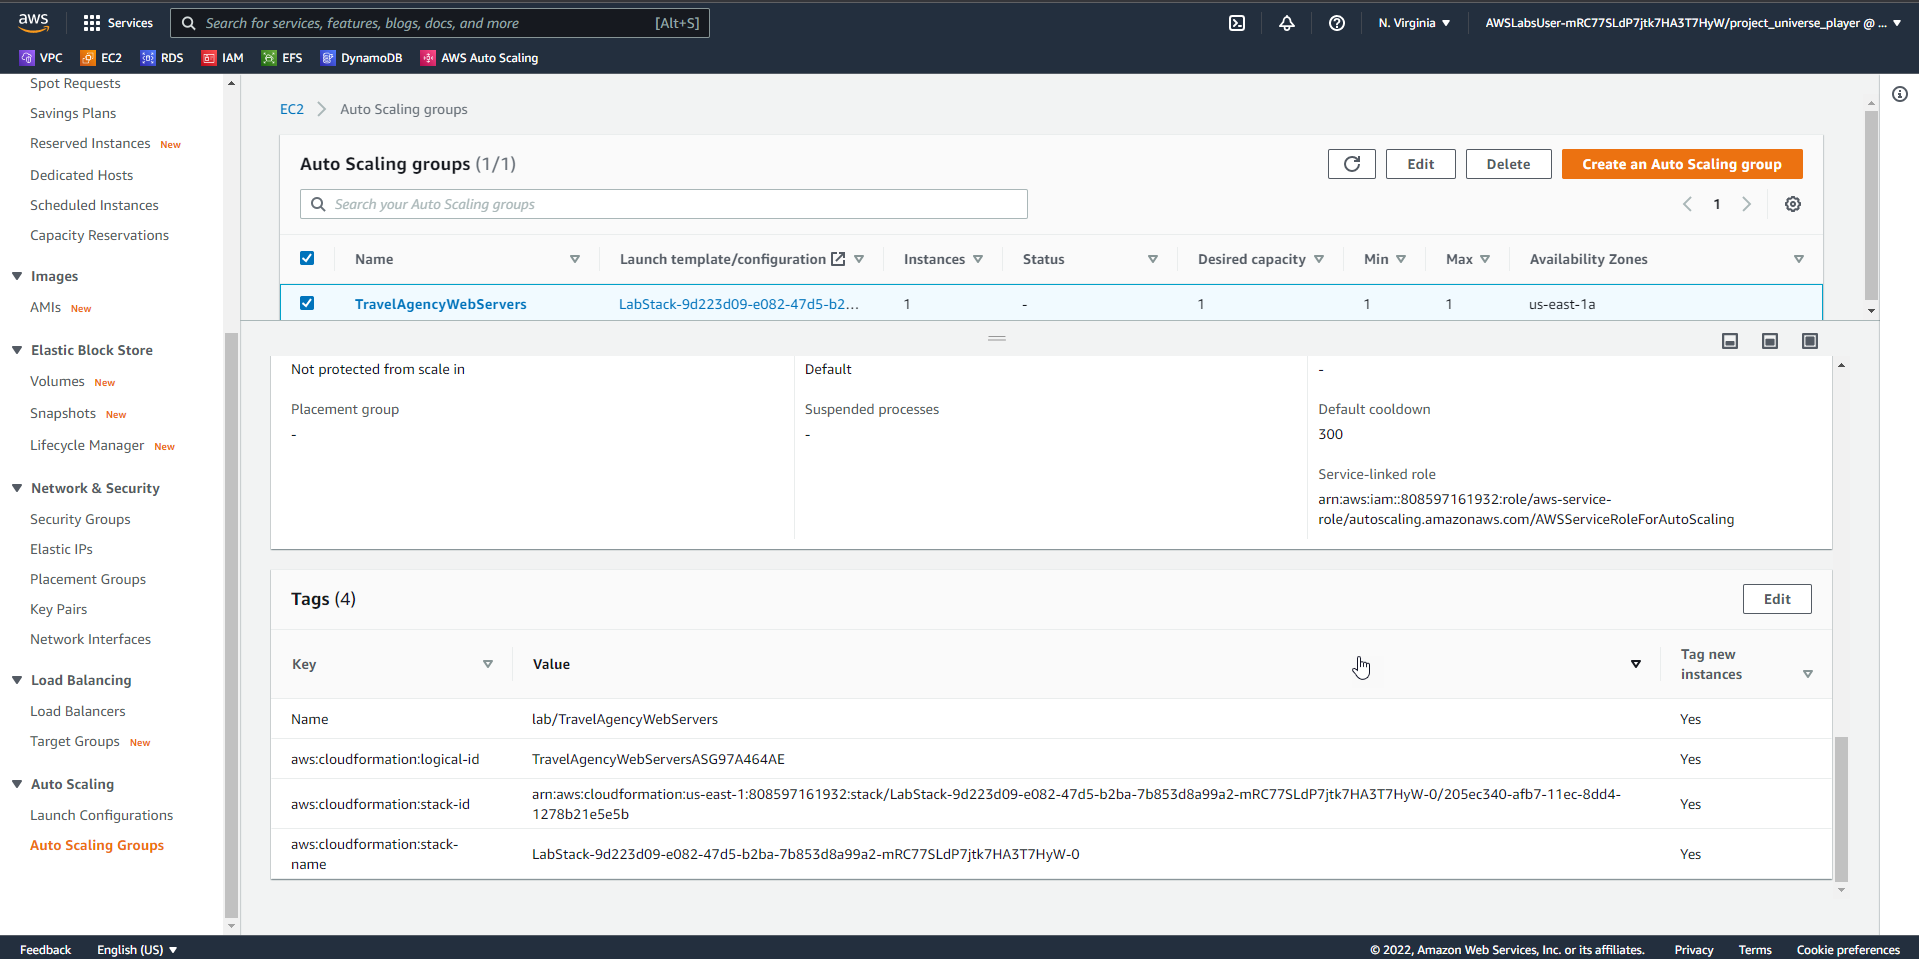
- In the Auto Scaling groups interface
- Select Instance management
- View instances
- In the Practice interface
- Read step 5 of highly Available Web Applications
- Read CONCEPT
- Select the arrow to the right to see the next steps
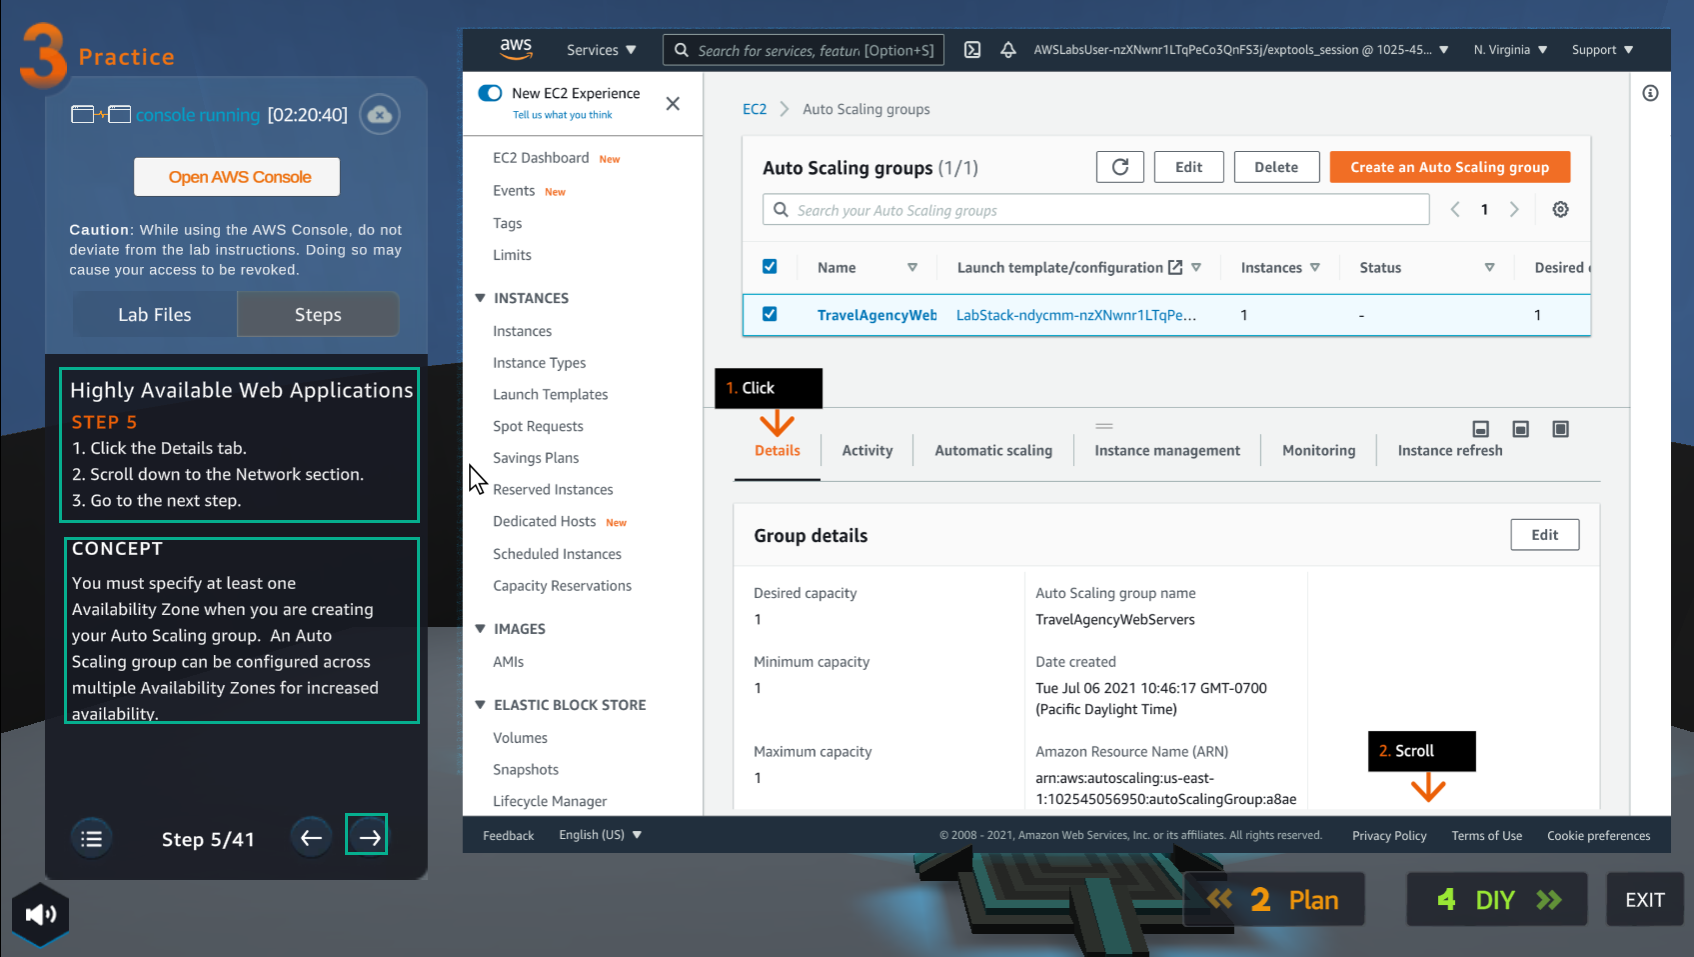
- In the Auto Scaling groups interface
- Select Deatils
- In the Practice interface
- Read step 6 of highly Available Web Applications
- Read CONCEPT
- Select the arrow to the right to see the next steps
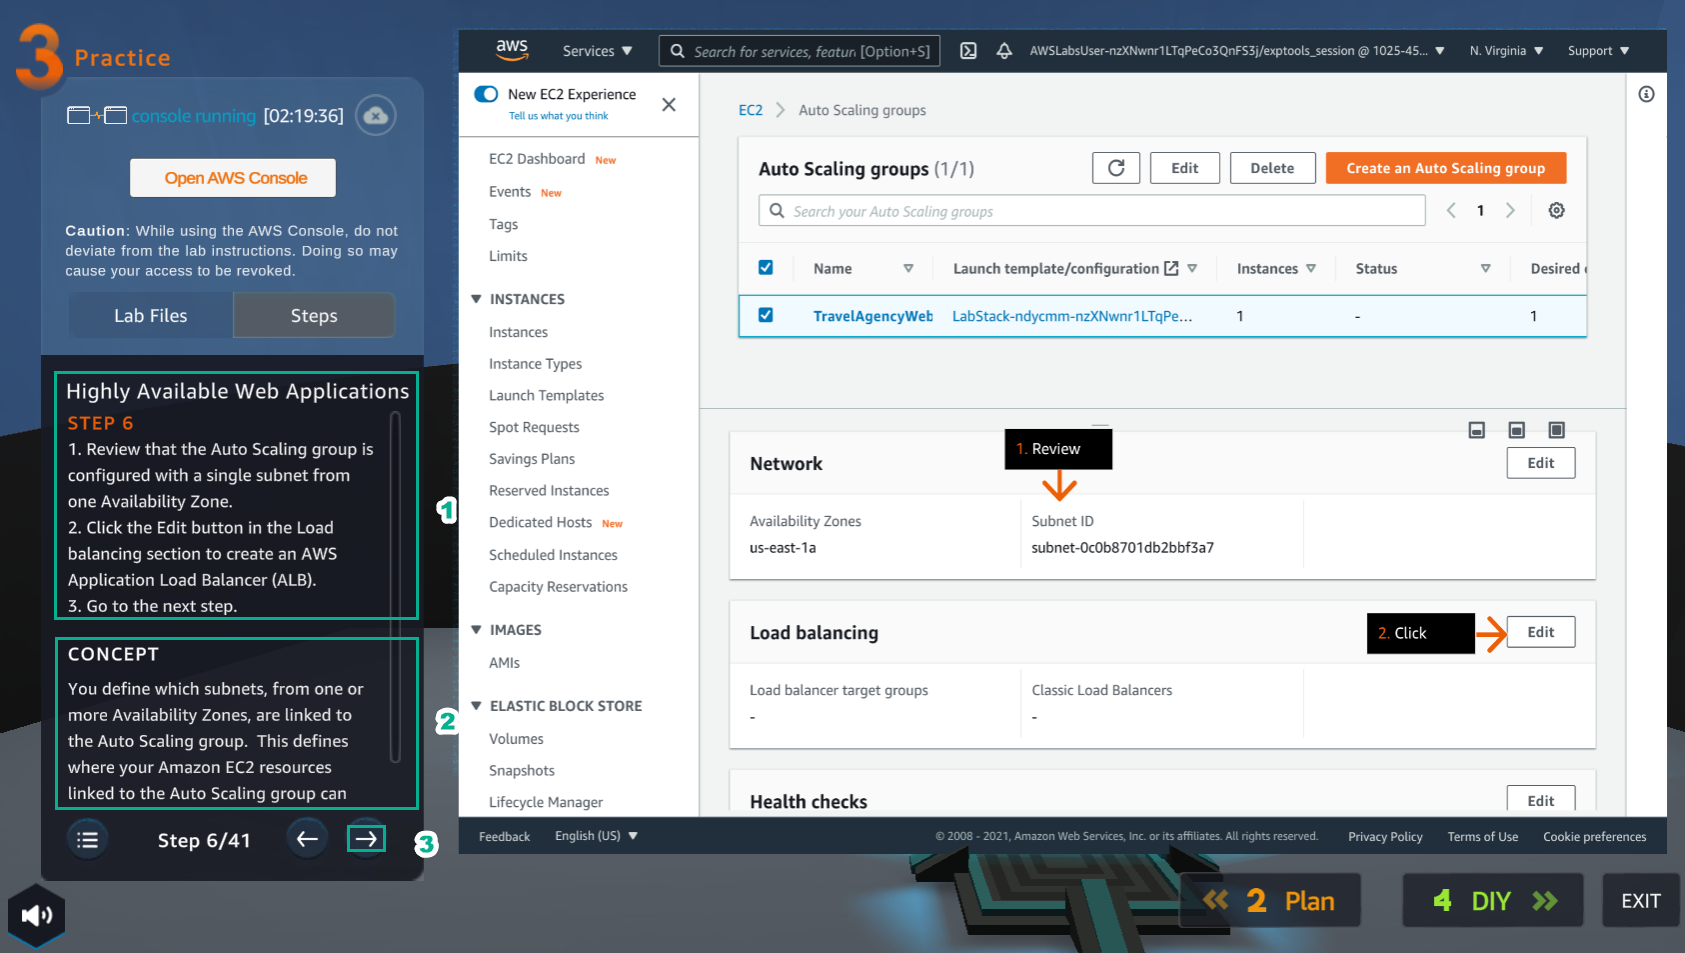
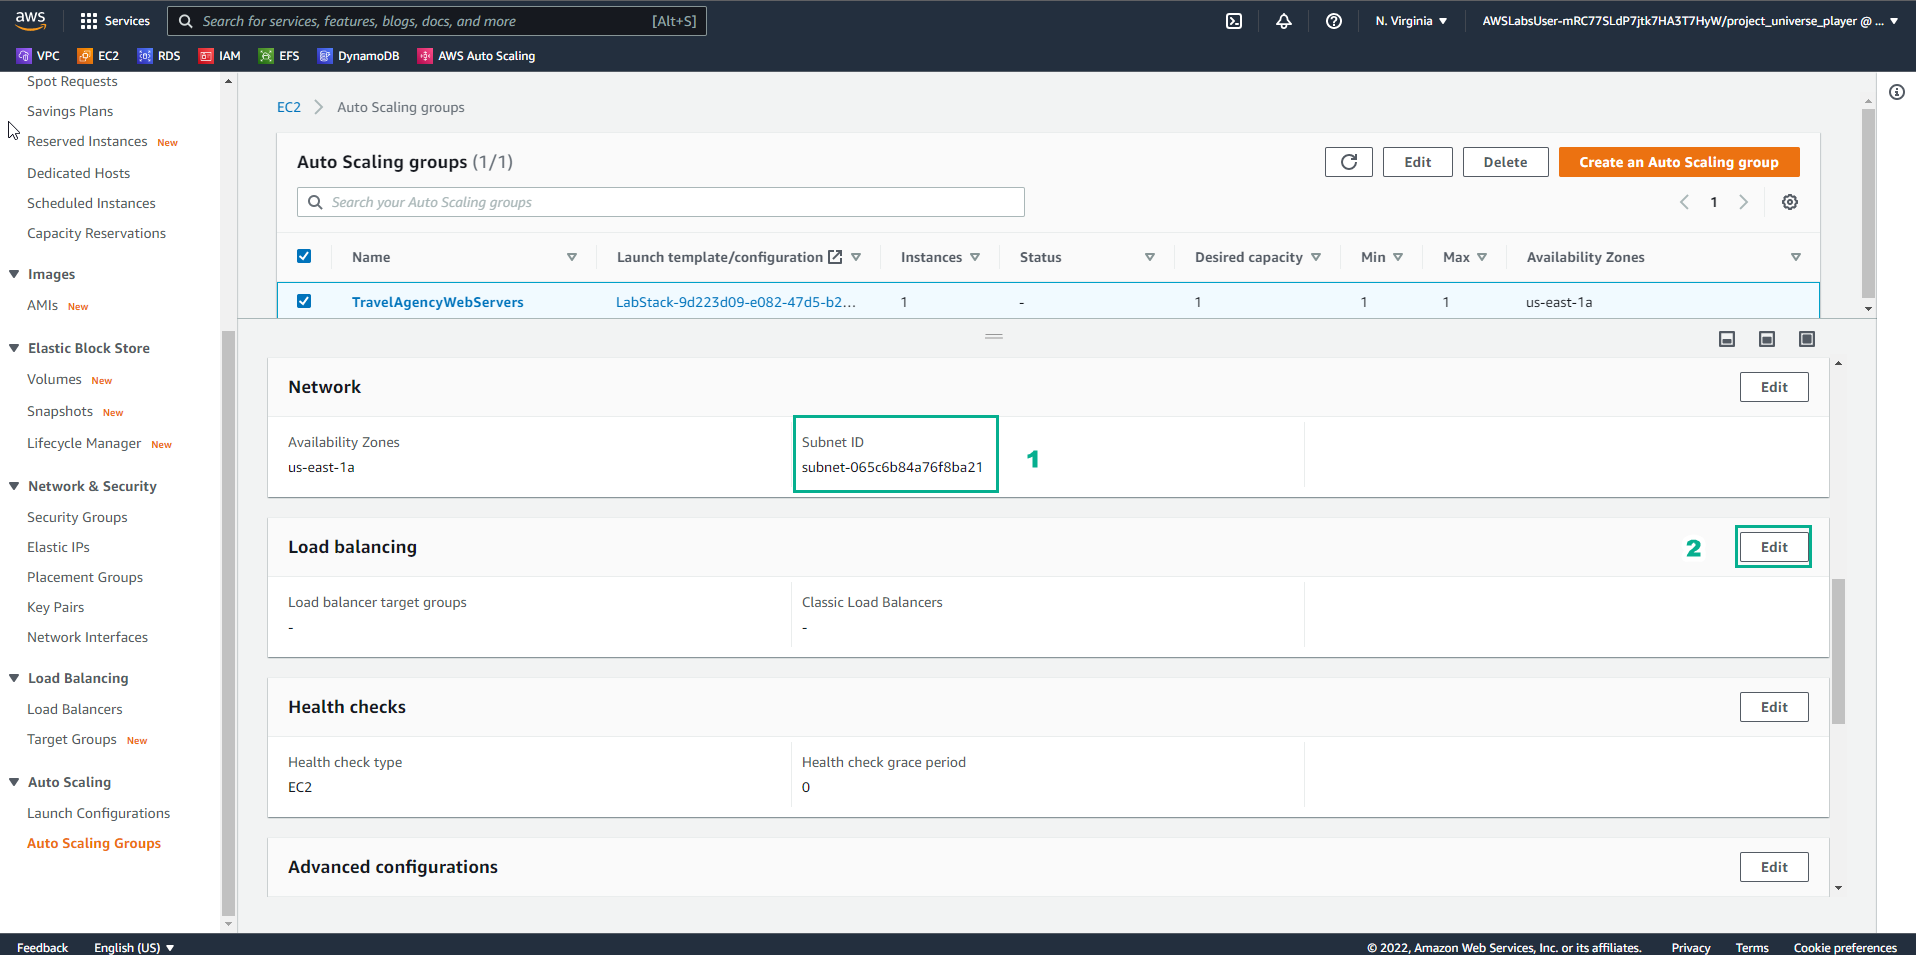
- In the Auto Scaling groups interface
- In Network, see Subnet ID
- In Load balancing, select Edit
- In the Practice interface
- Read step 7 of highly Available Web Applications
- Read CONCEPT
- Select the arrow to the right to see the next steps
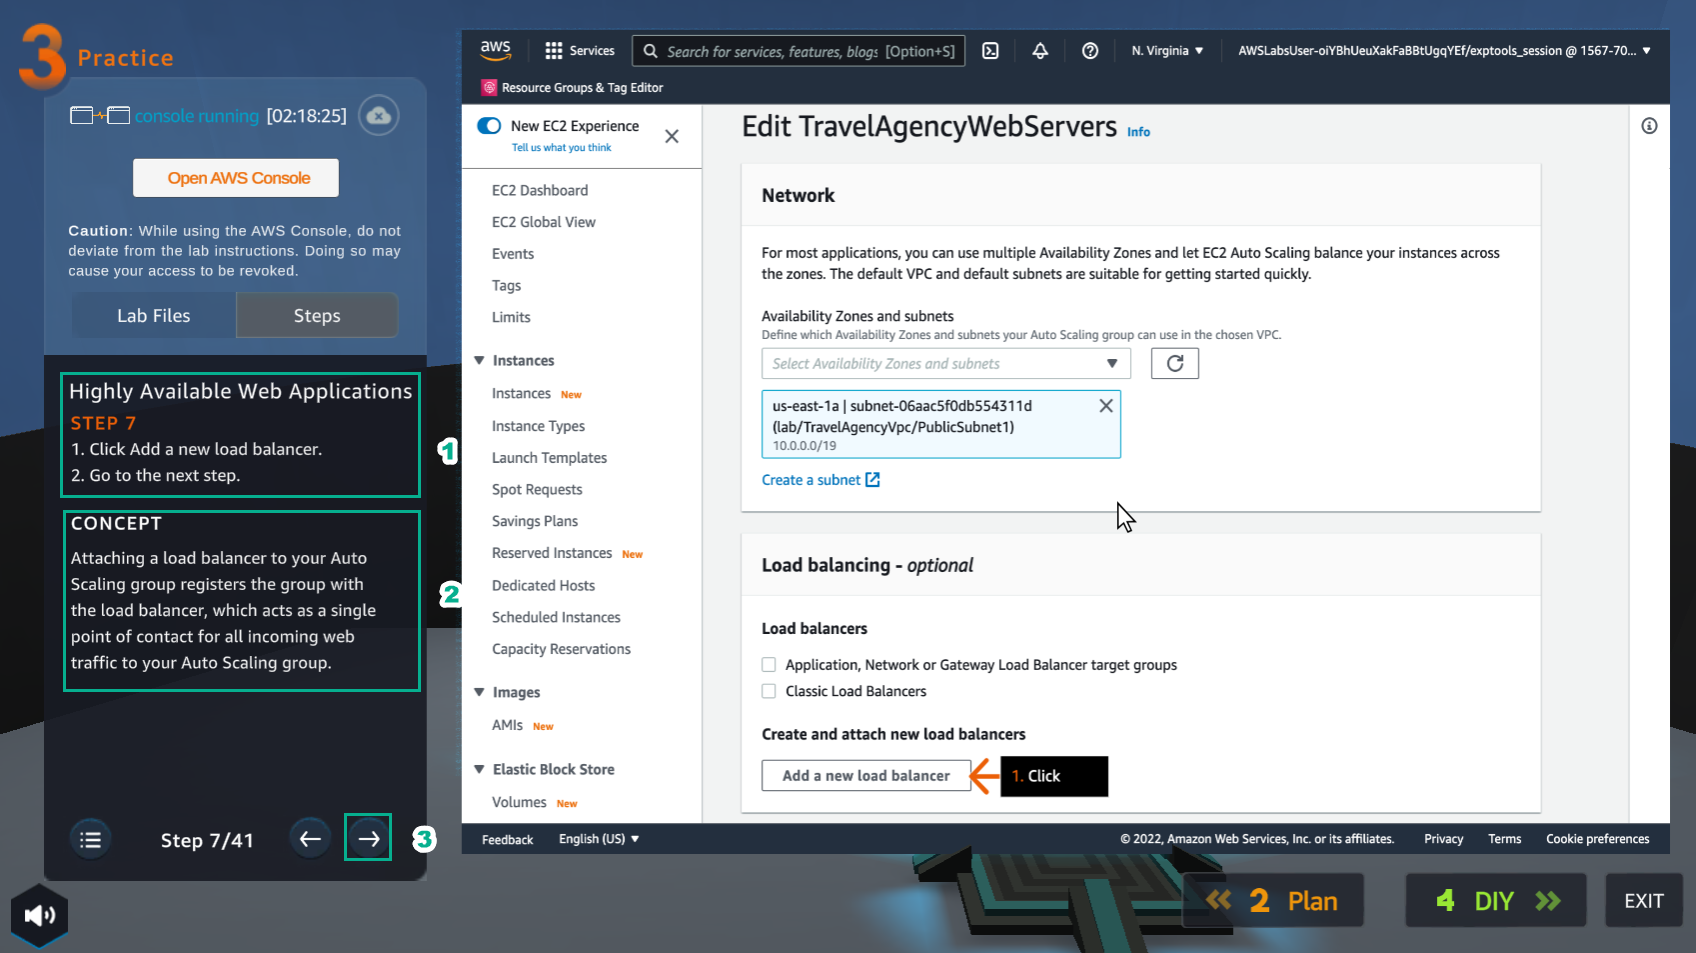
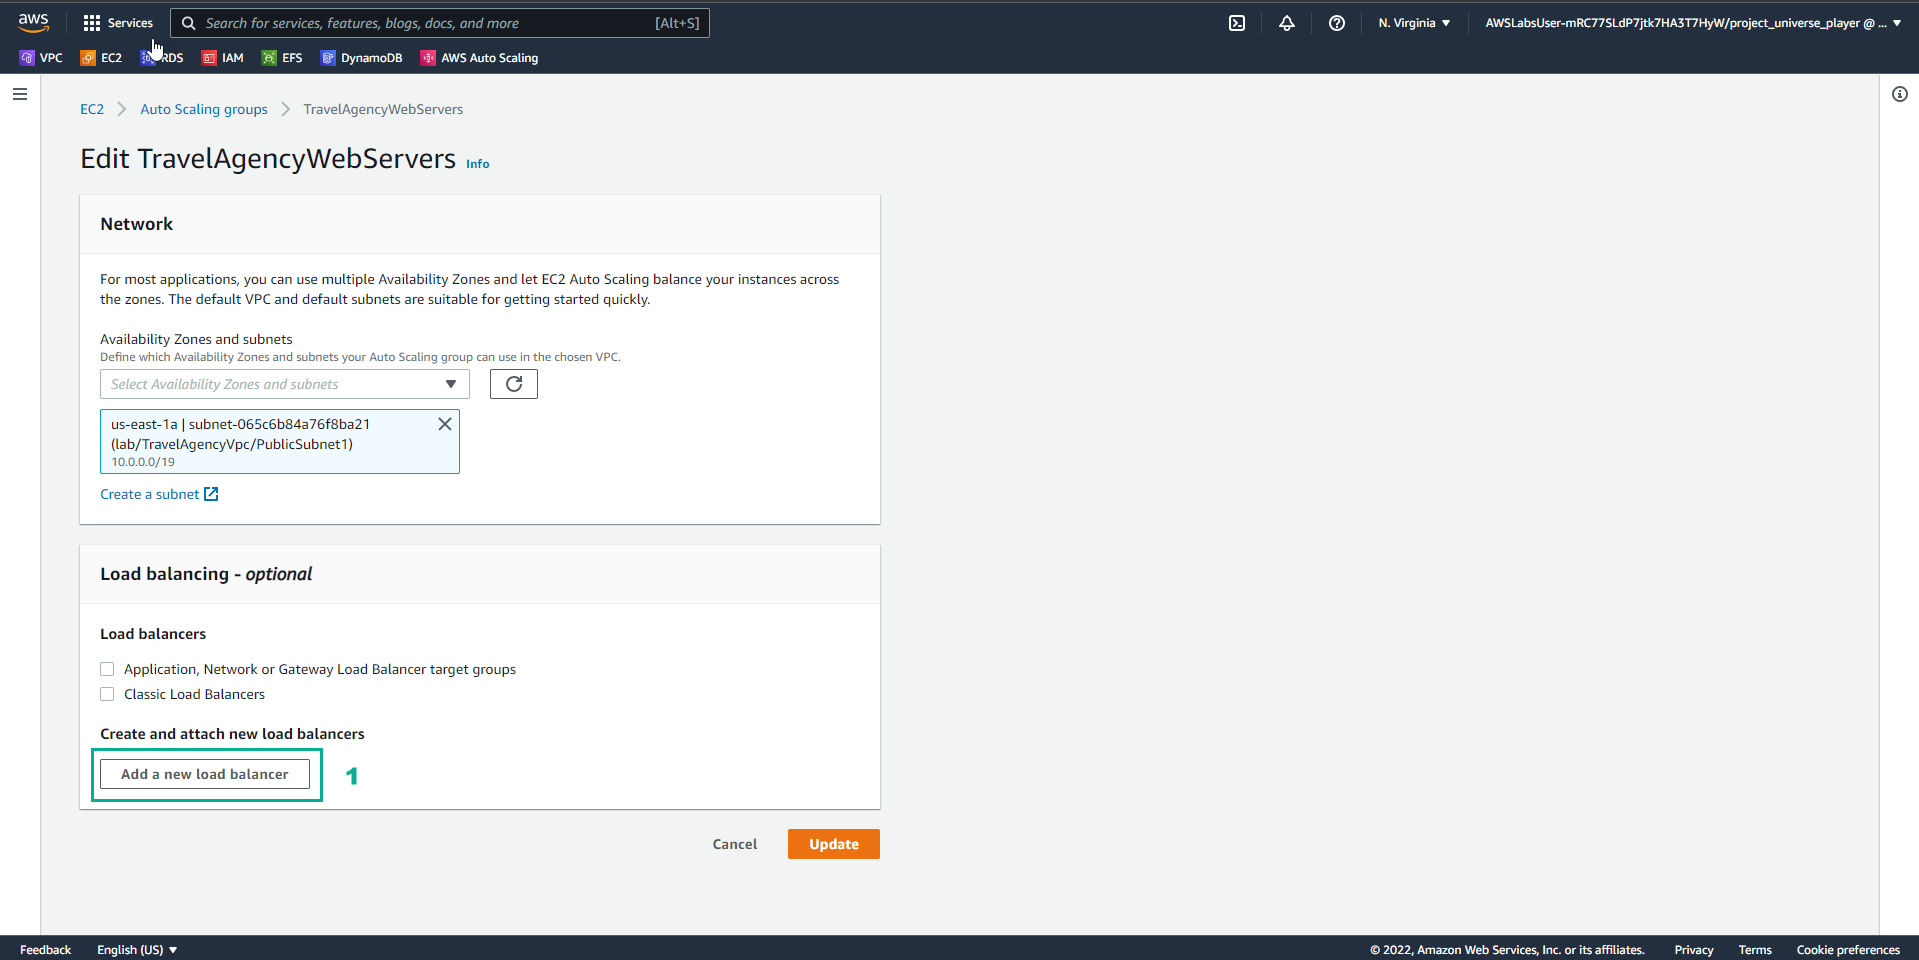
- In the Edit TravleAgencyWebServers interface
- Select Add a new load balancer
- In the Practice interface
- Read step 8 of Highly Available Web Applications
- Read CONCEPT
- Select the arrow to the right to see the next steps
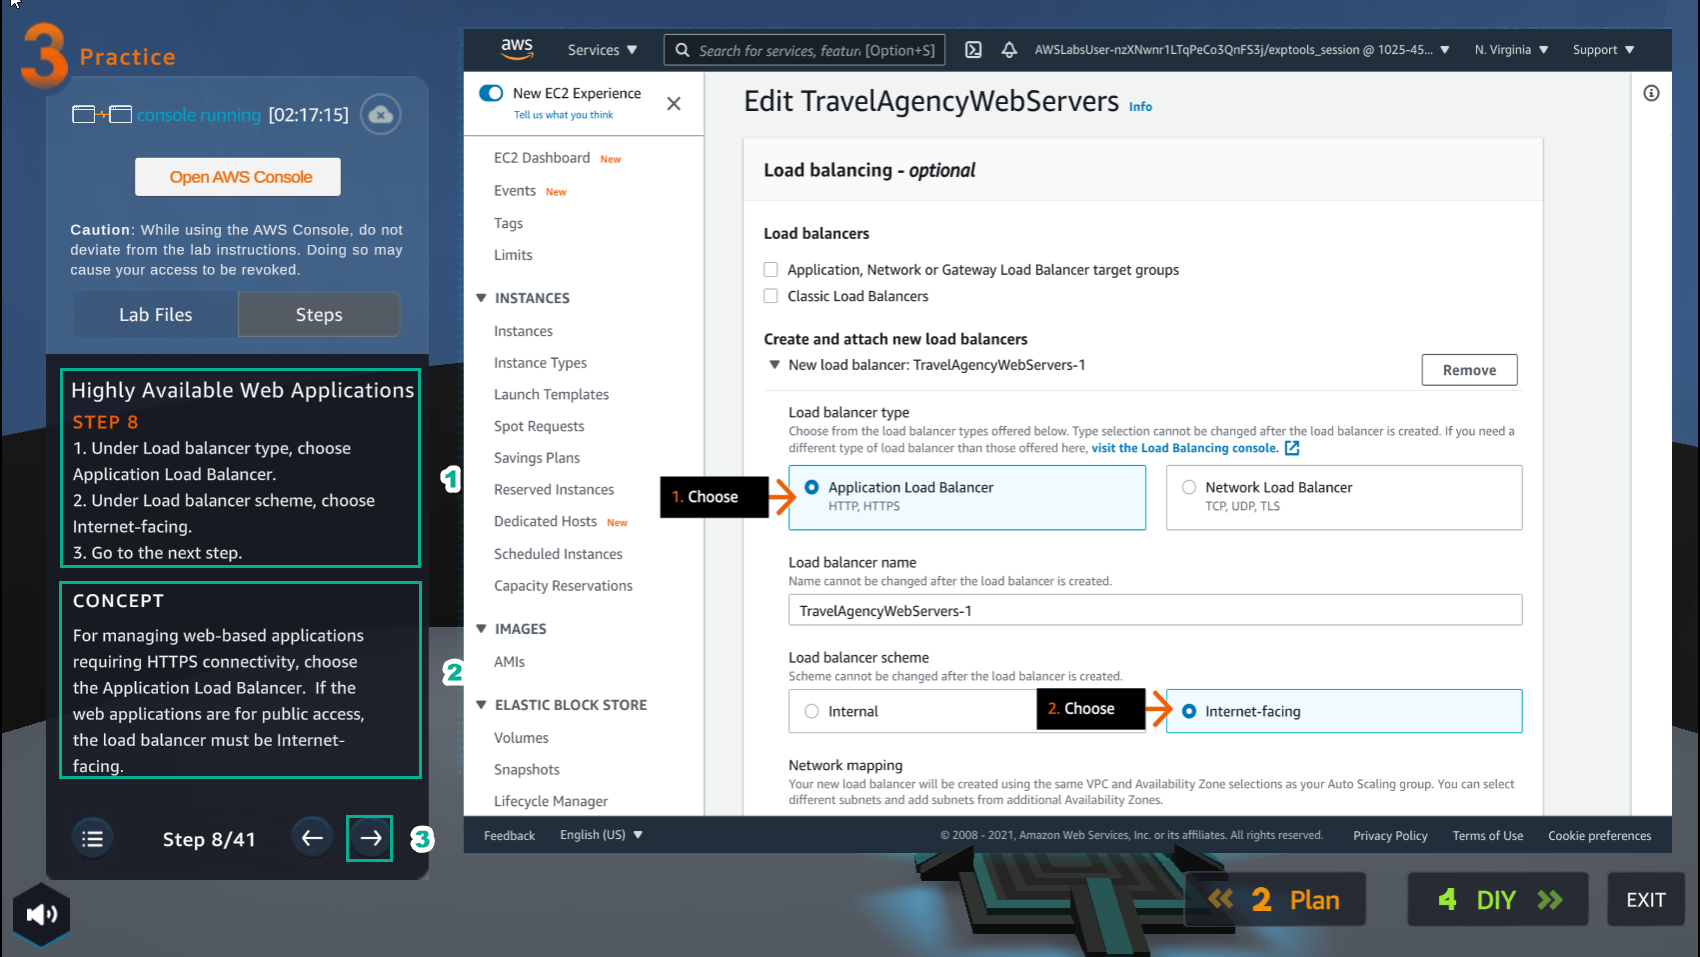
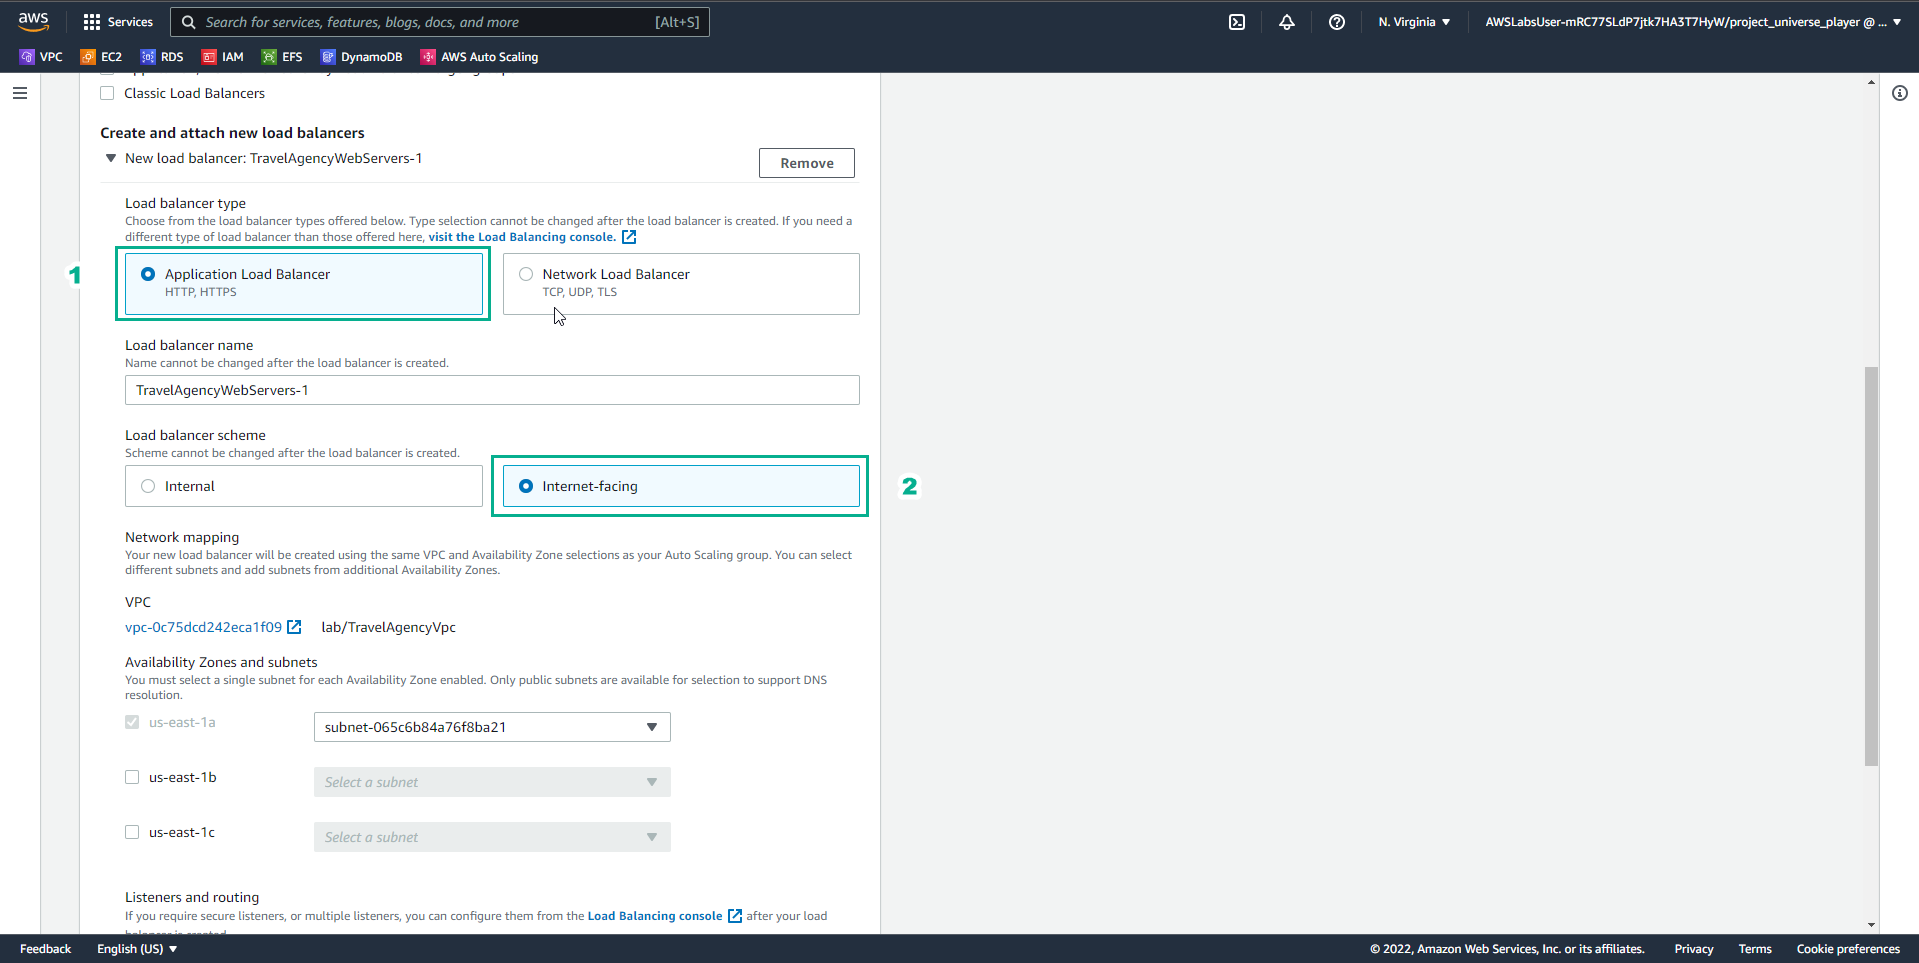
- In the Edit TravleAgencyWebServers interface
- Select Application Load Balancer
- In Load balancer scheme, select Internet-facing
- In the Practice interface
- Read step 9 of Highly Available Web Applications
- Read CONCEPT
- Select the arrow to the right to see the next steps
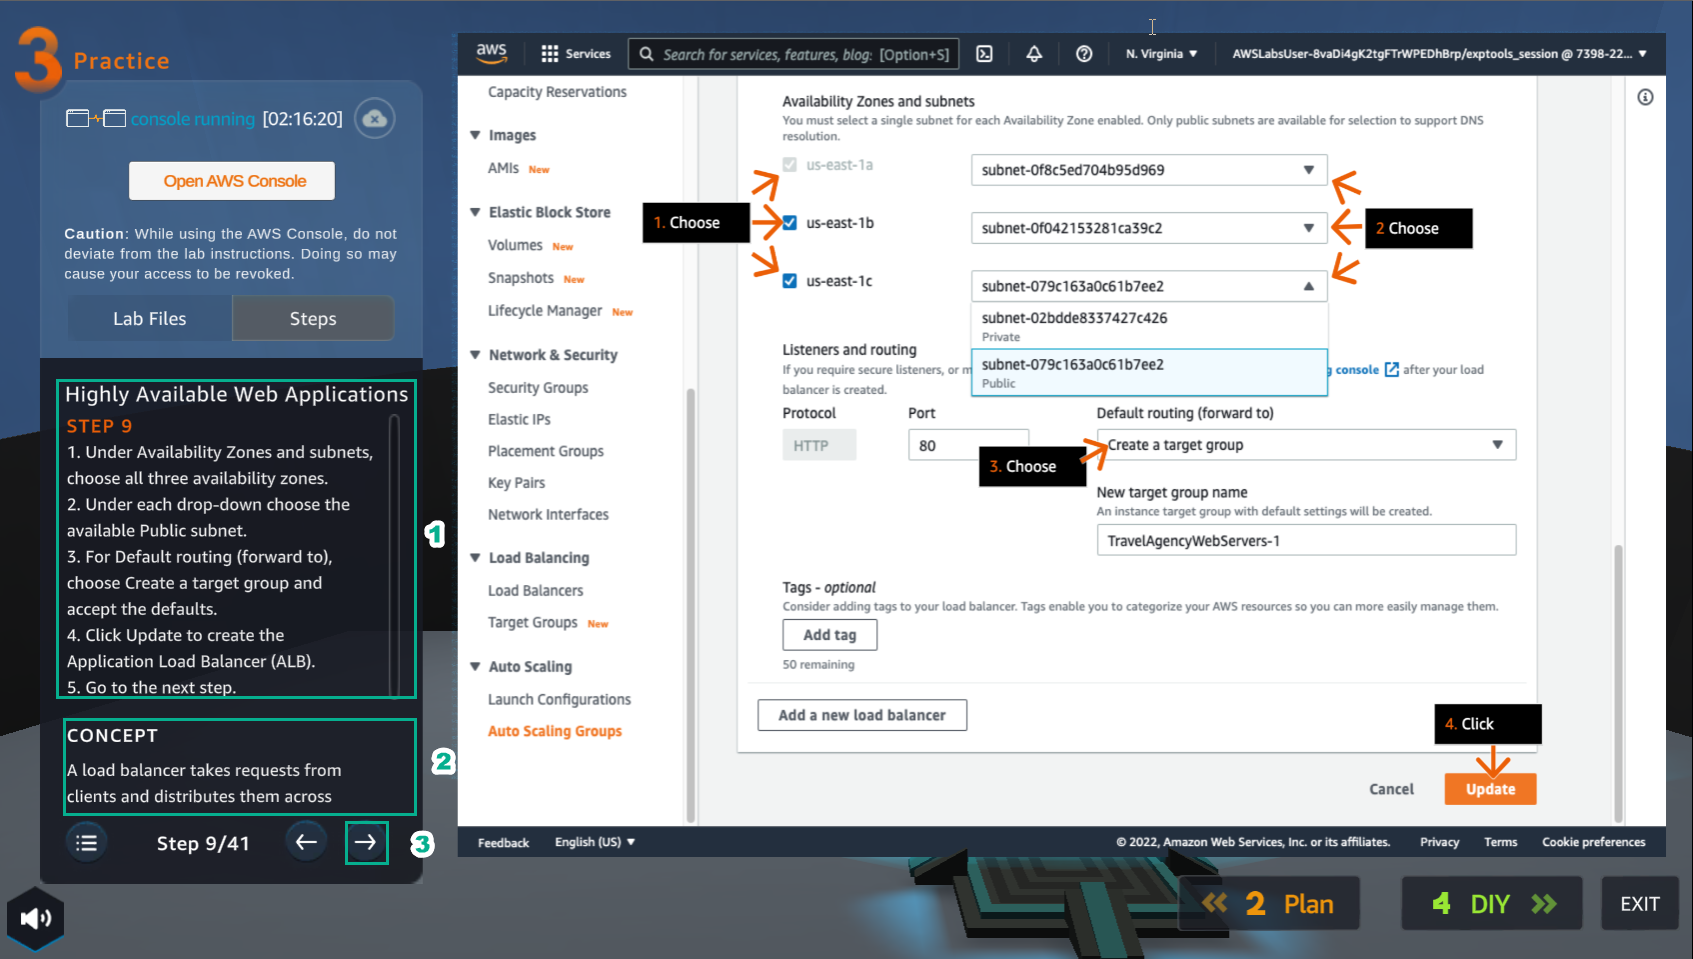
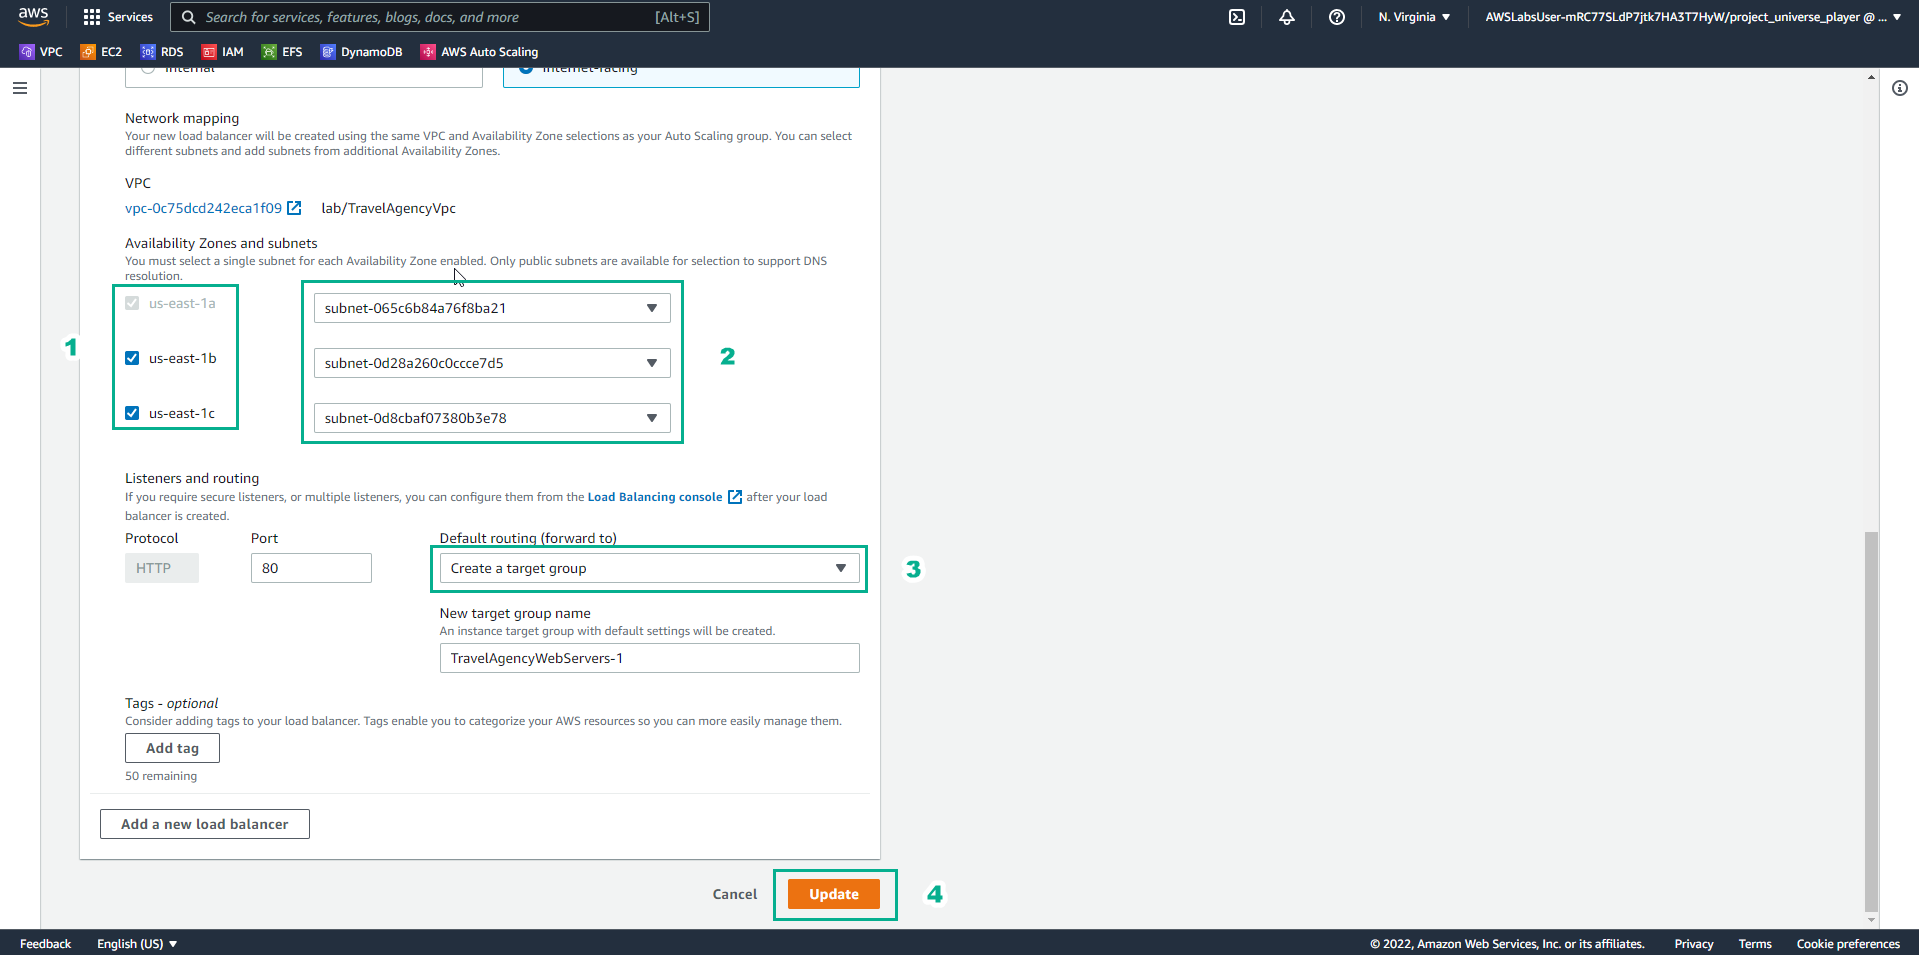
- In the Availability Zone and subnets interface
- Select all 3 availability zones
- Select Public subnet
- In Default routing (forward to), select Create a target group
- Select Update
- In the Practice interface
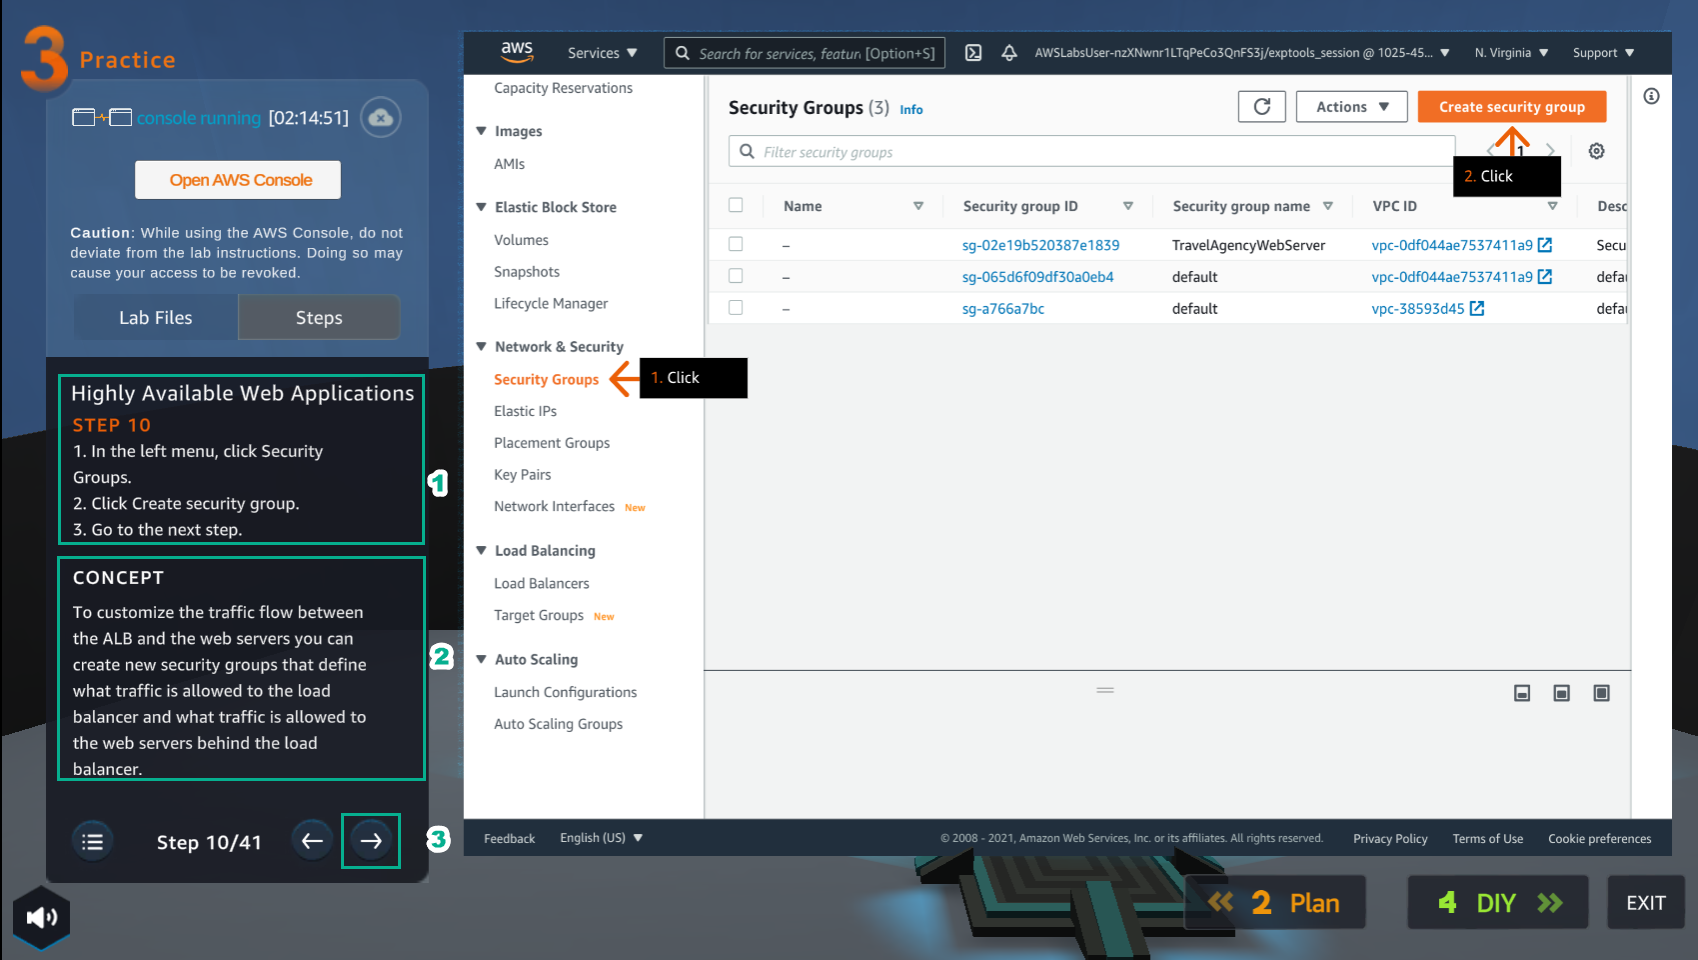
- Read step 10 of Highly Available Web Applications
- Read CONCEPT
- Select the arrow to the right to see the next steps
- In the VPC interface
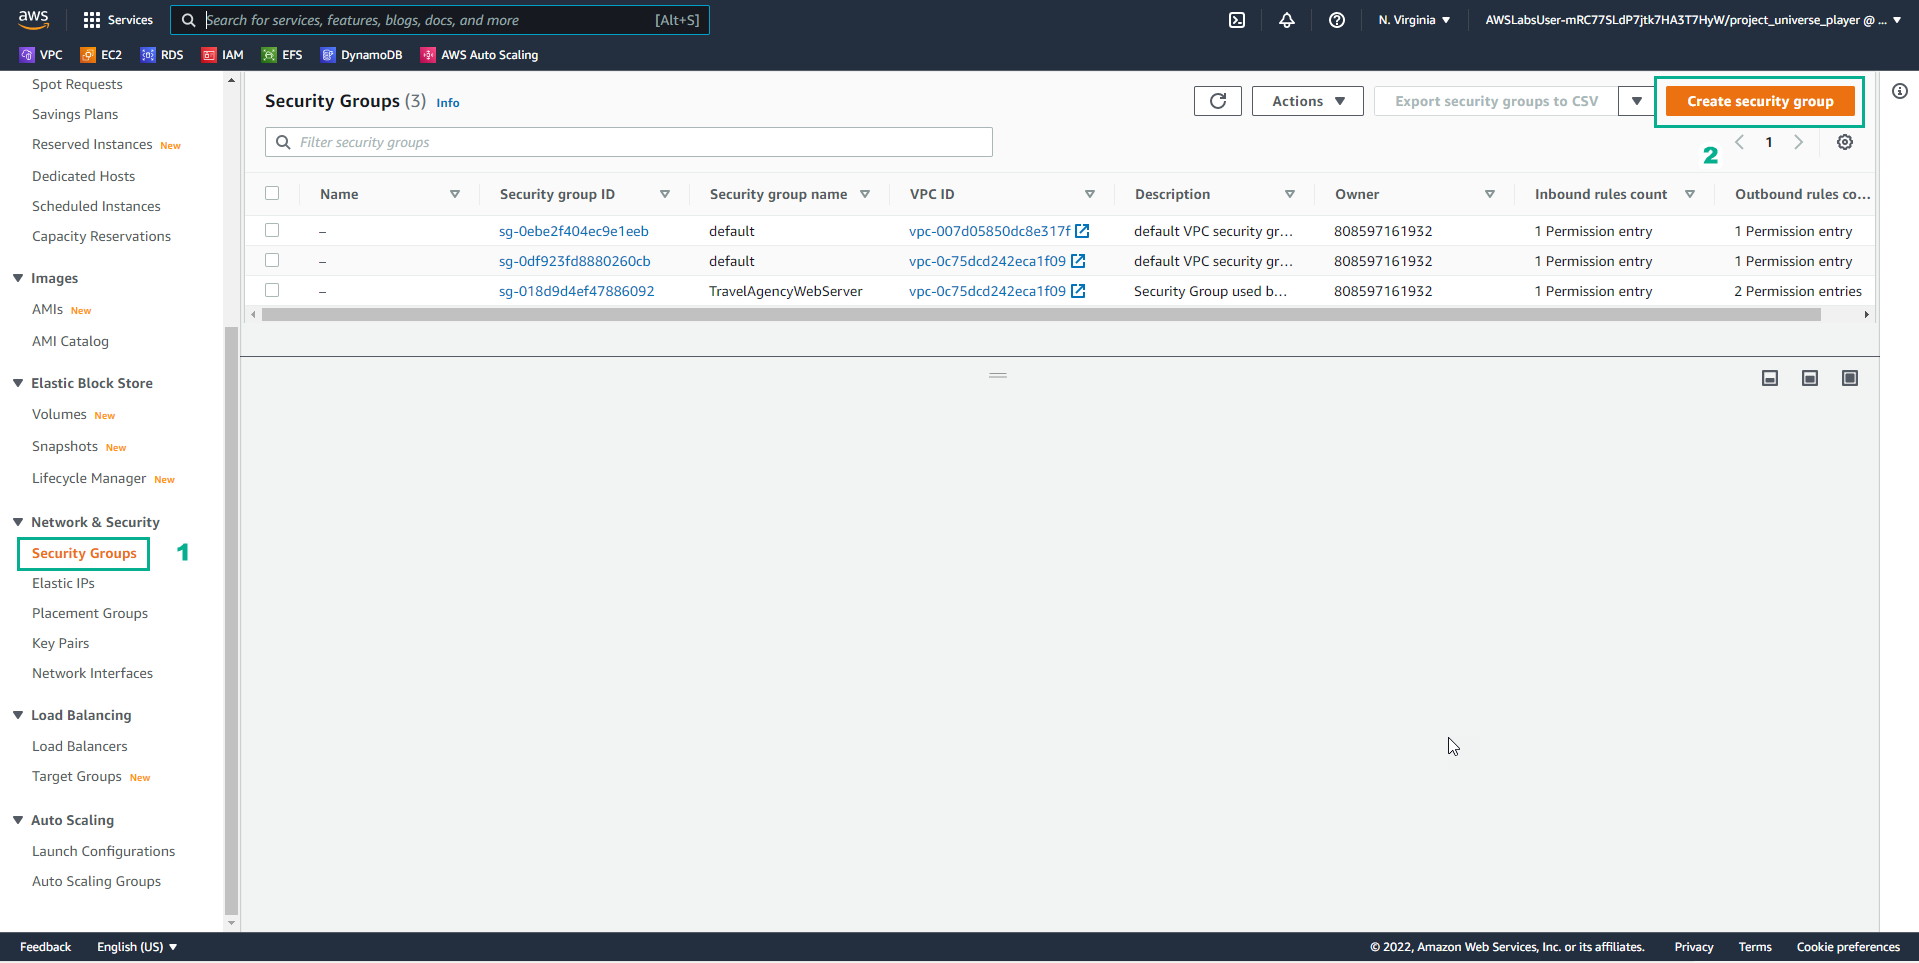
- Select Security Groups
- Select Create security group
- In the Practice interface
- Read step 11 of Highly Available Web Applications
- Read CONCEPT
- Select the arrow to the right to see the next steps
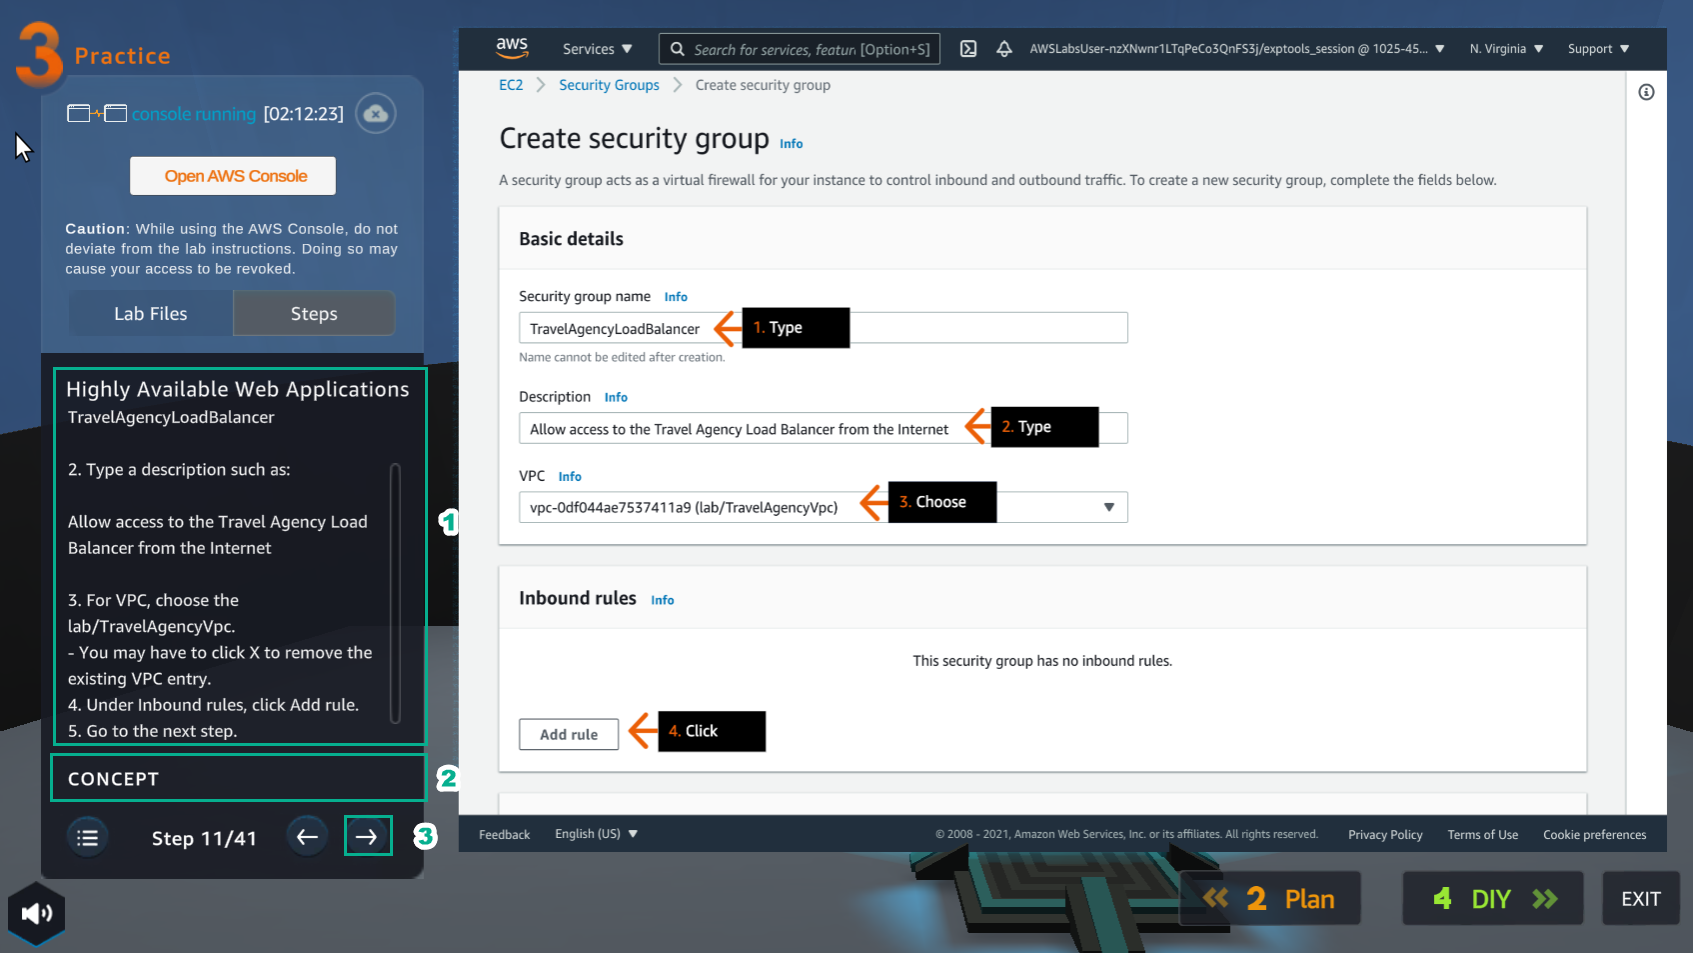
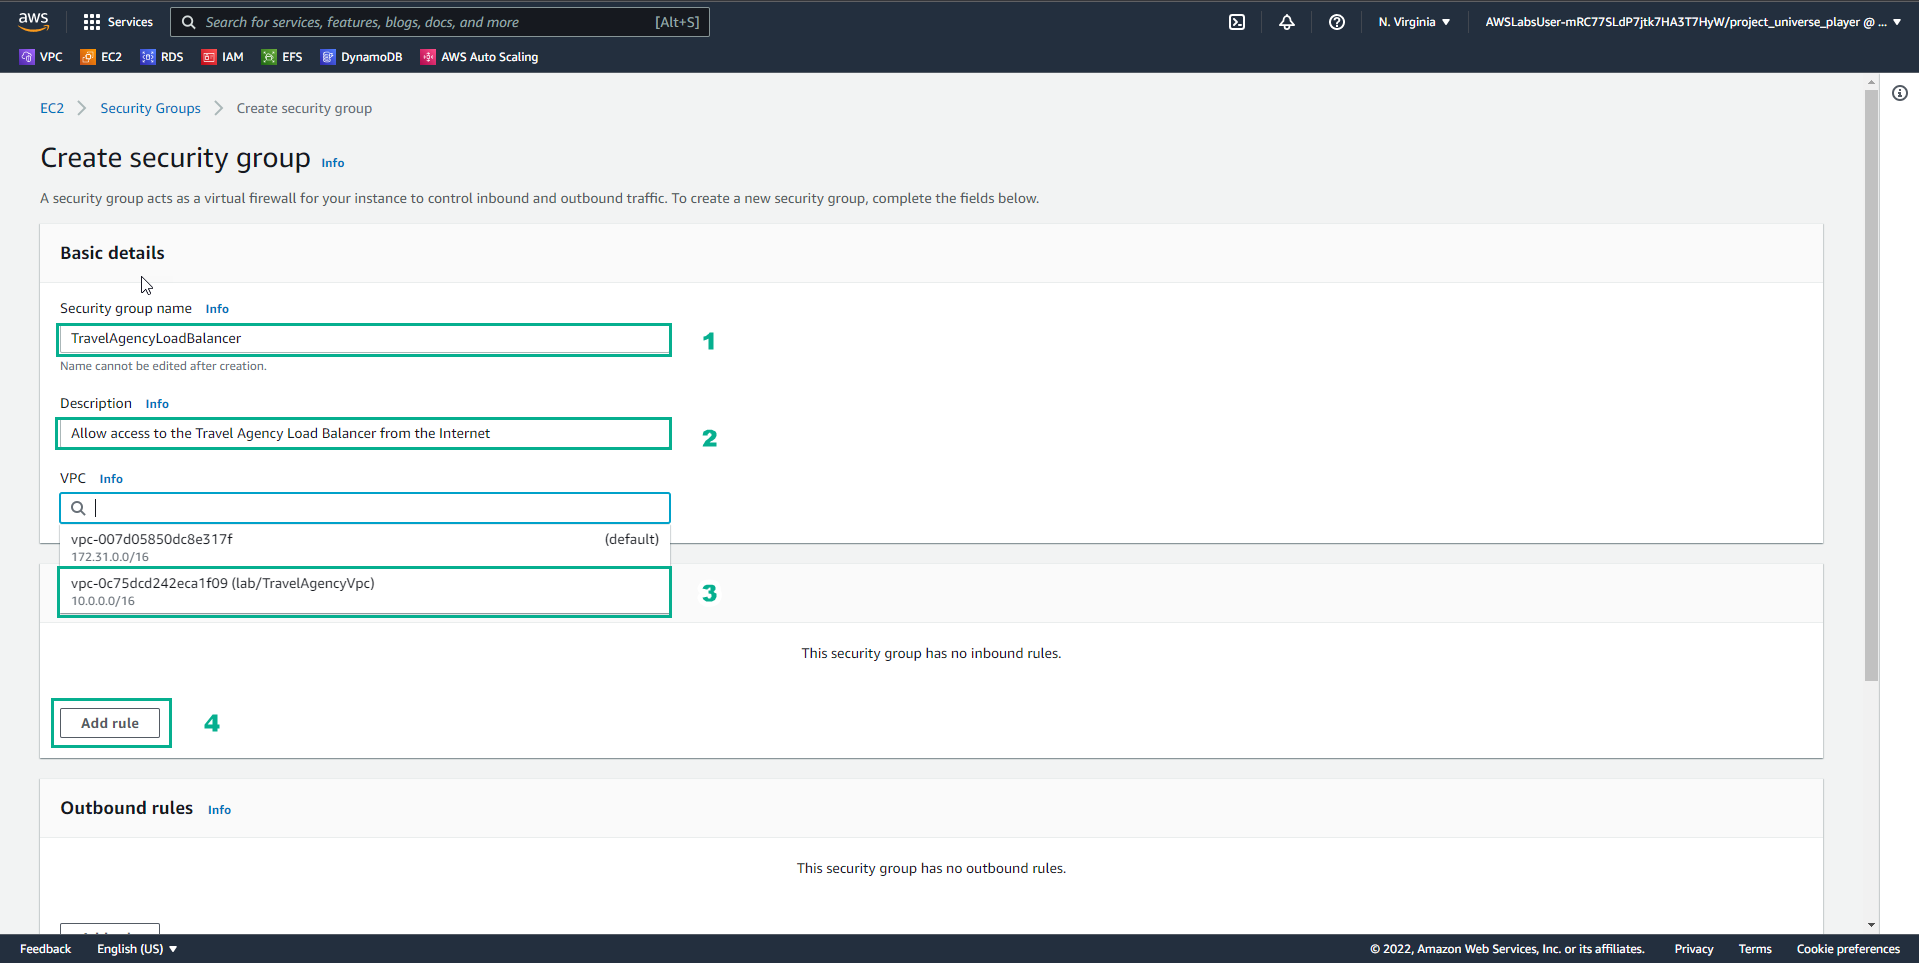
- In the Create security group interface
- Security group name, enter
TravelAgencyLoadBalancer - Description, enter
Allow access to the Travel Agency Balancer from the Internet - Select VPC
- In Inbound rules, select Add rule
- Results after entering information
- In the Practice interface
- Read step 12 of Highly Available Web Applications
- Read CONCEPT
- Select the arrow to the right to see the next steps
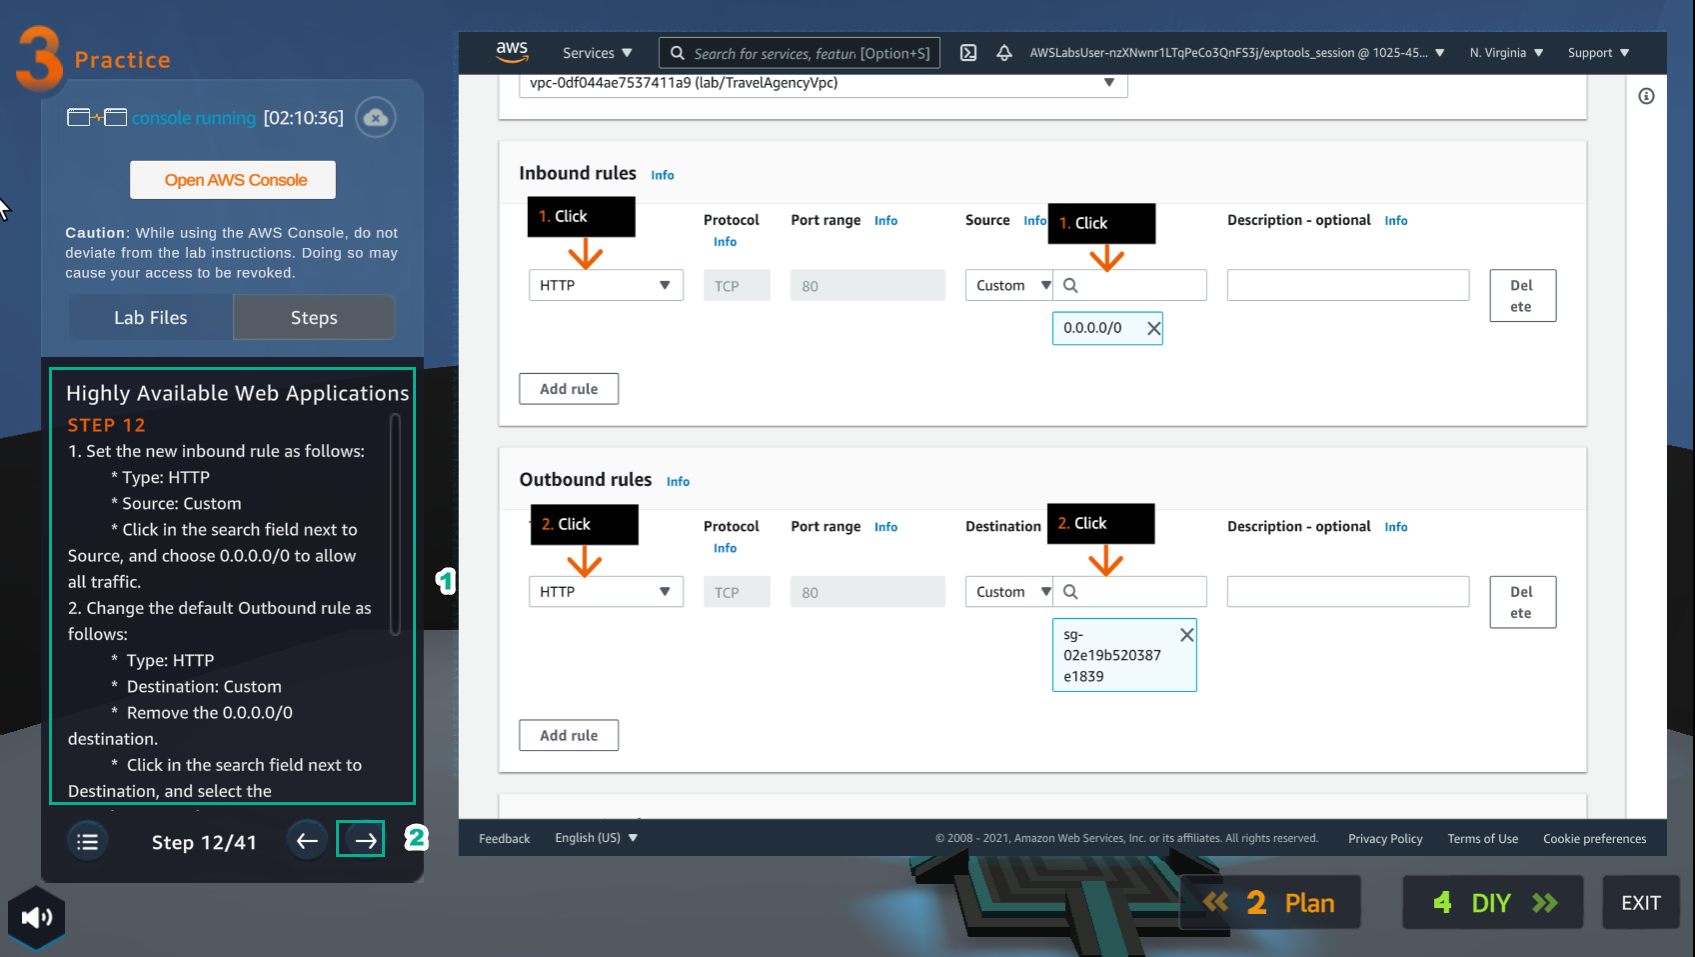
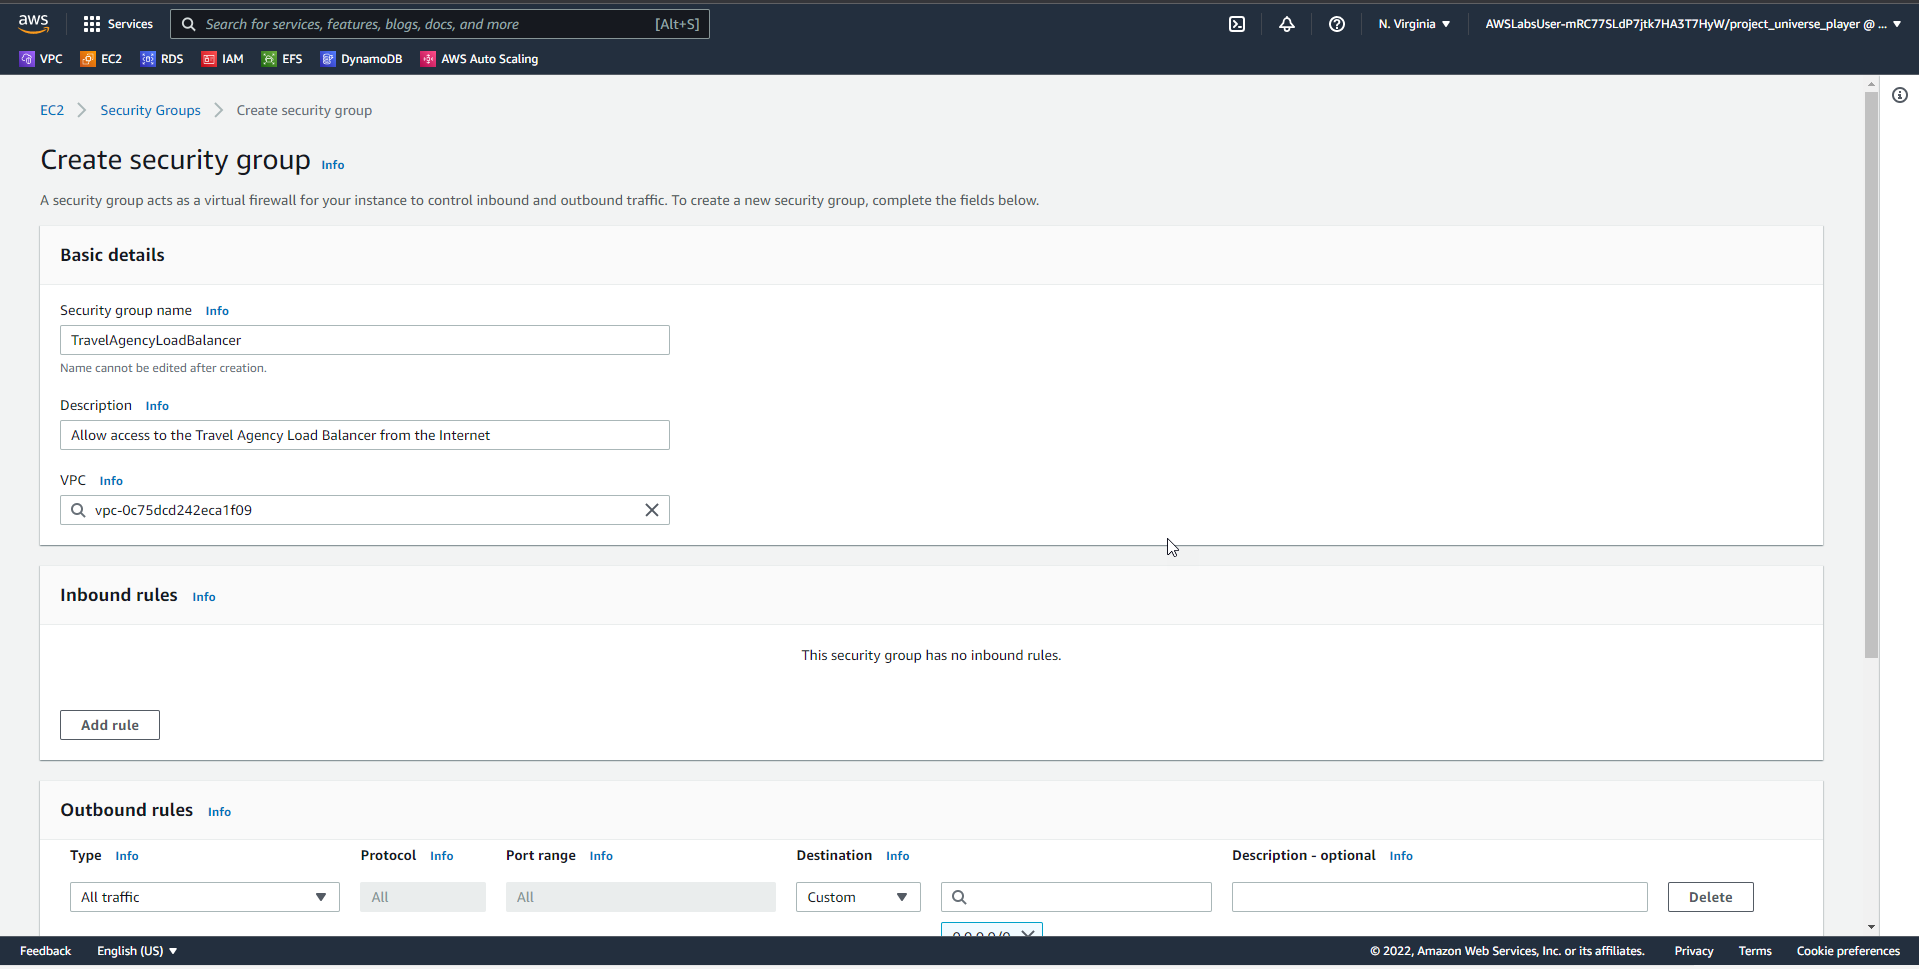
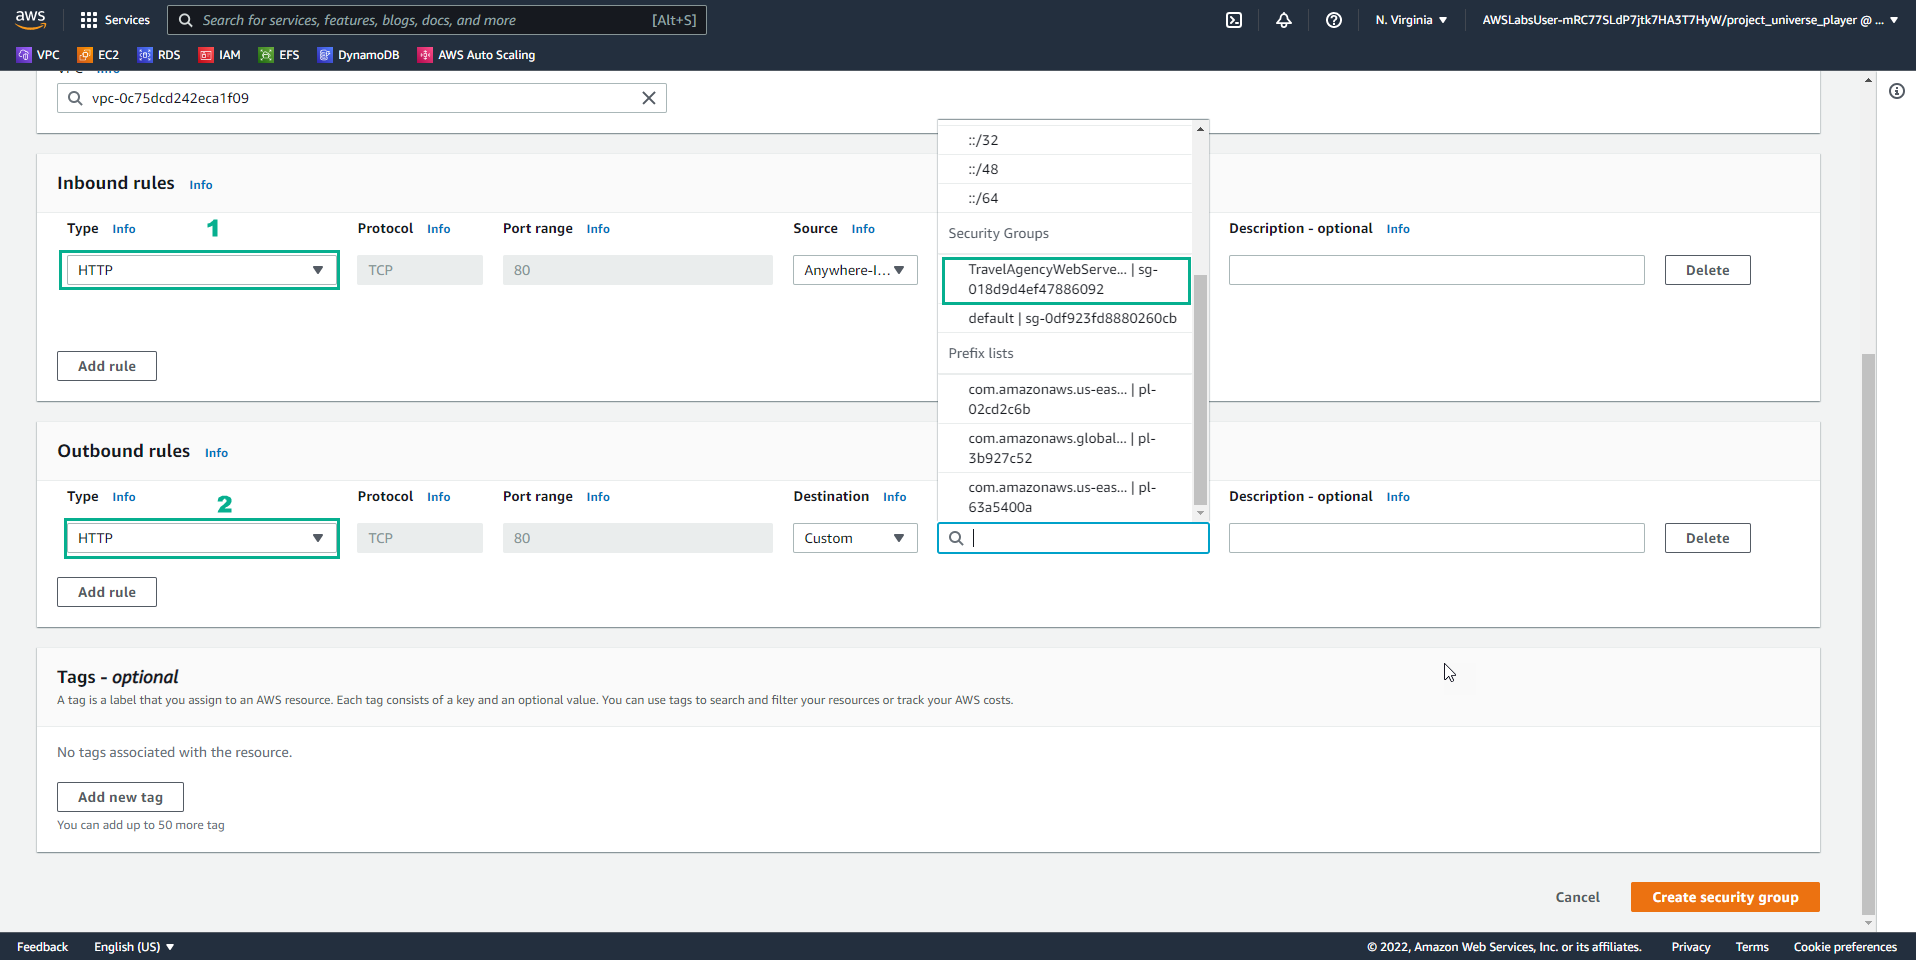
- In the Create security group interface
- In Inbound rules, select HTTP, select Source as Custom, select
0.0.0.0/0 - In Outbound rules, select HTTP, select Destination as Custom, select Security group
- In the Practice interface
- Read step 13 of Highly Available Web Applications
- Read CONCEPT
- Select the arrow to the right to see the next steps
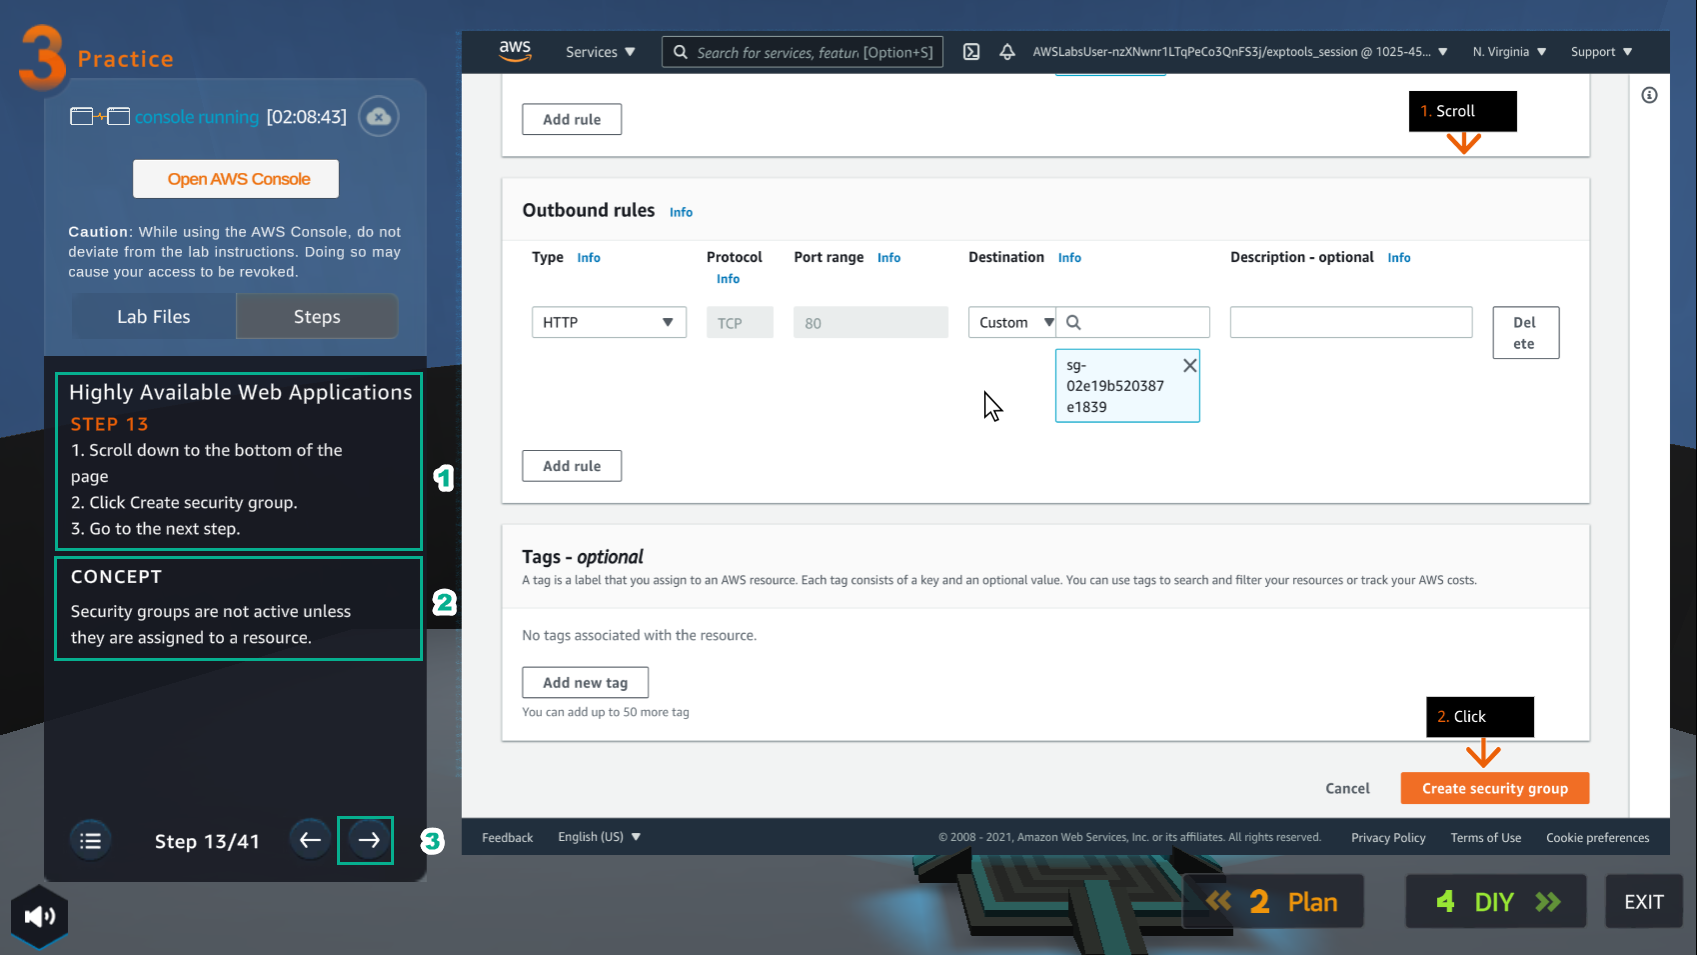
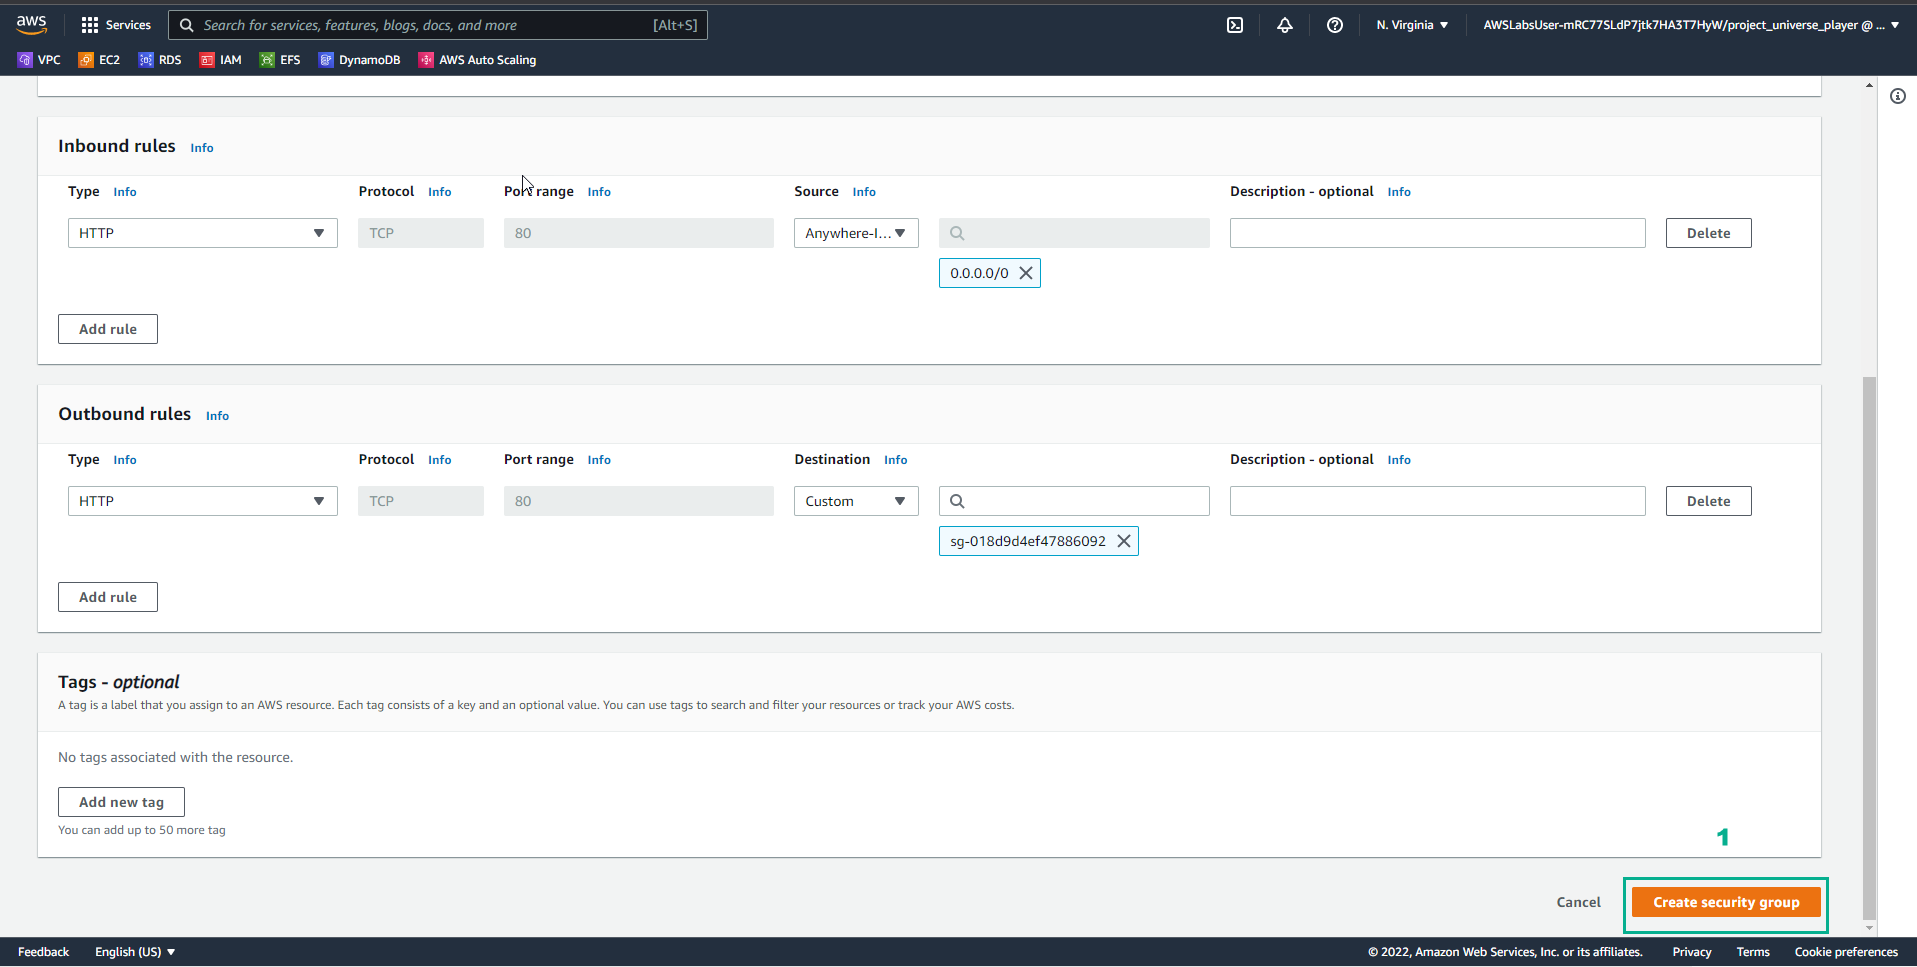
- In the Create security group interface
- Select Create security group
- In the Practice interface
- Read step 14 of Highly Available Web Applications
- Read CONCEPT
- Select the arrow to the right to see the next steps

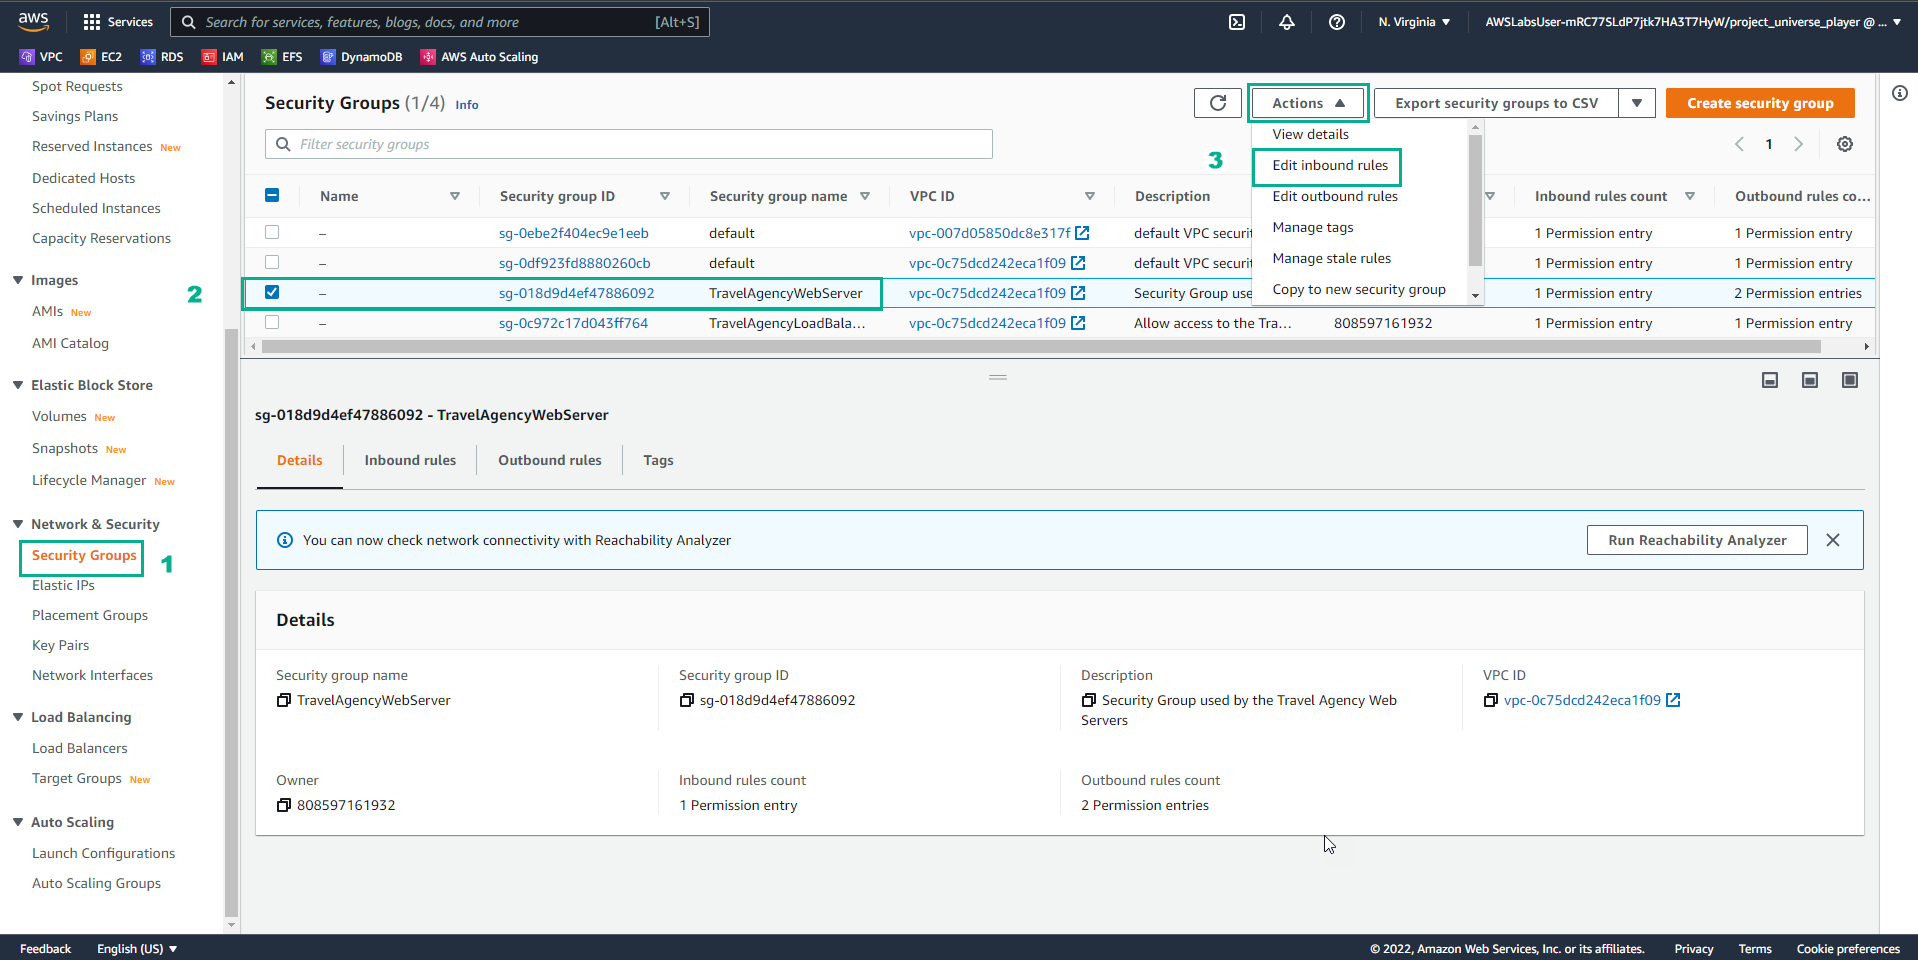
- In the Security Groups interface
- Select Security Groups
- Select TravelAgencyWebServer
- Select Actions
- Select Edit inblound rules
- In the Practice interface
- Read step 15 of Highly Available Web Applications
- Read CONCEPT
- Select the arrow to the right to see the next steps
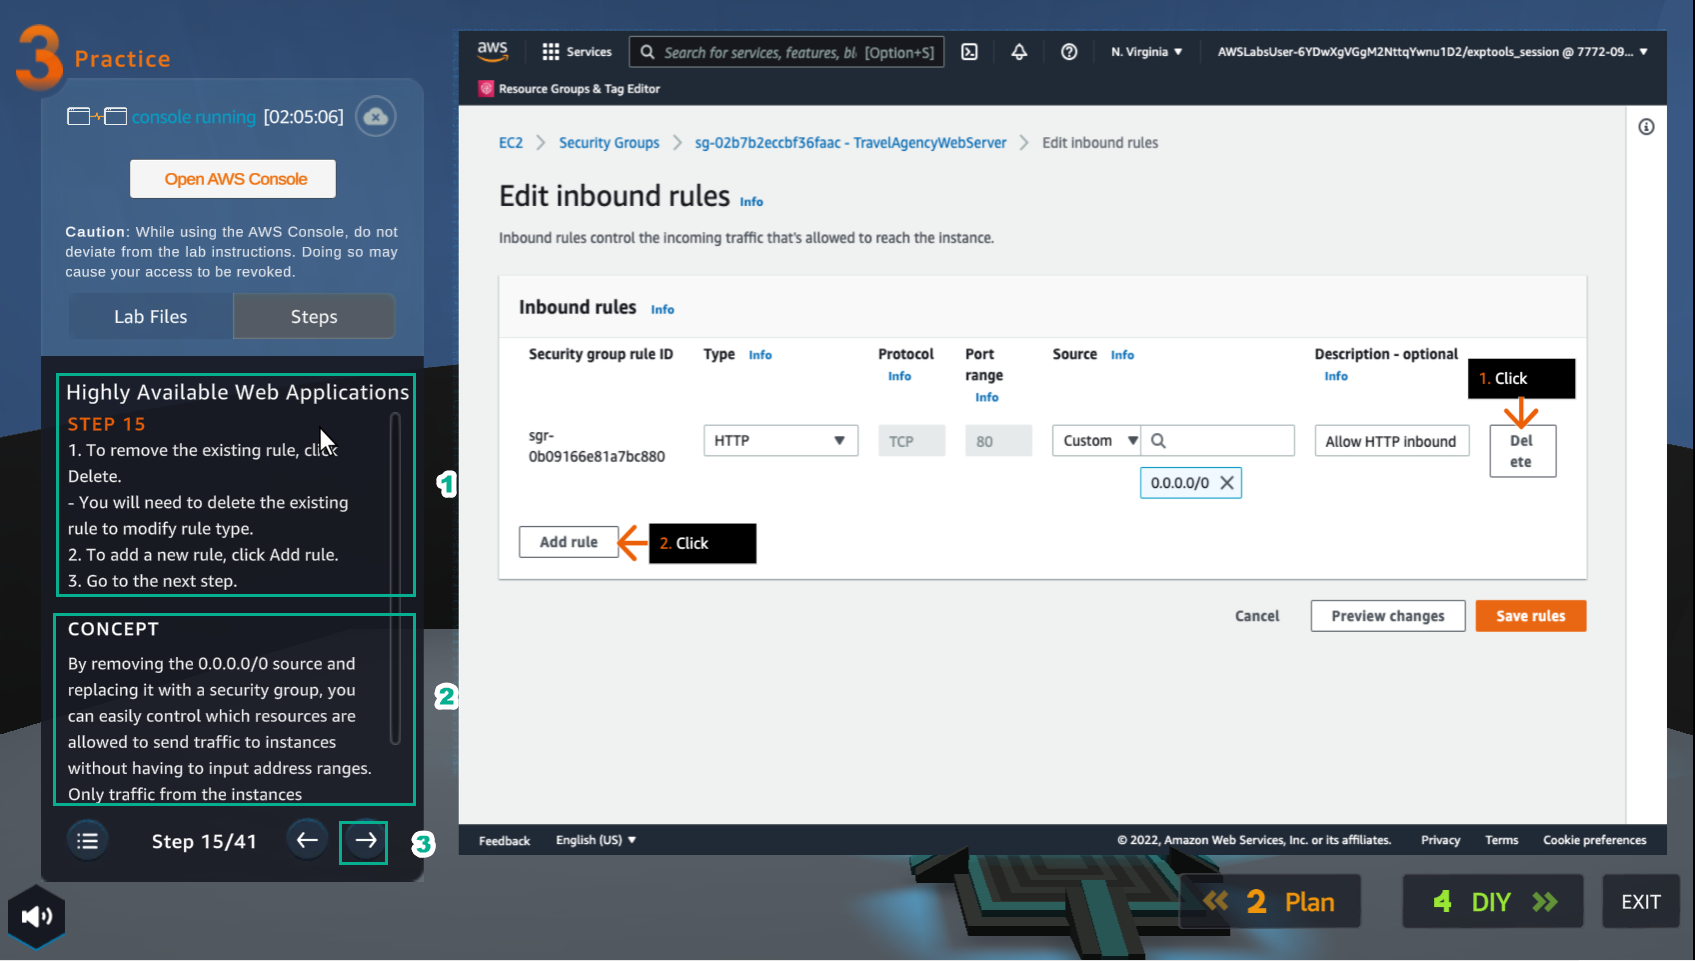
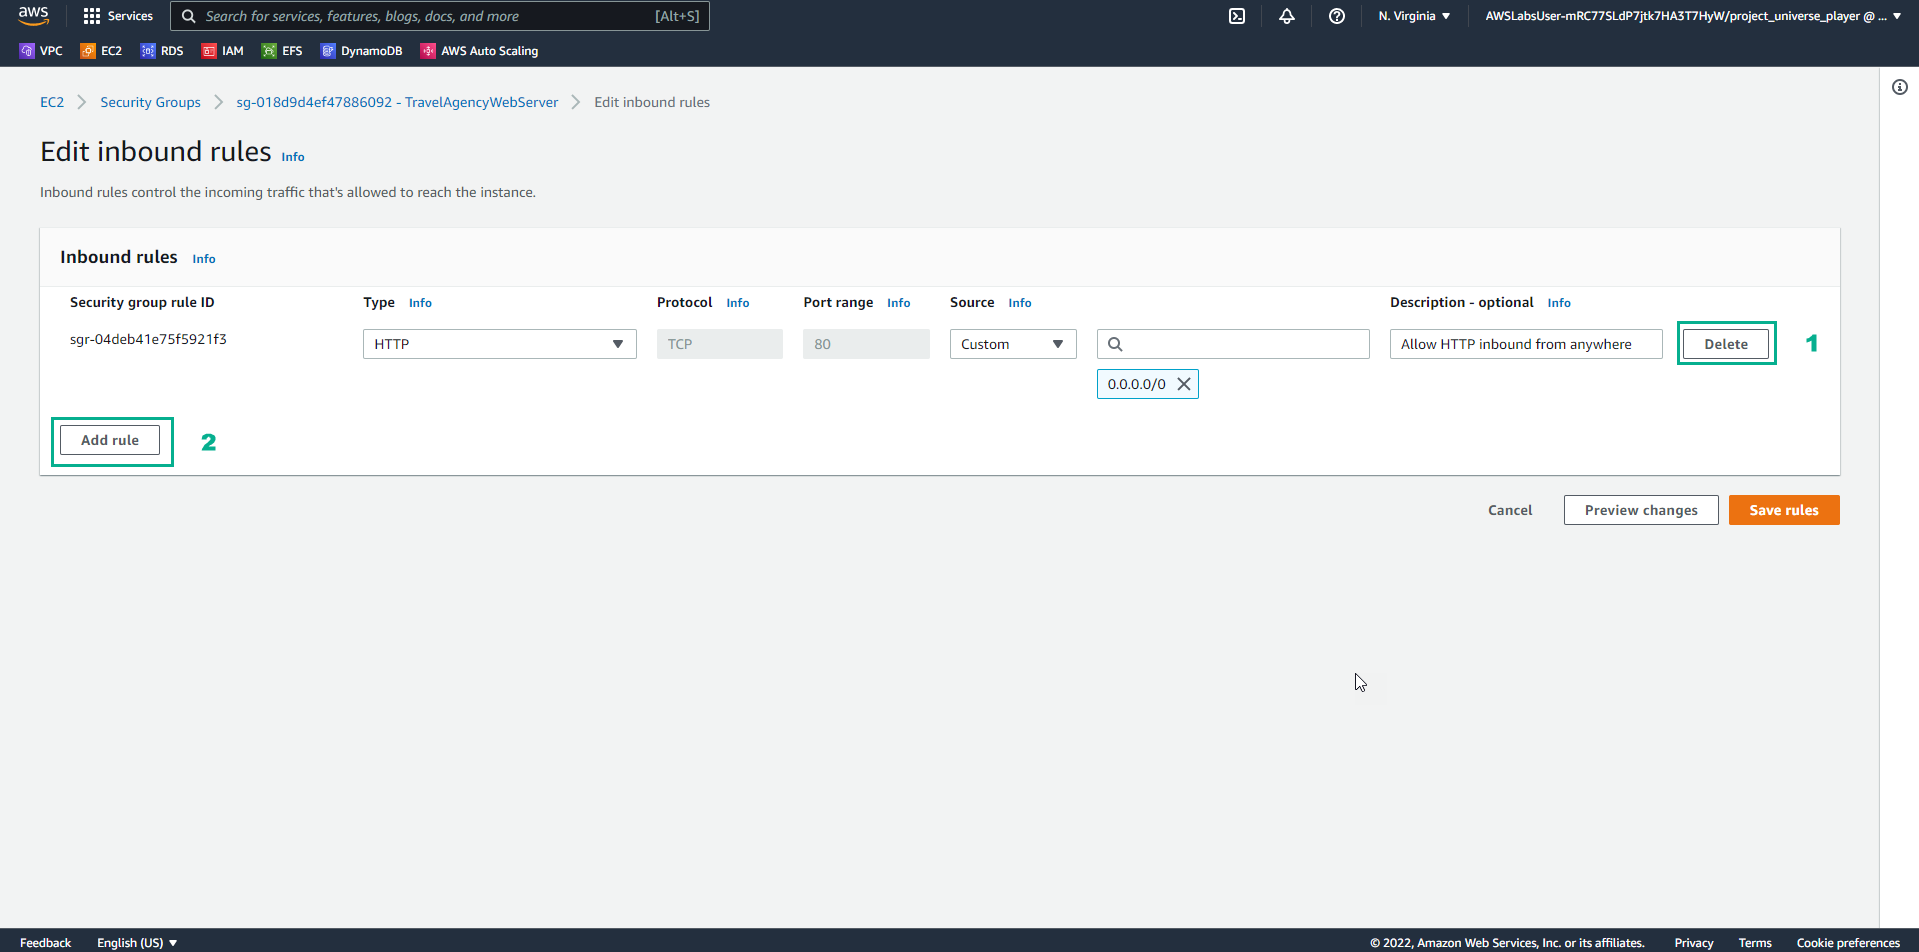
- In the Inbound rules interface
- Select Delete
- Select Add rule
- In the Practice interface
- Read step 16 of Highly Available Web Applications
- Read CONCEPT
- Select the arrow to the right to see the next steps
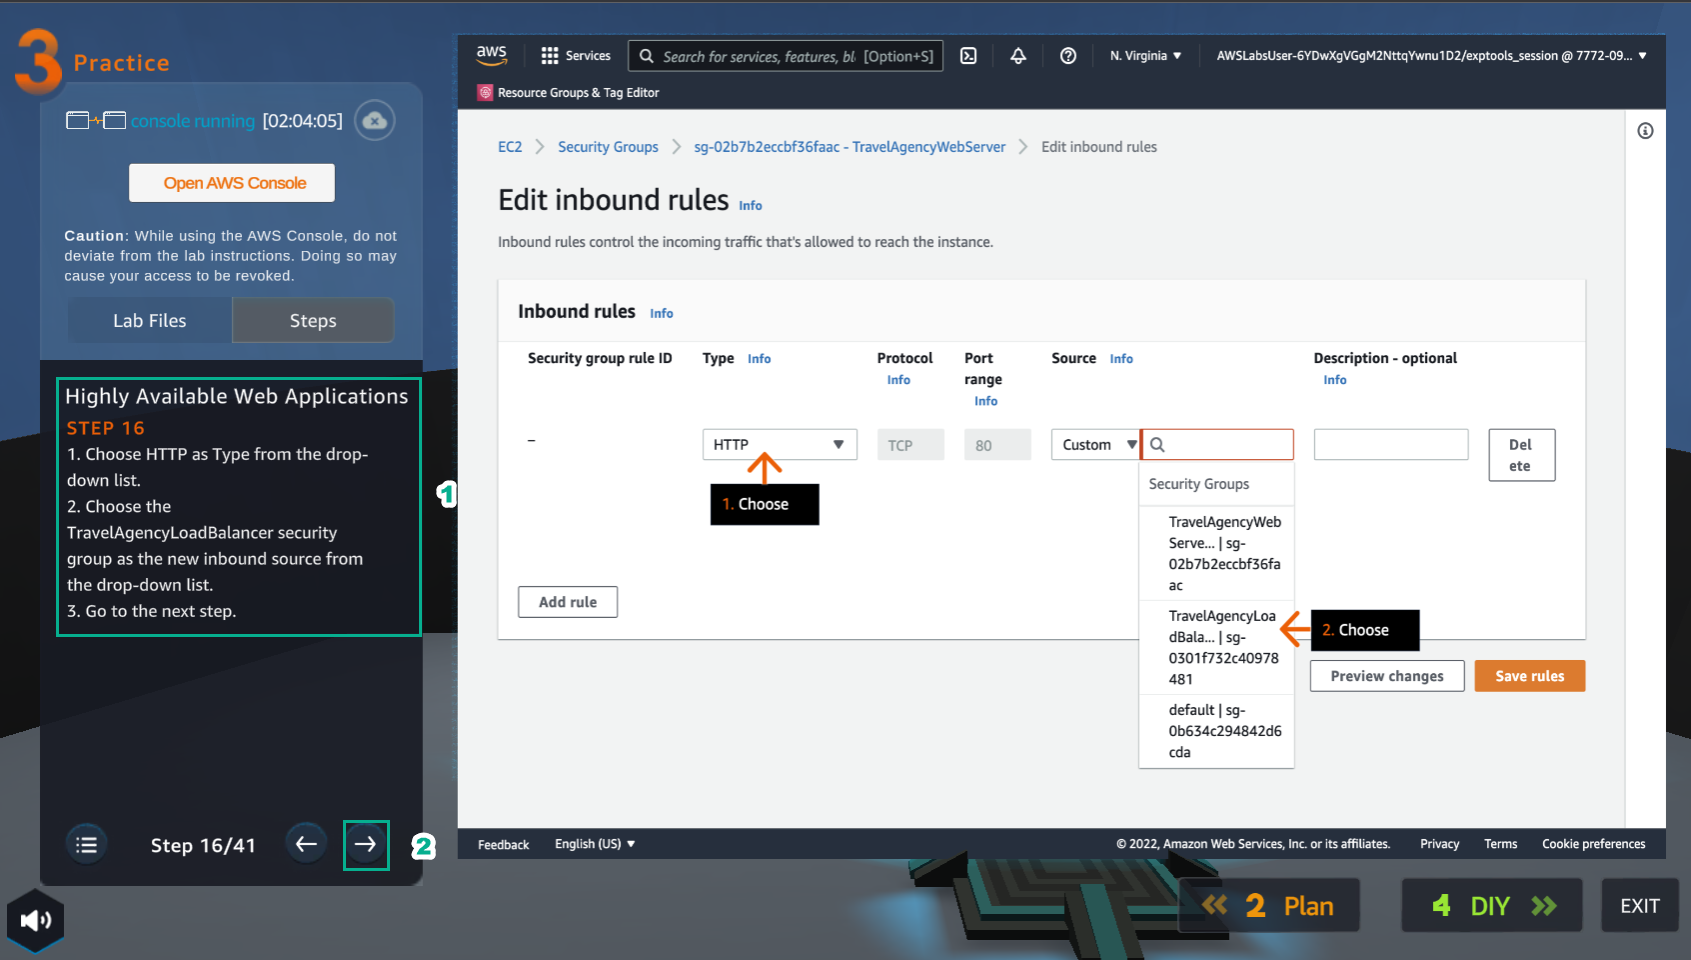
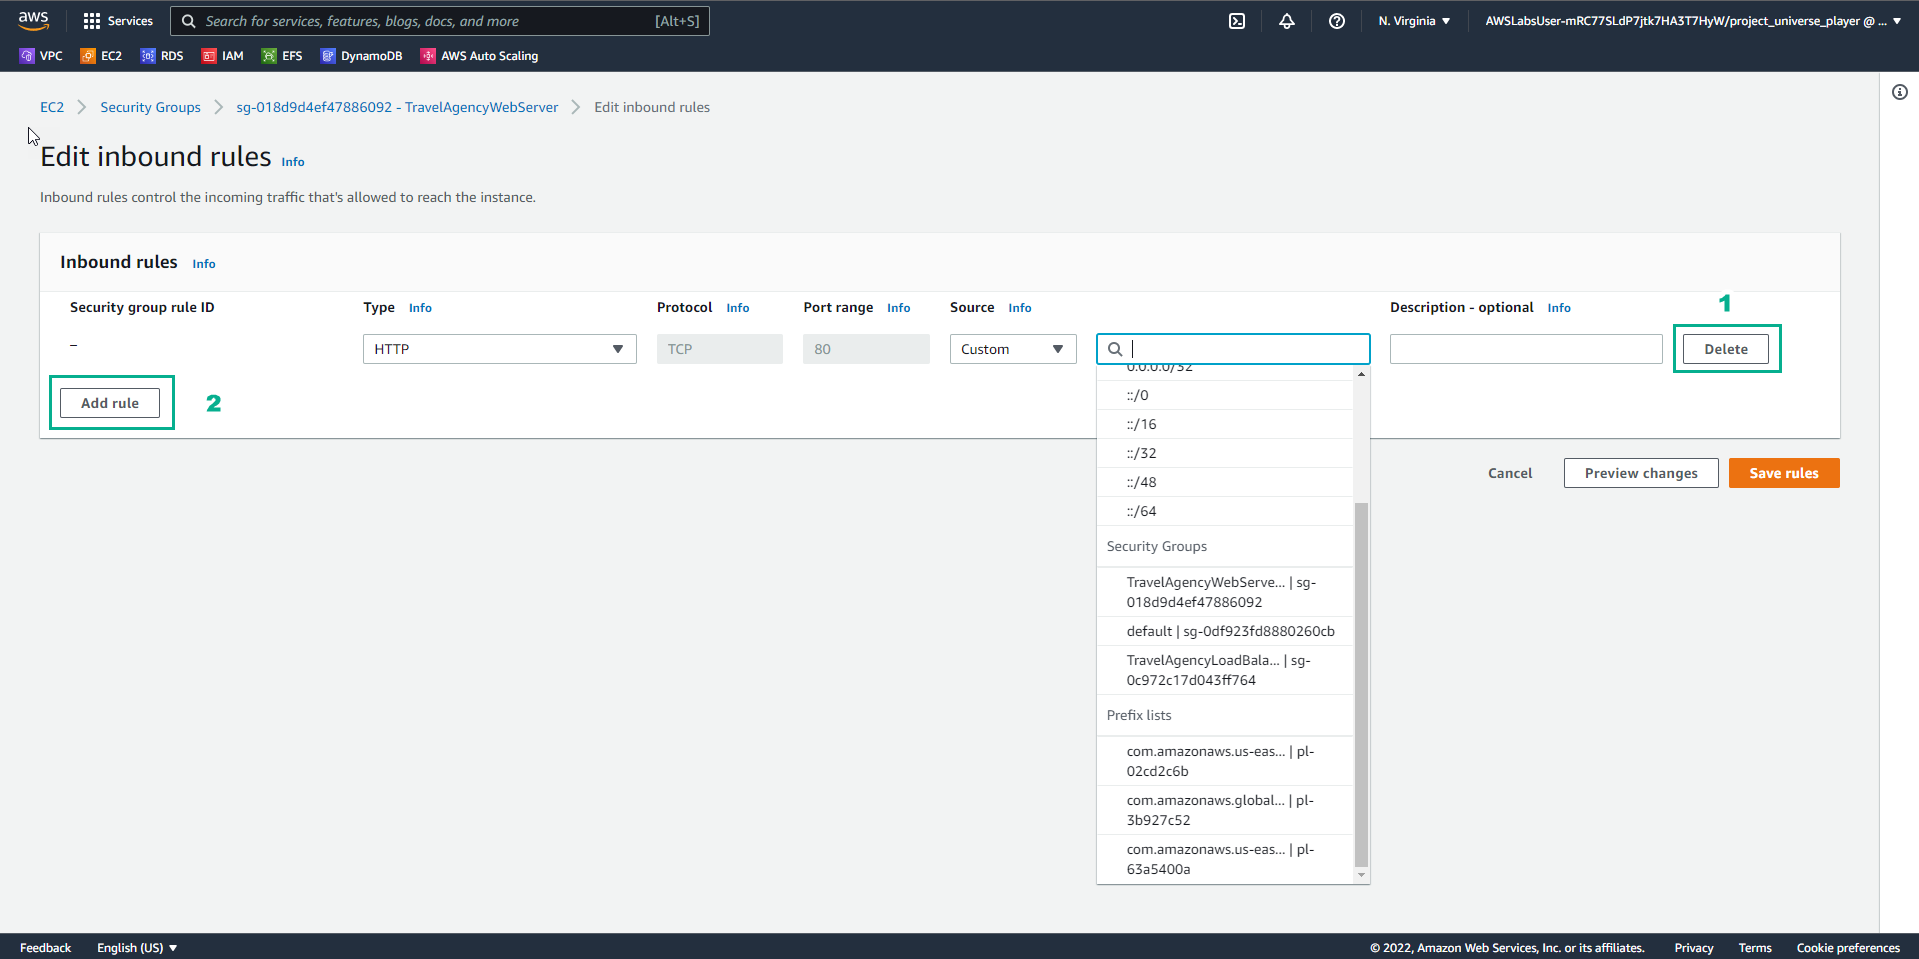
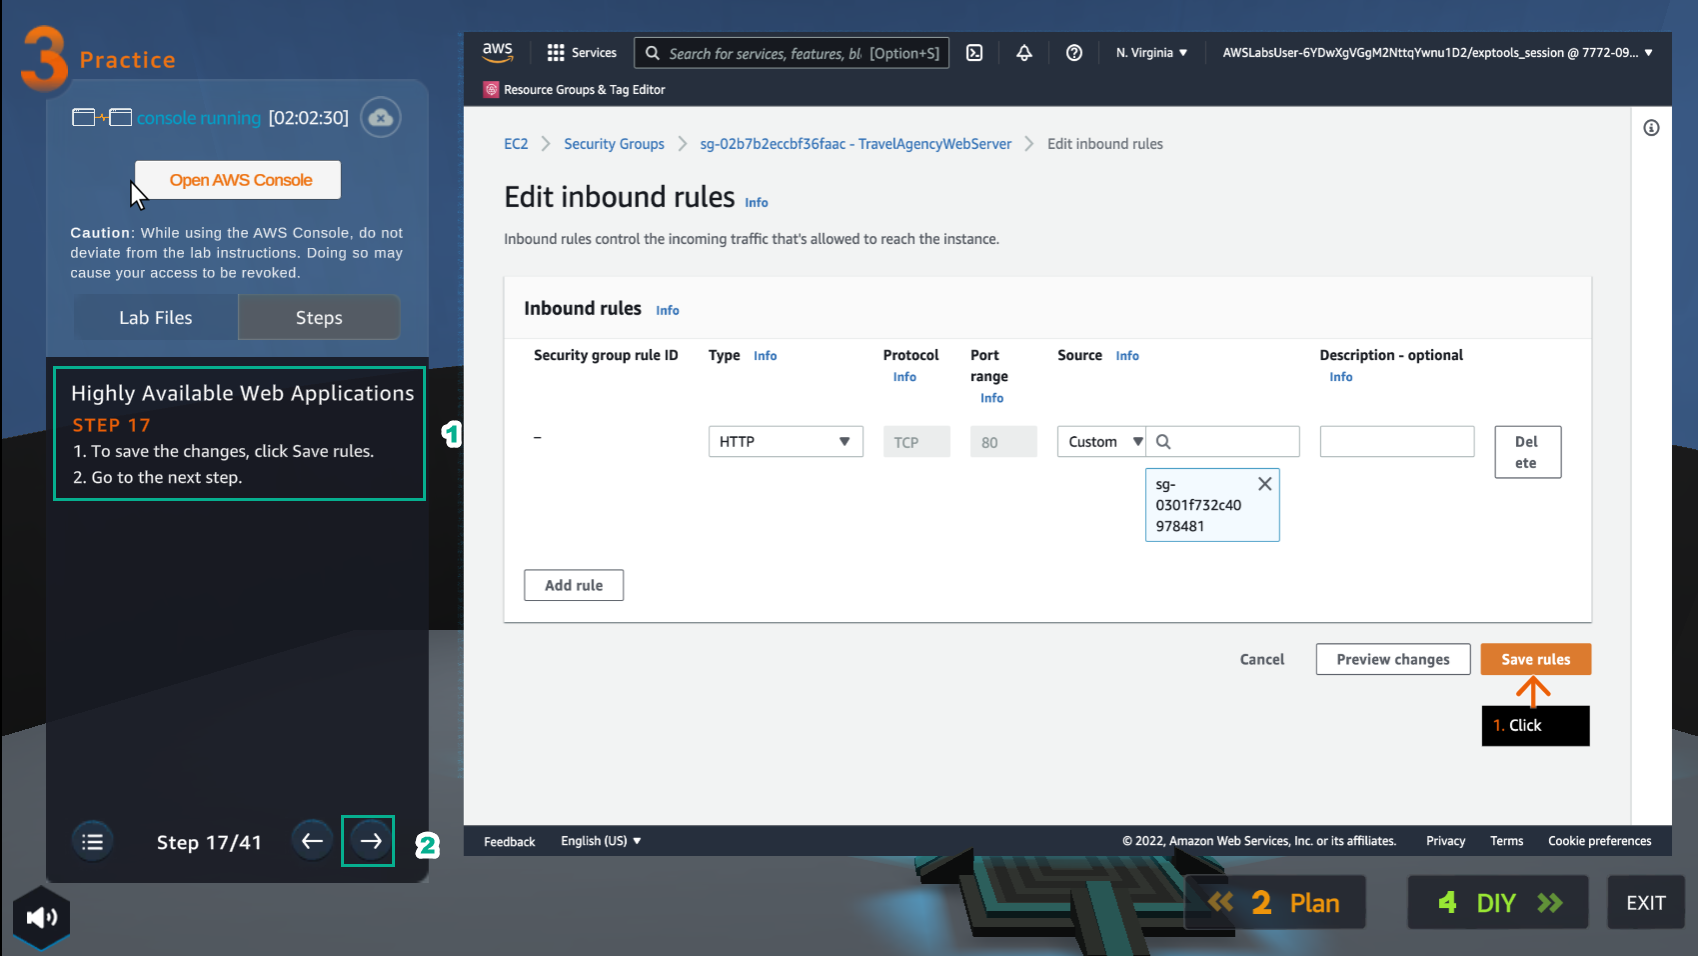
- In the Edit inbound rules interface
- Select HTTP
- Select TravelAgencyLoadBalancer security group
- Select Save rules
- In the Practice interface
- Read step 17 of Highly Available Web Applications
- Select the arrow to the right to see the next steps
- In the Practice interface
- Read step 18 of Highly Available Web Applications
- Read CONCEPT
- Select the arrow to the right to see the next steps
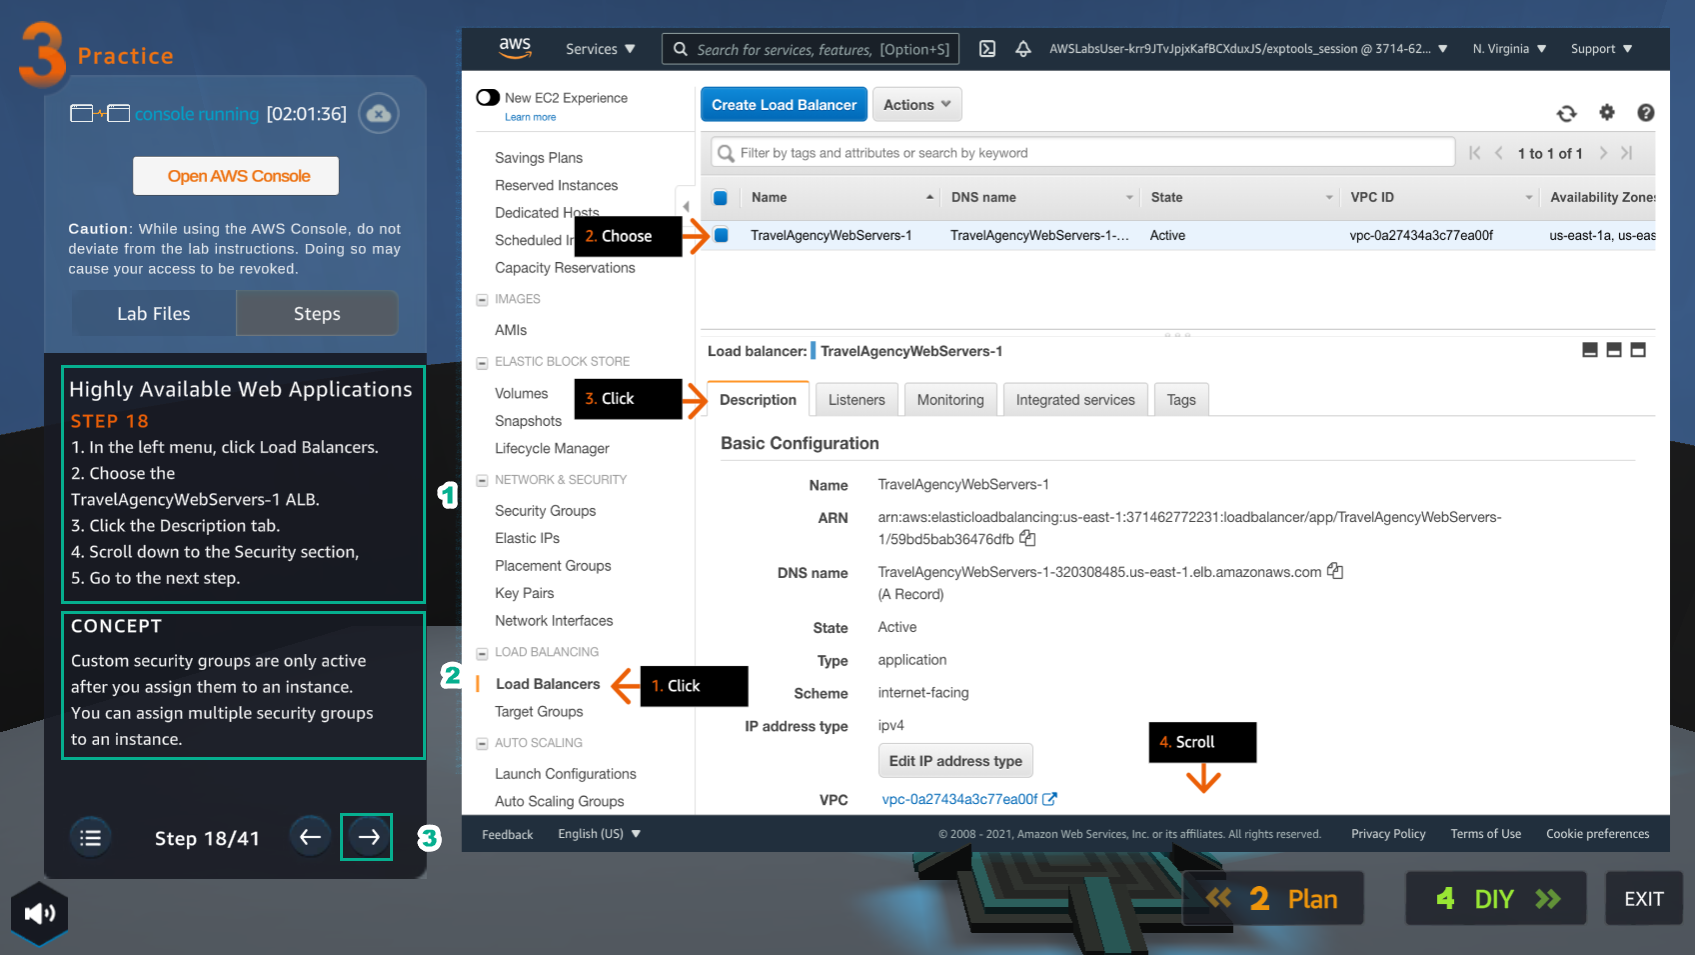
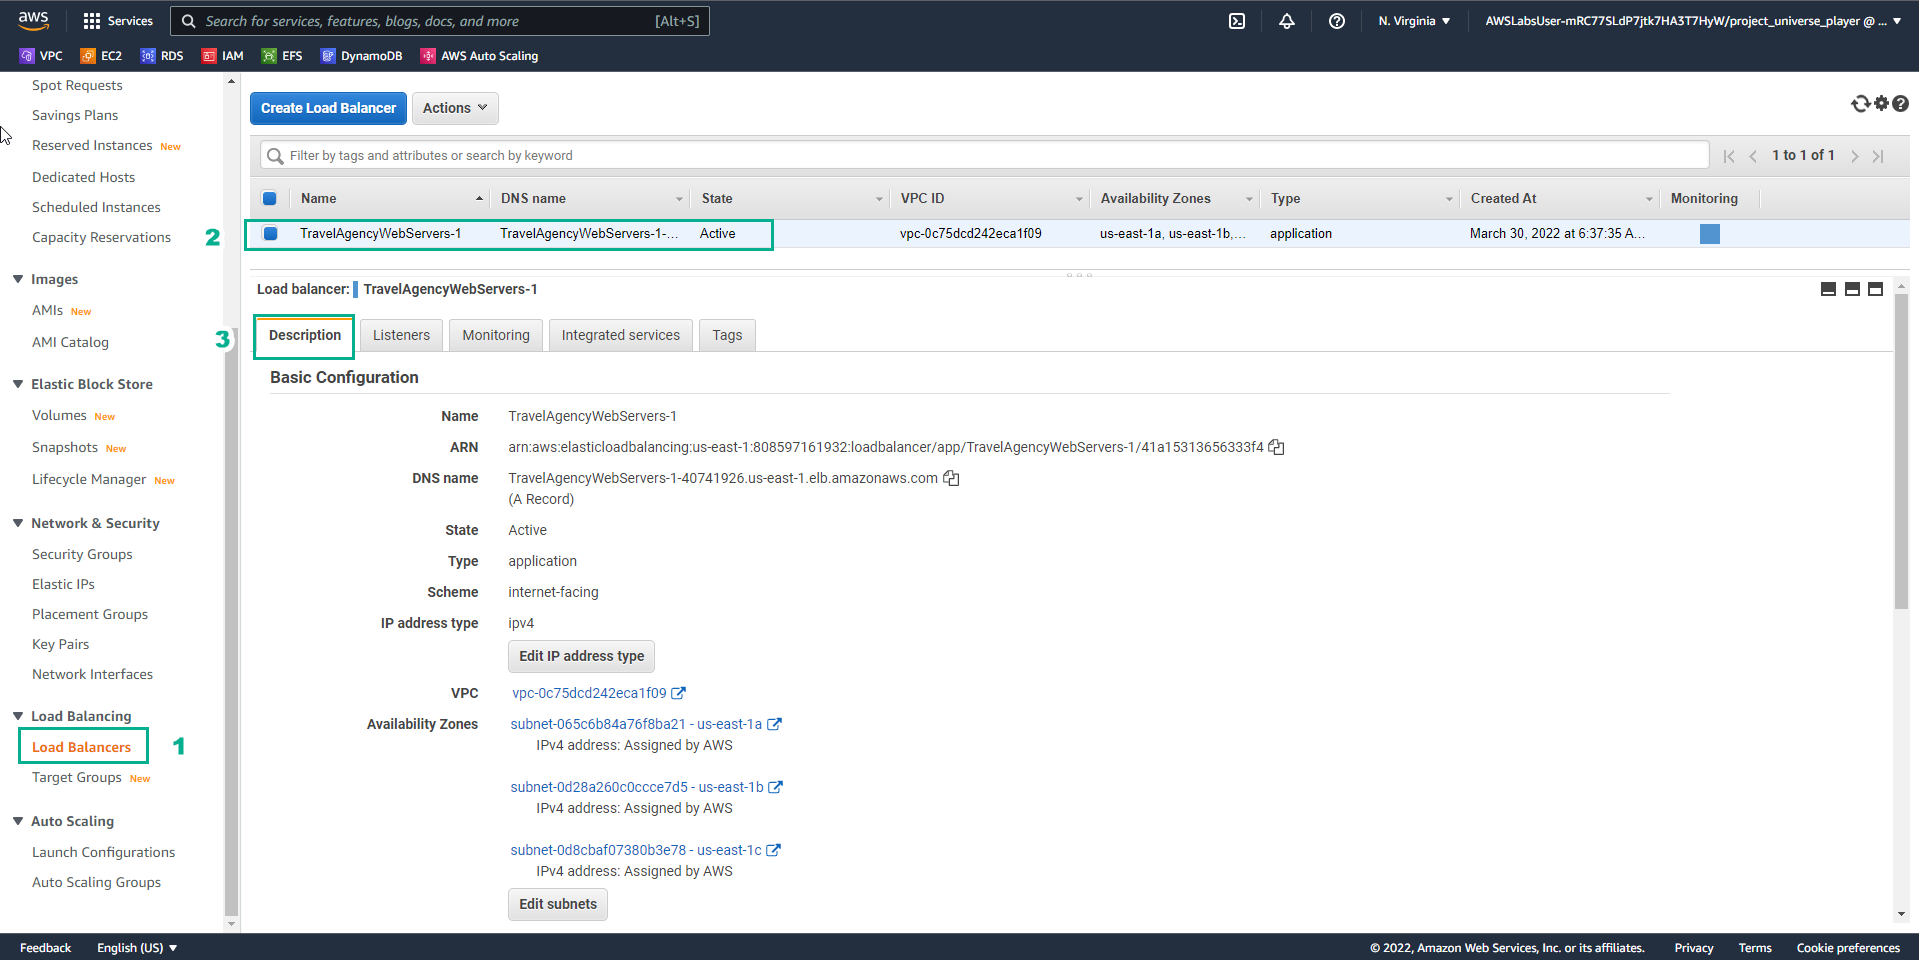
- In the VPC interface
- Select Load Balancers
- Select TravelAgencyWebServers-1 ALB
- Select Description
- In the Practice interface
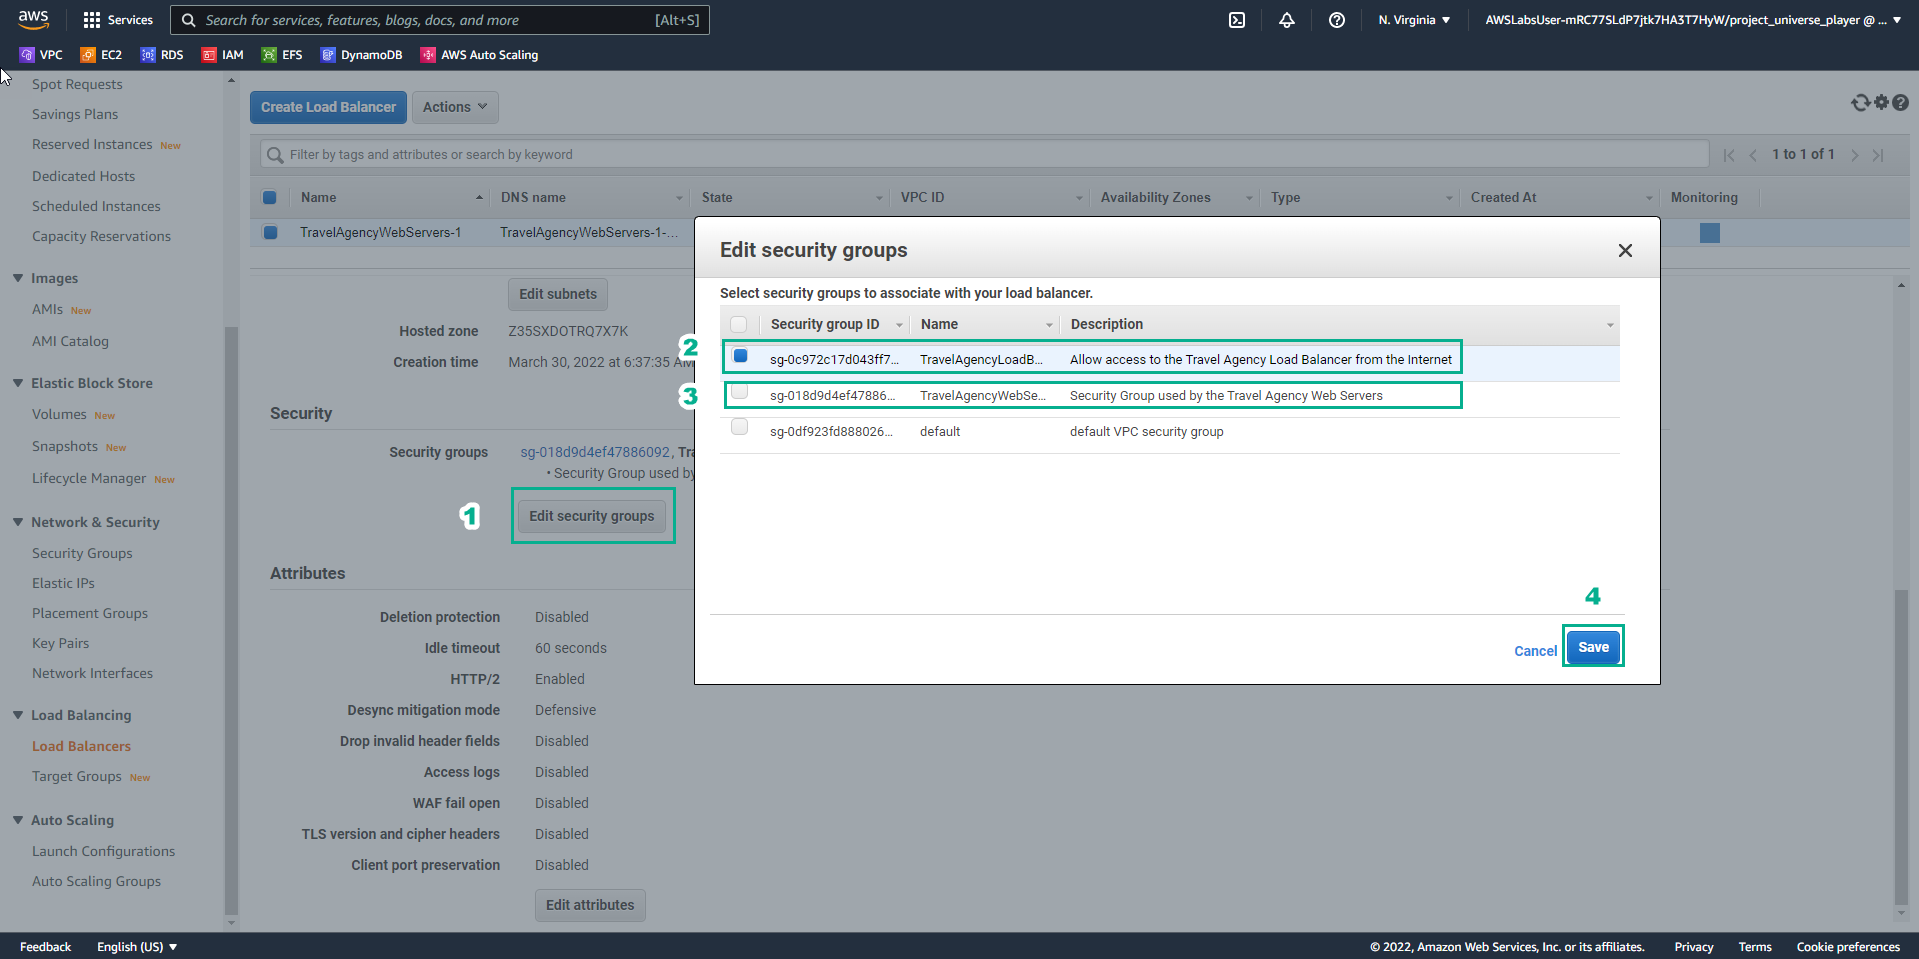
- Read step 19 of Highly Available Web Applications
- Read CONCEPT
- Select the arrow to the right to see the next steps
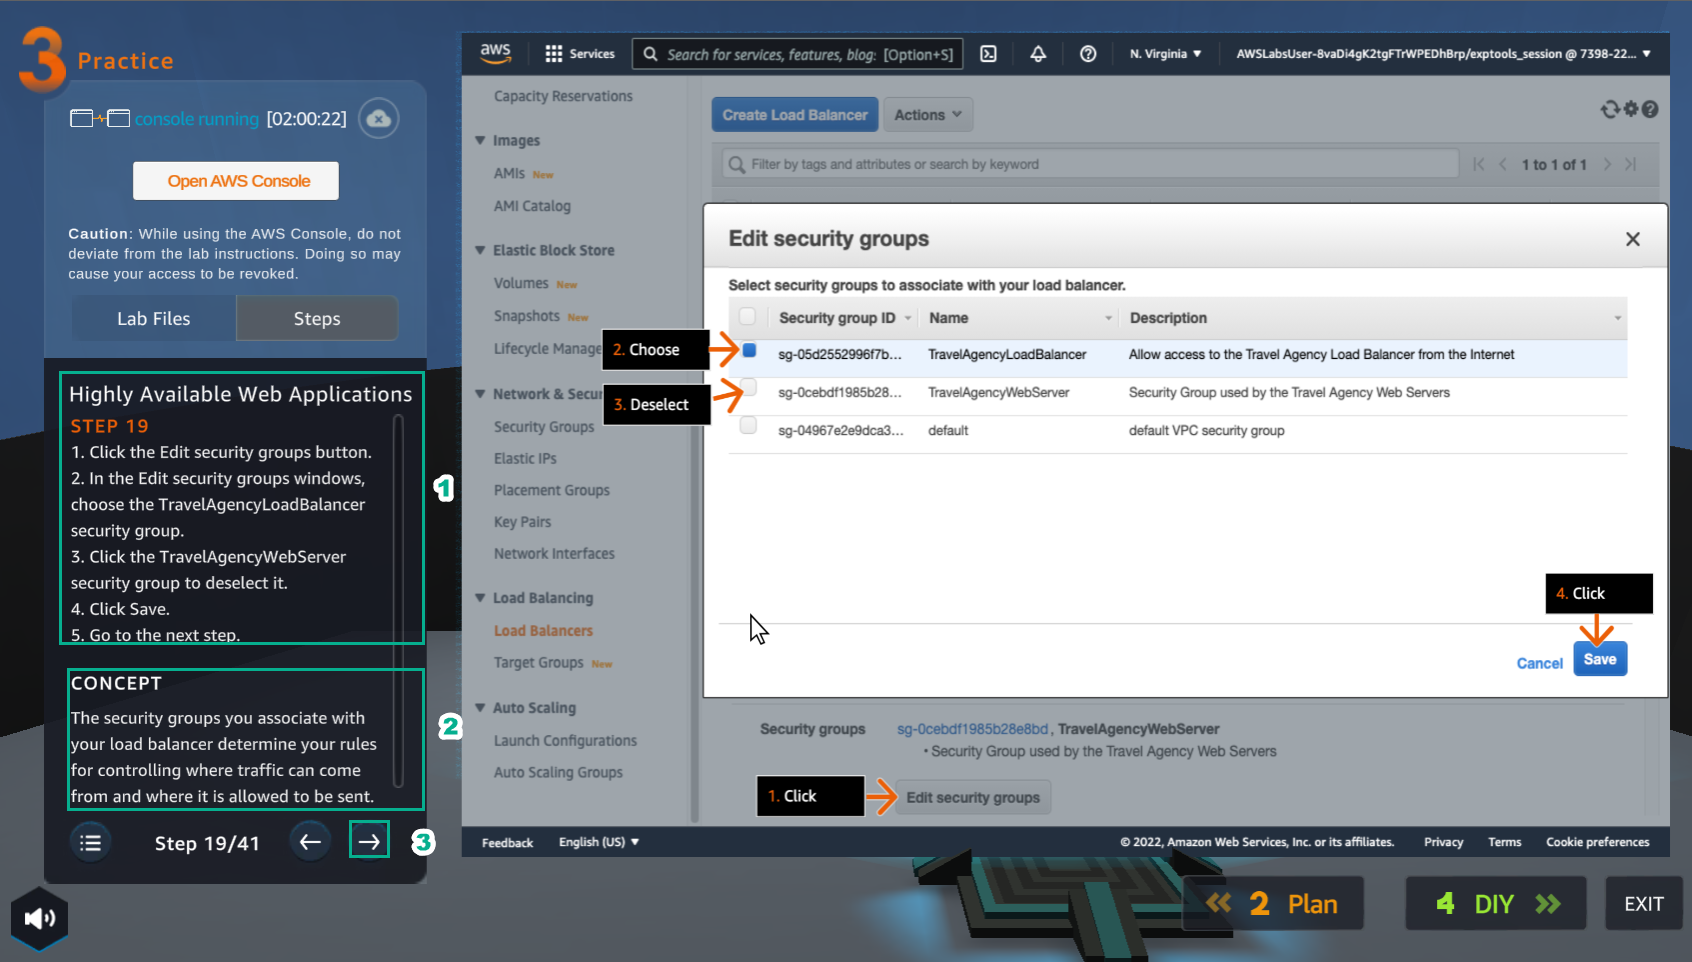
- In the Security groups interface
- Select Edit security groups
- Select TravelAgencyLoadBalancer
- Uncheck TravelAgencyWebServer
- Select Save
- In the Practice interface
- Read step 20 of Highly Available Web Applications
- Read CONCEPT
- Select the arrow to the right to see the next steps
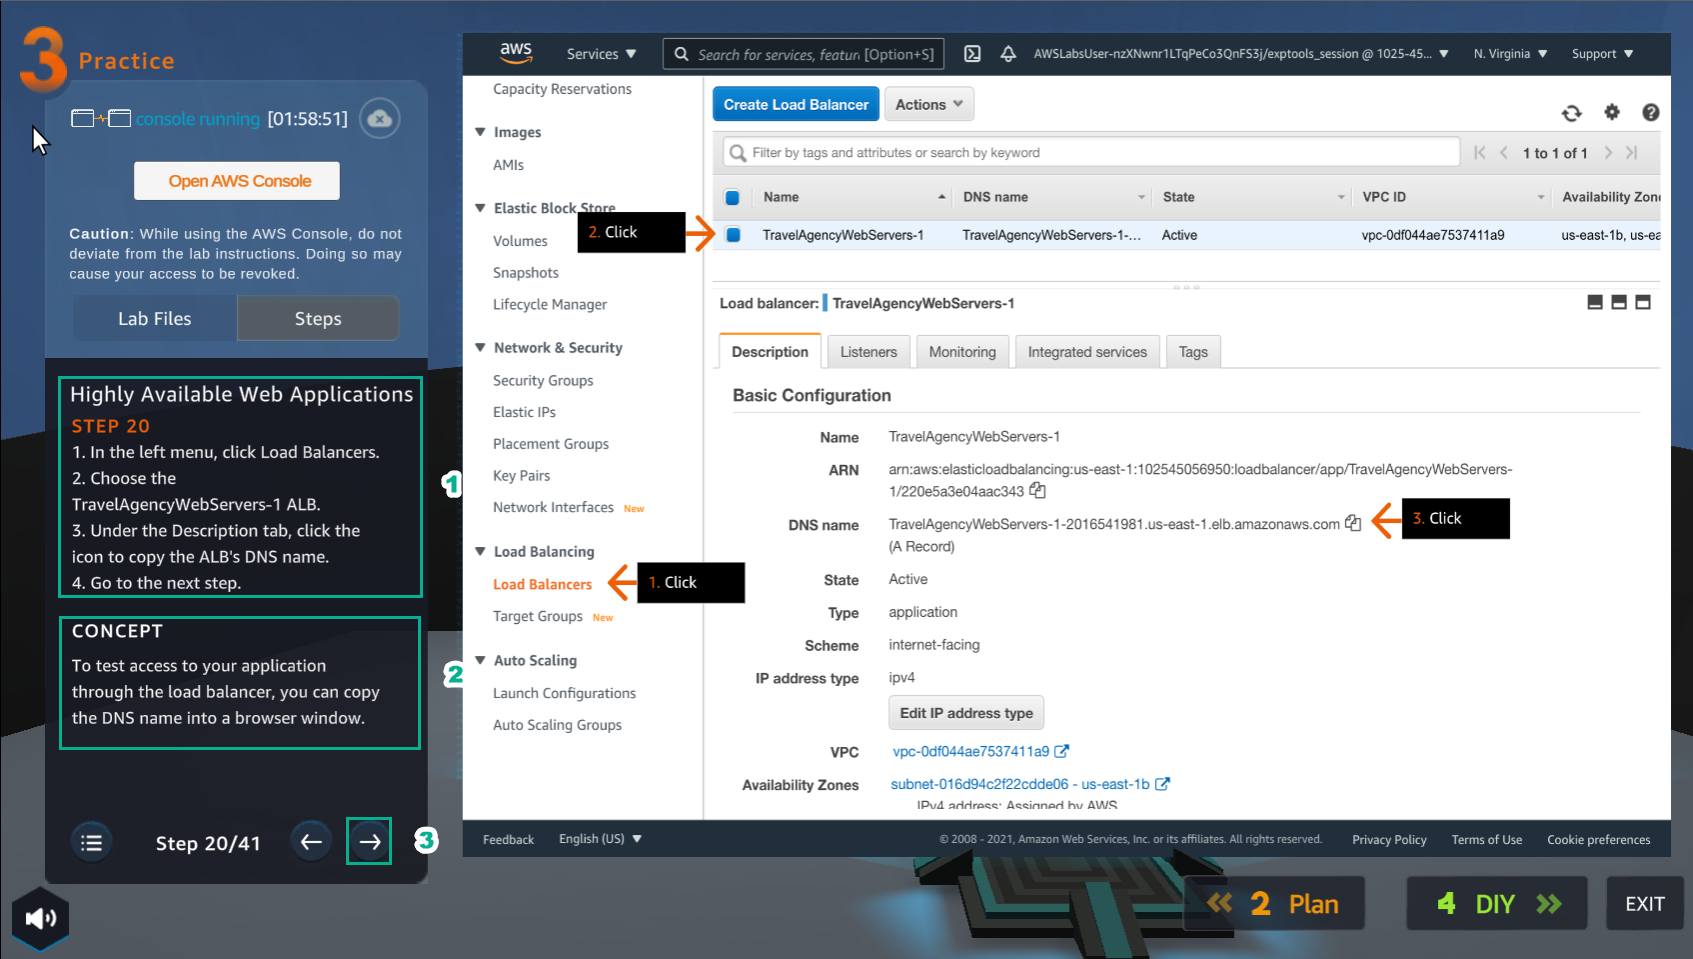
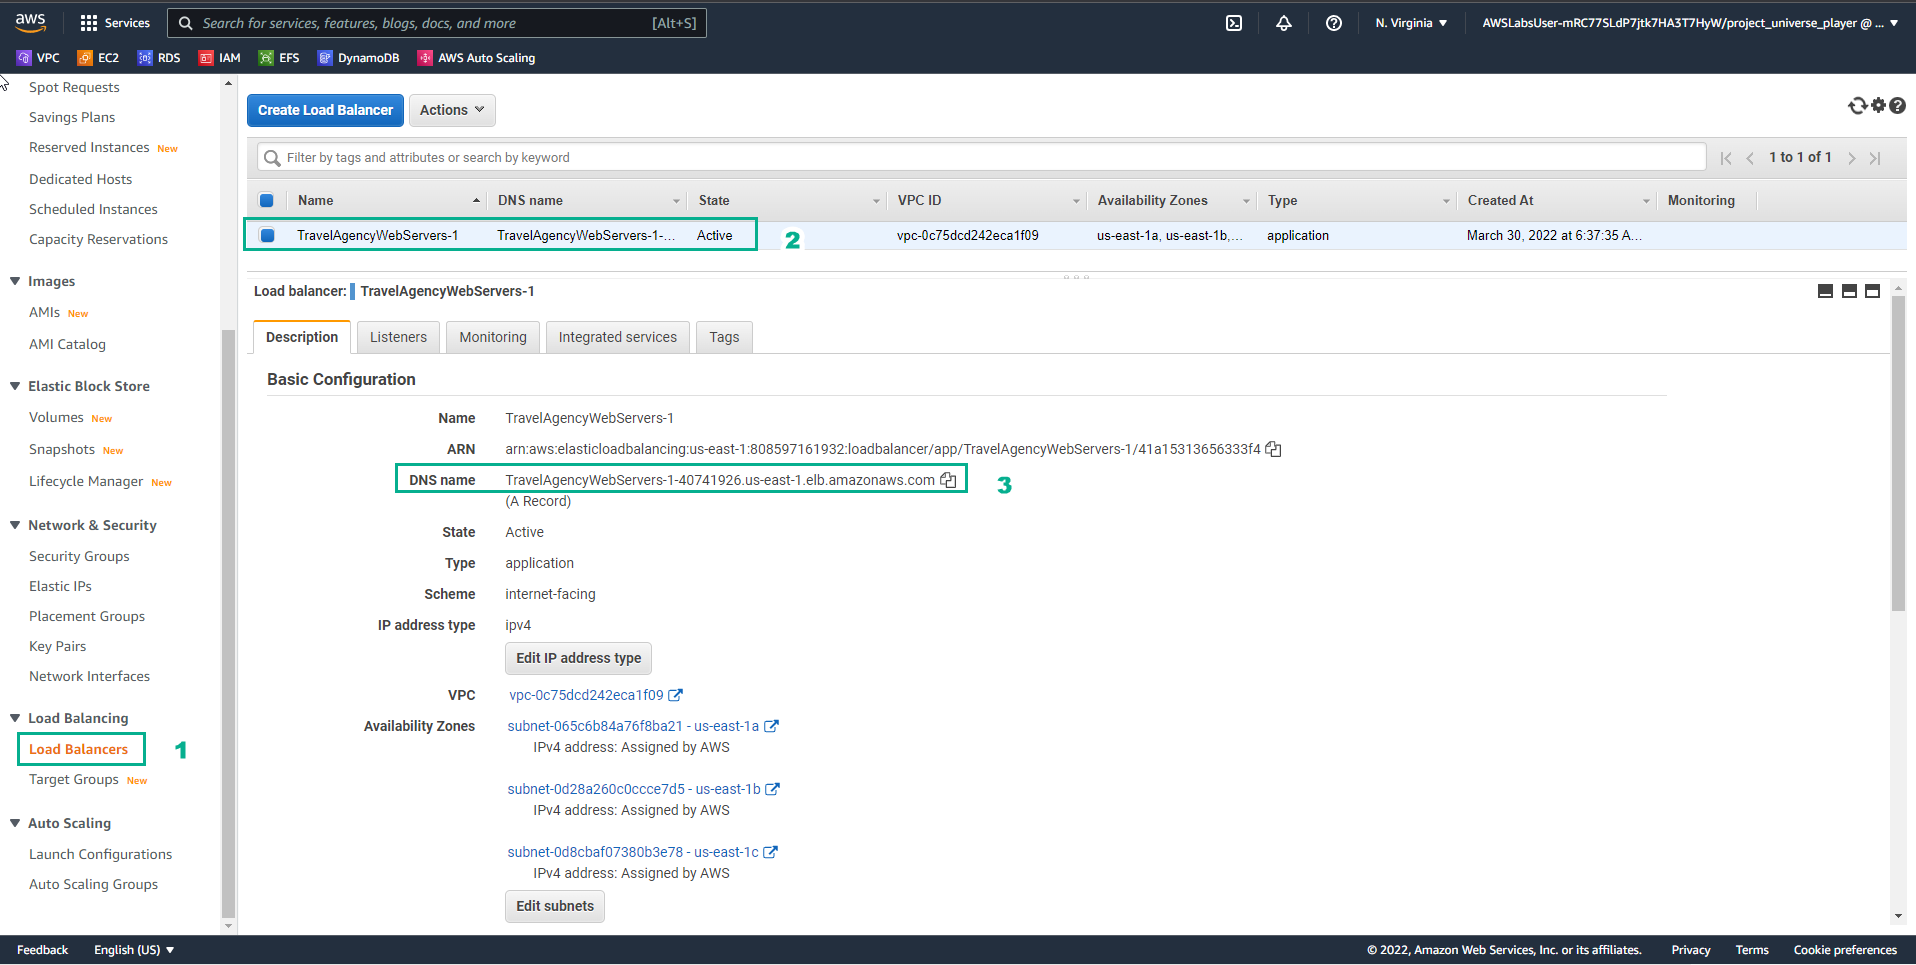
- In the VPC interface
- Select Load Balancers
- Select TravelAgencyWebServer-1 ALB
- In Description, copy ALB DNS name
- In the Practice interface
- Read step 21 of Highly Available Web Applications
- Read CONCEPT
- Select the arrow to the right to see the next steps
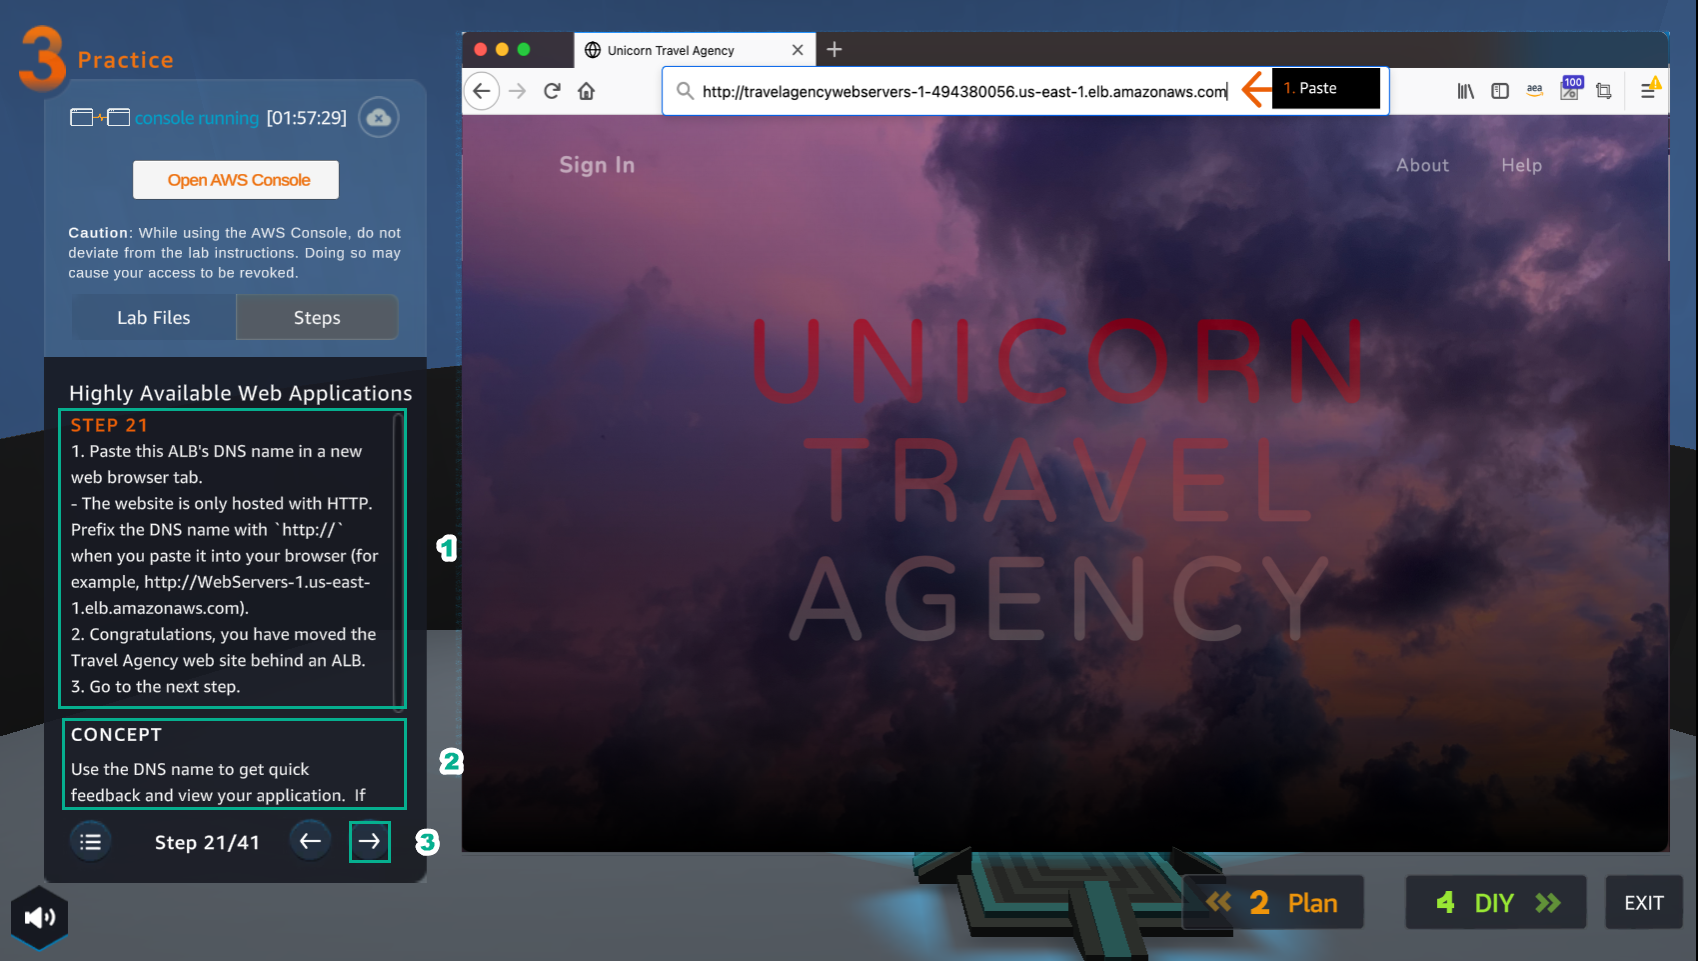
- Open a browser
- Paste ALB DNS name in
- Select Enter
- View results

- In the Practice interface
- Read step 22 of Highly Available Web Applications
- Read CONCEPT
- Select the arrow to the right to see the next steps
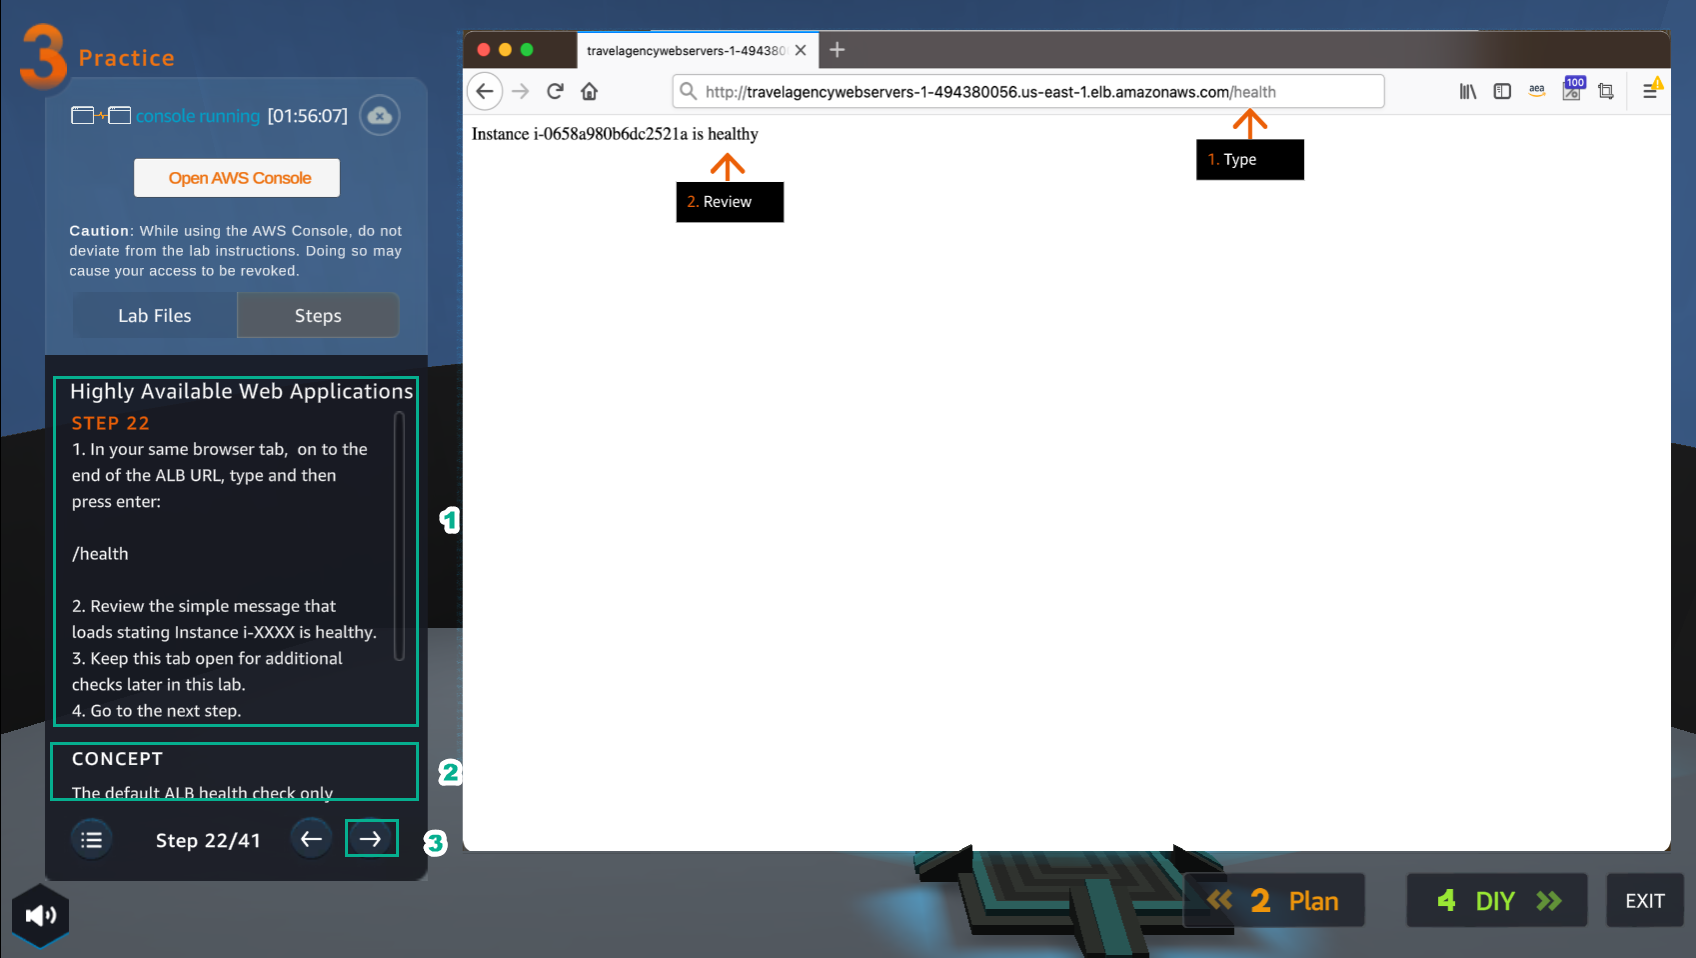
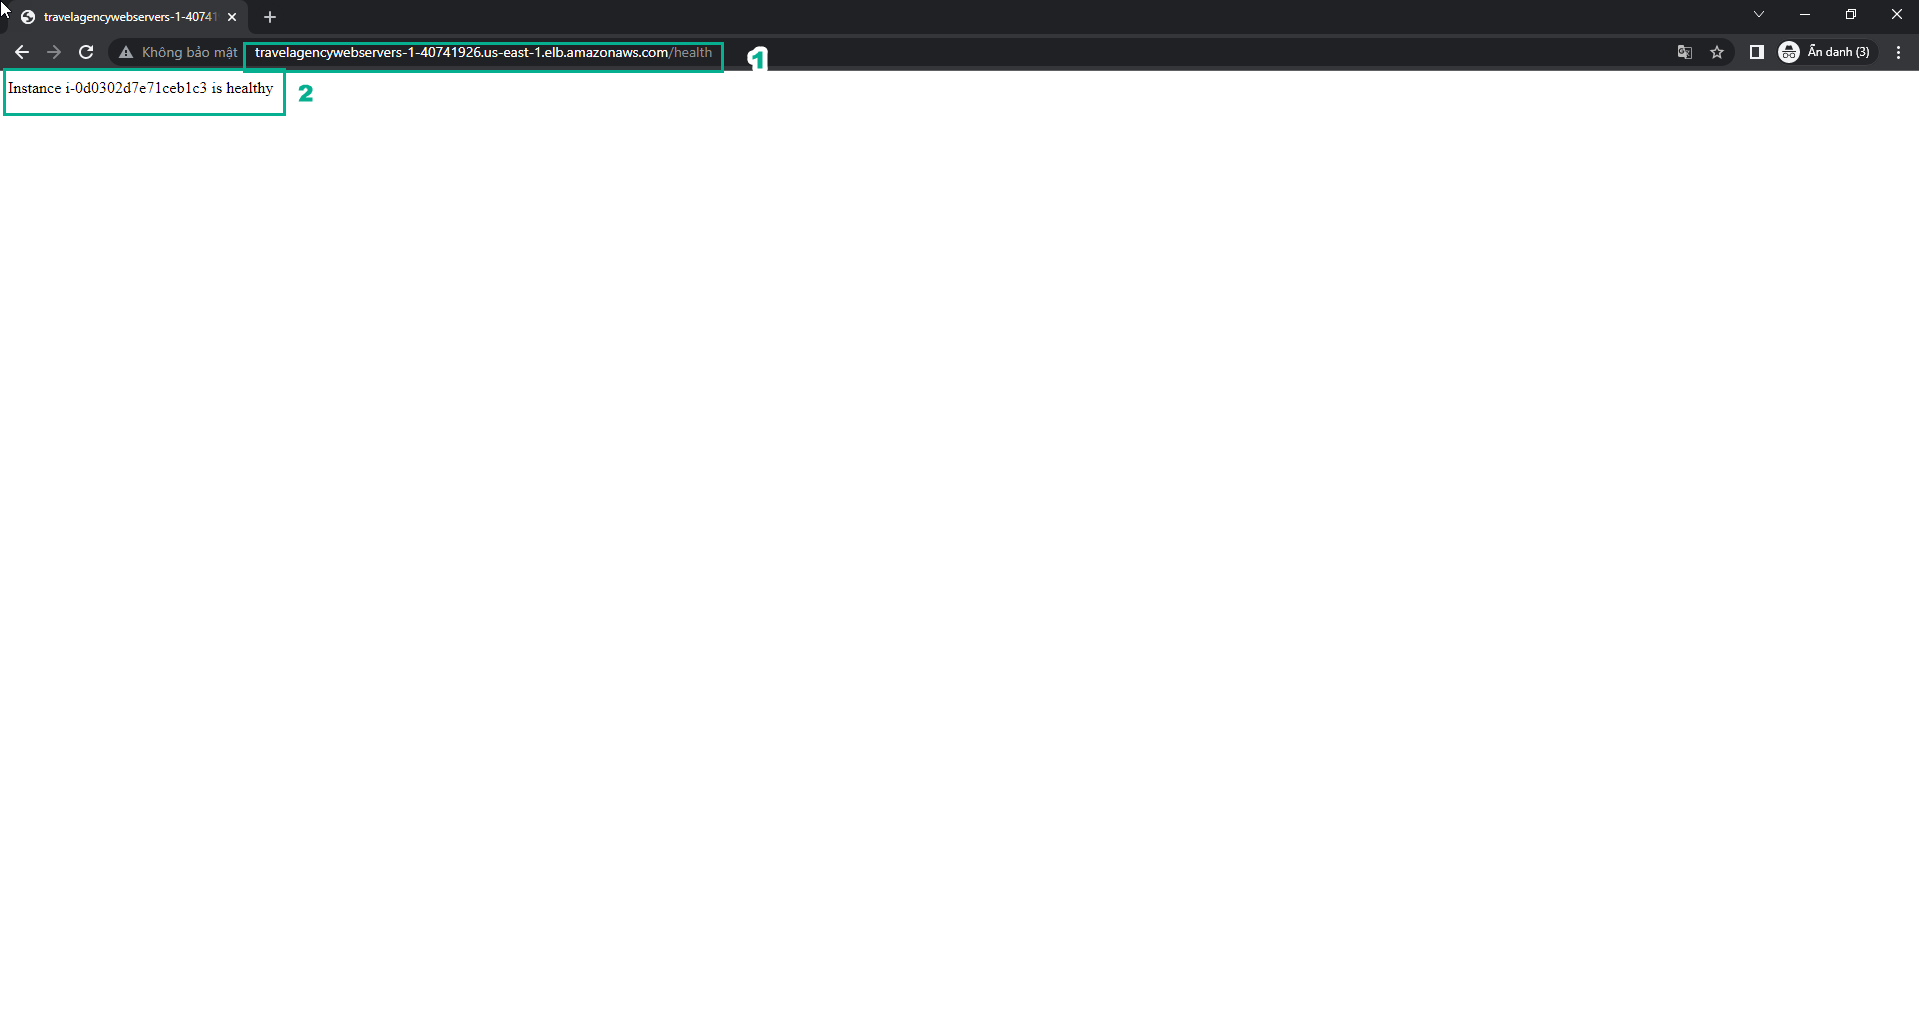
- In the browser interface
- Add at the end ALB DNS name:
/health - View results
- In the Practice interface
- Read step 23 of Highly Available Web Applications
- Read CONCEPT
- Select the arrow to the right to see the next steps
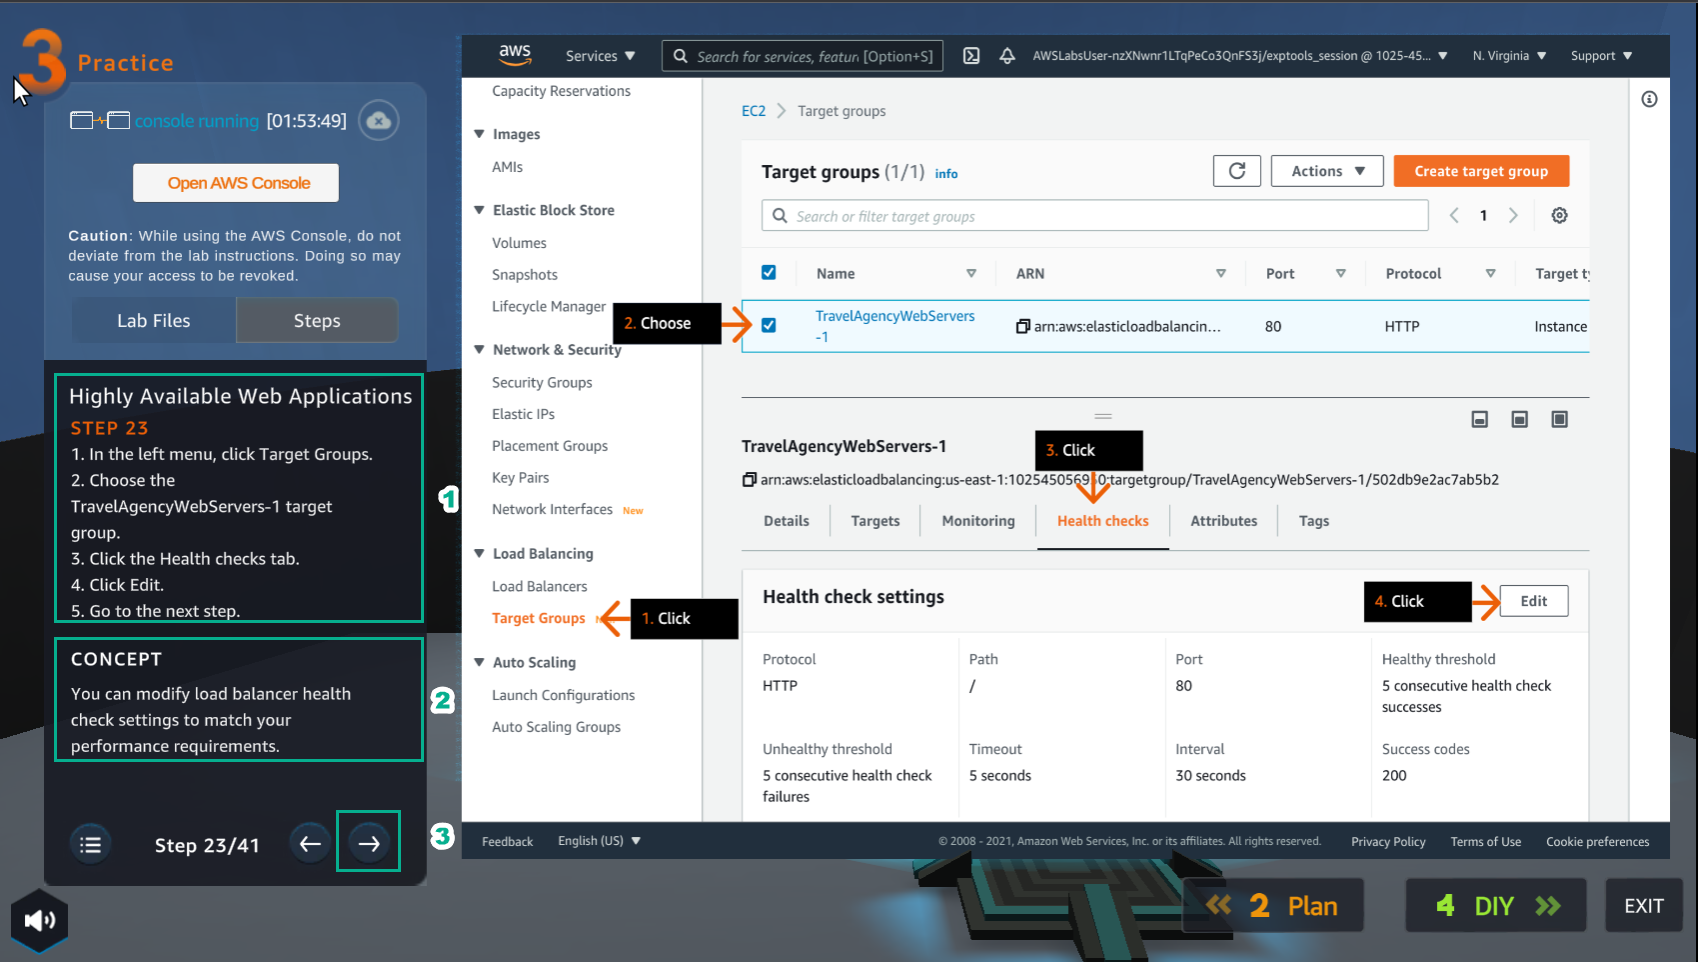
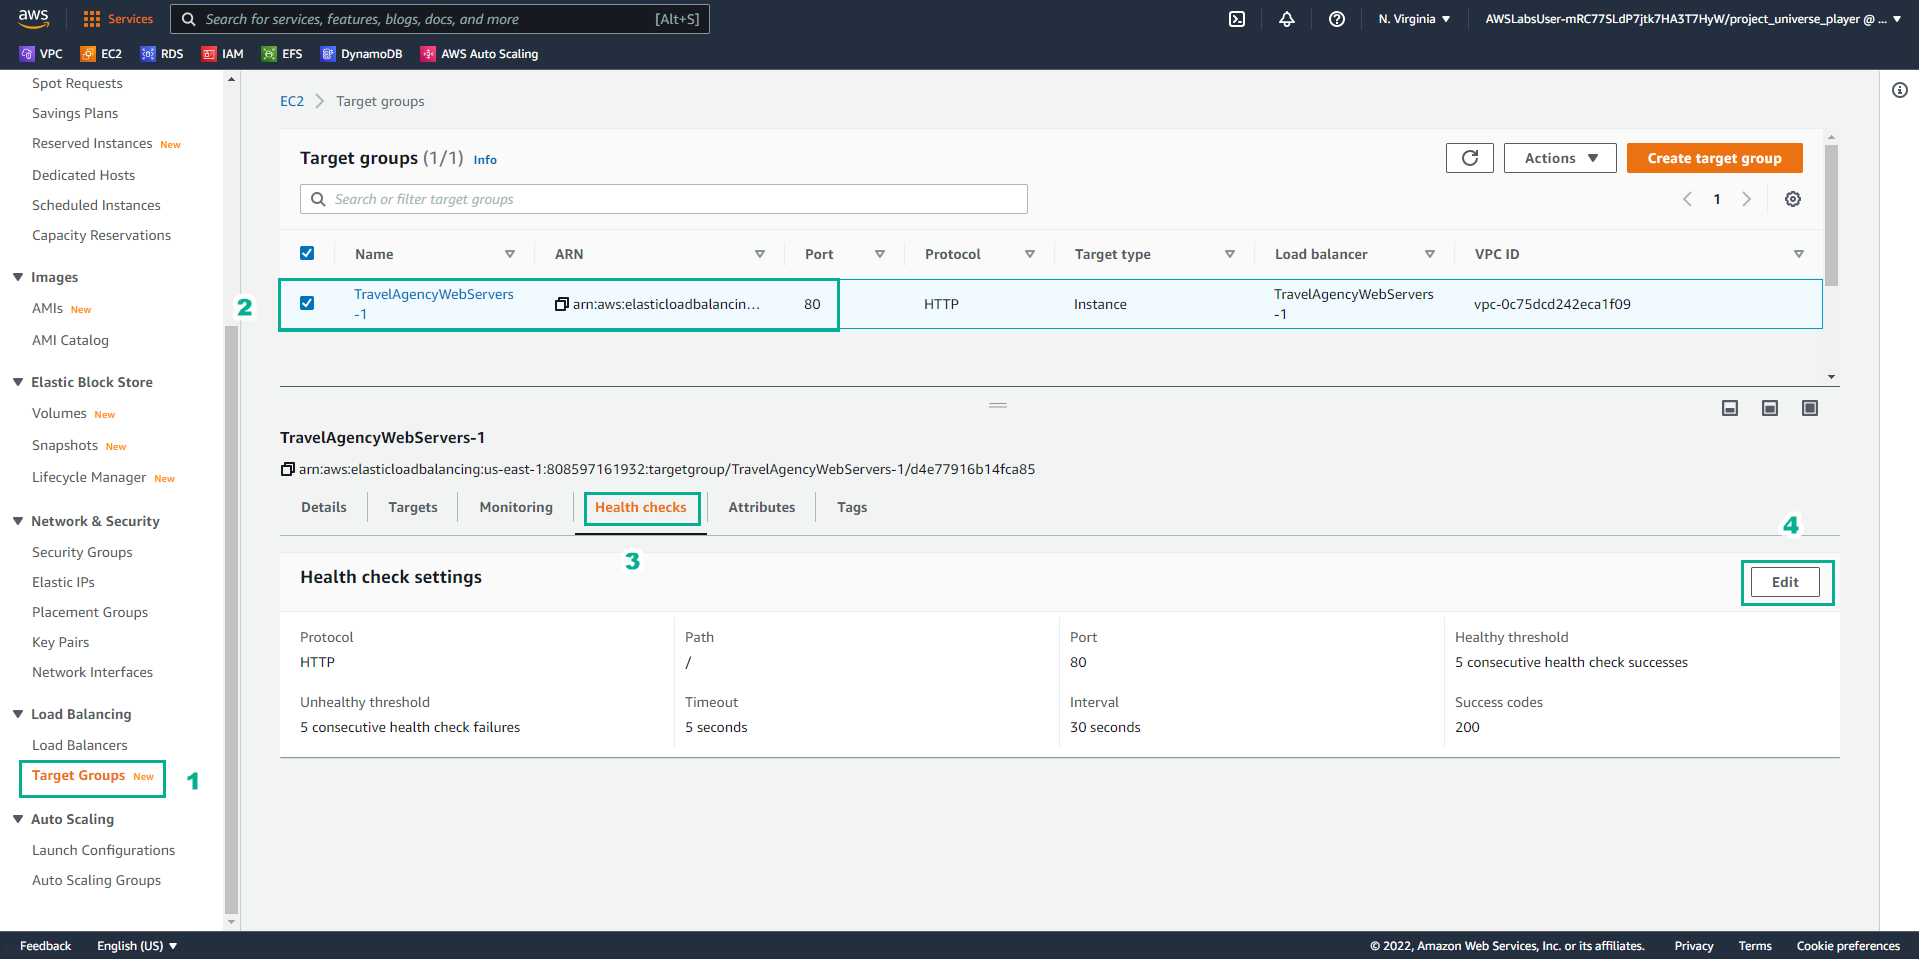
- In the VPC interface
- Select Target Groups
- Select TravelAgencyWebServers-1 target group
- Select Health checks
- Select Edit
- In the Practice interface
- Read step 24 of Highly Available Web Applications
- Read CONCEPT
- Select the arrow to the right to see the next steps
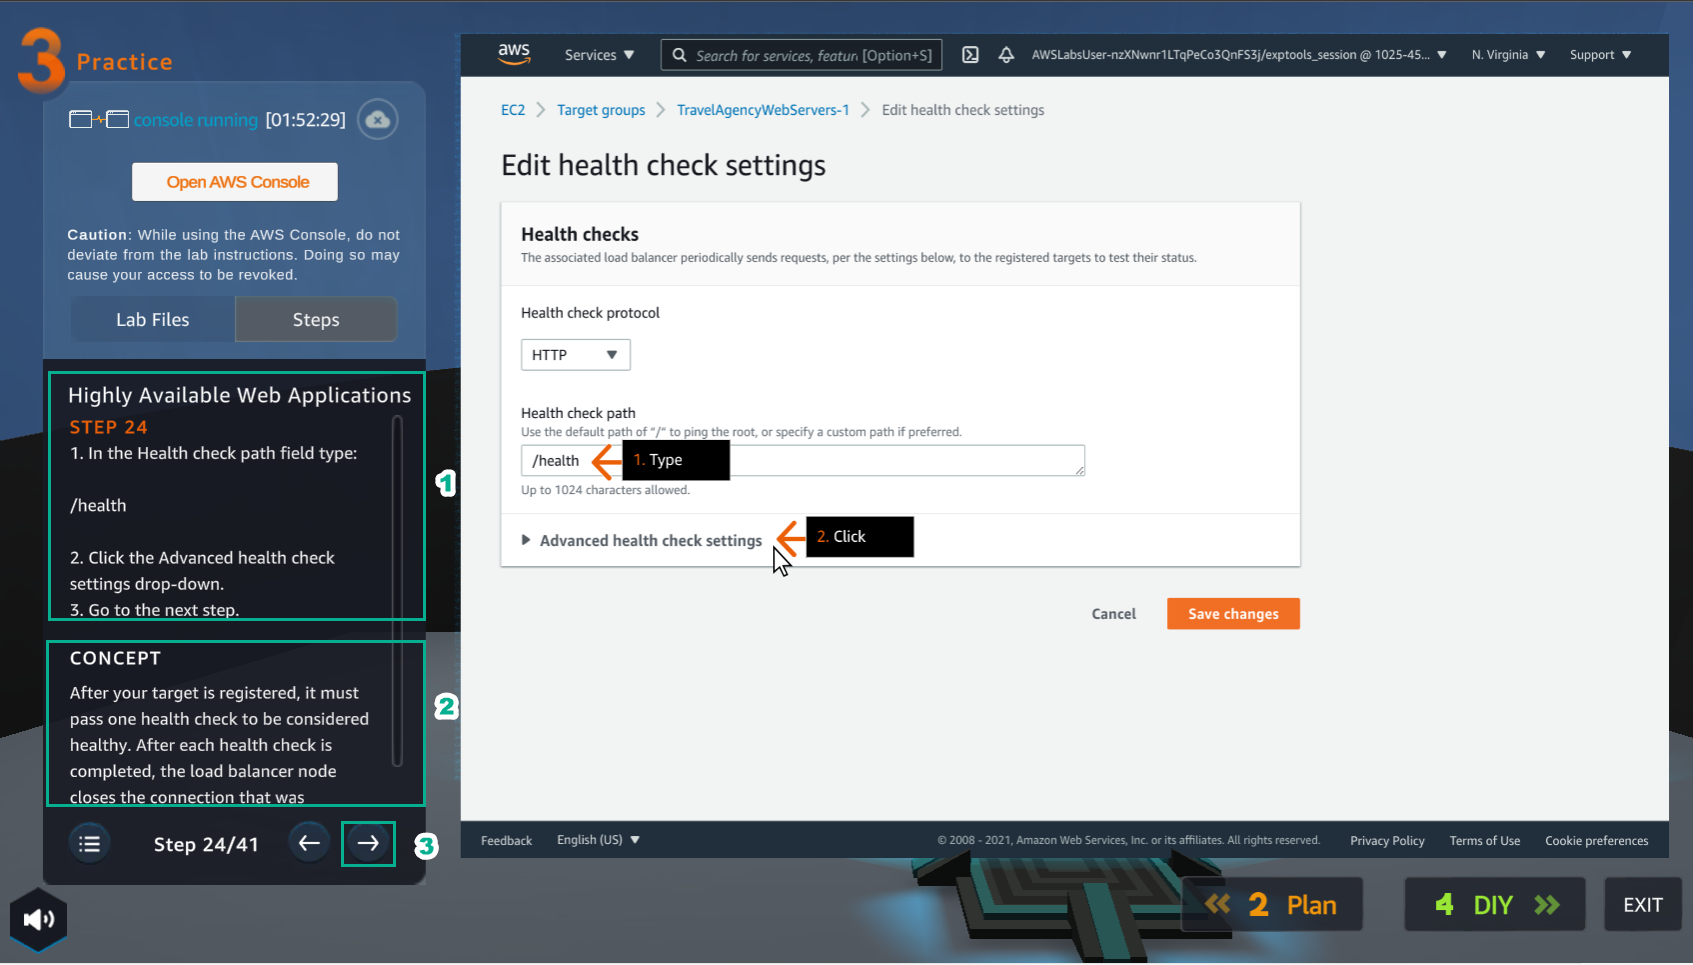
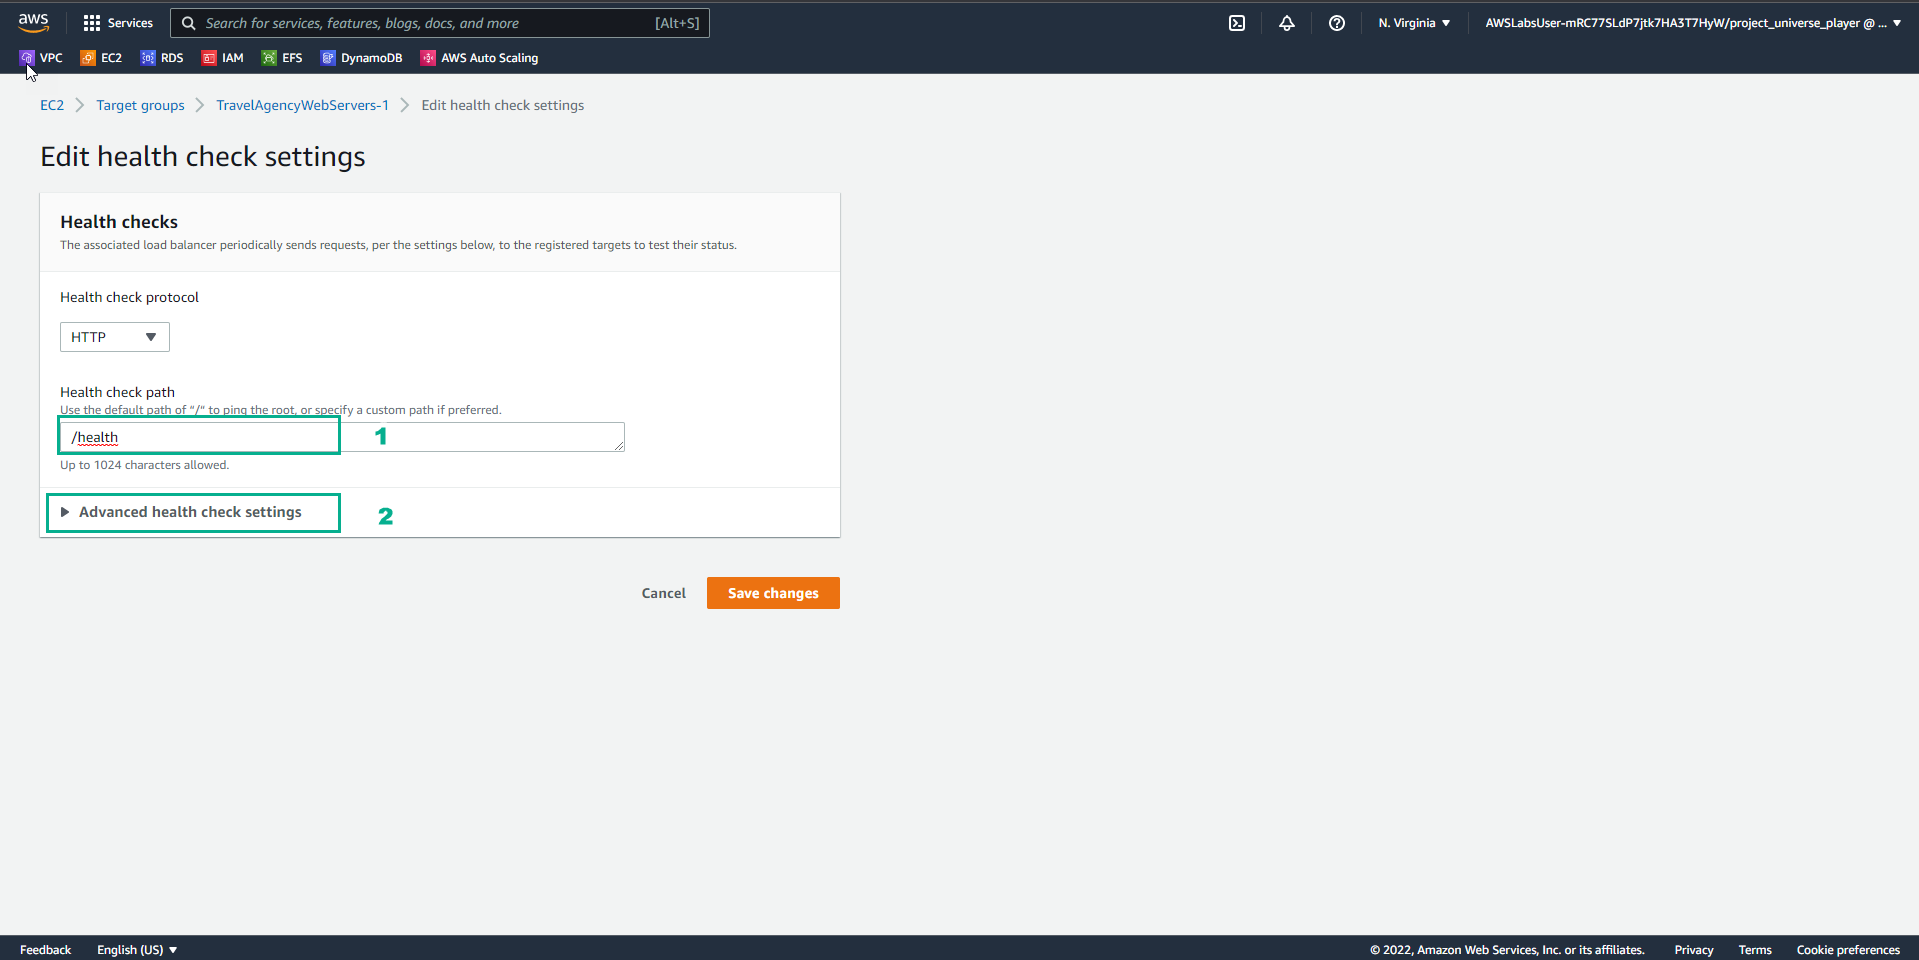
- In the Edit health check settings interface
- In Health check path, enter
/health - Select Advanced health check settings
- In the Practice interface
- Read step 25 of Highly Available Web Applications
- Read CONCEPT
- Select the arrow to the right to see the next steps
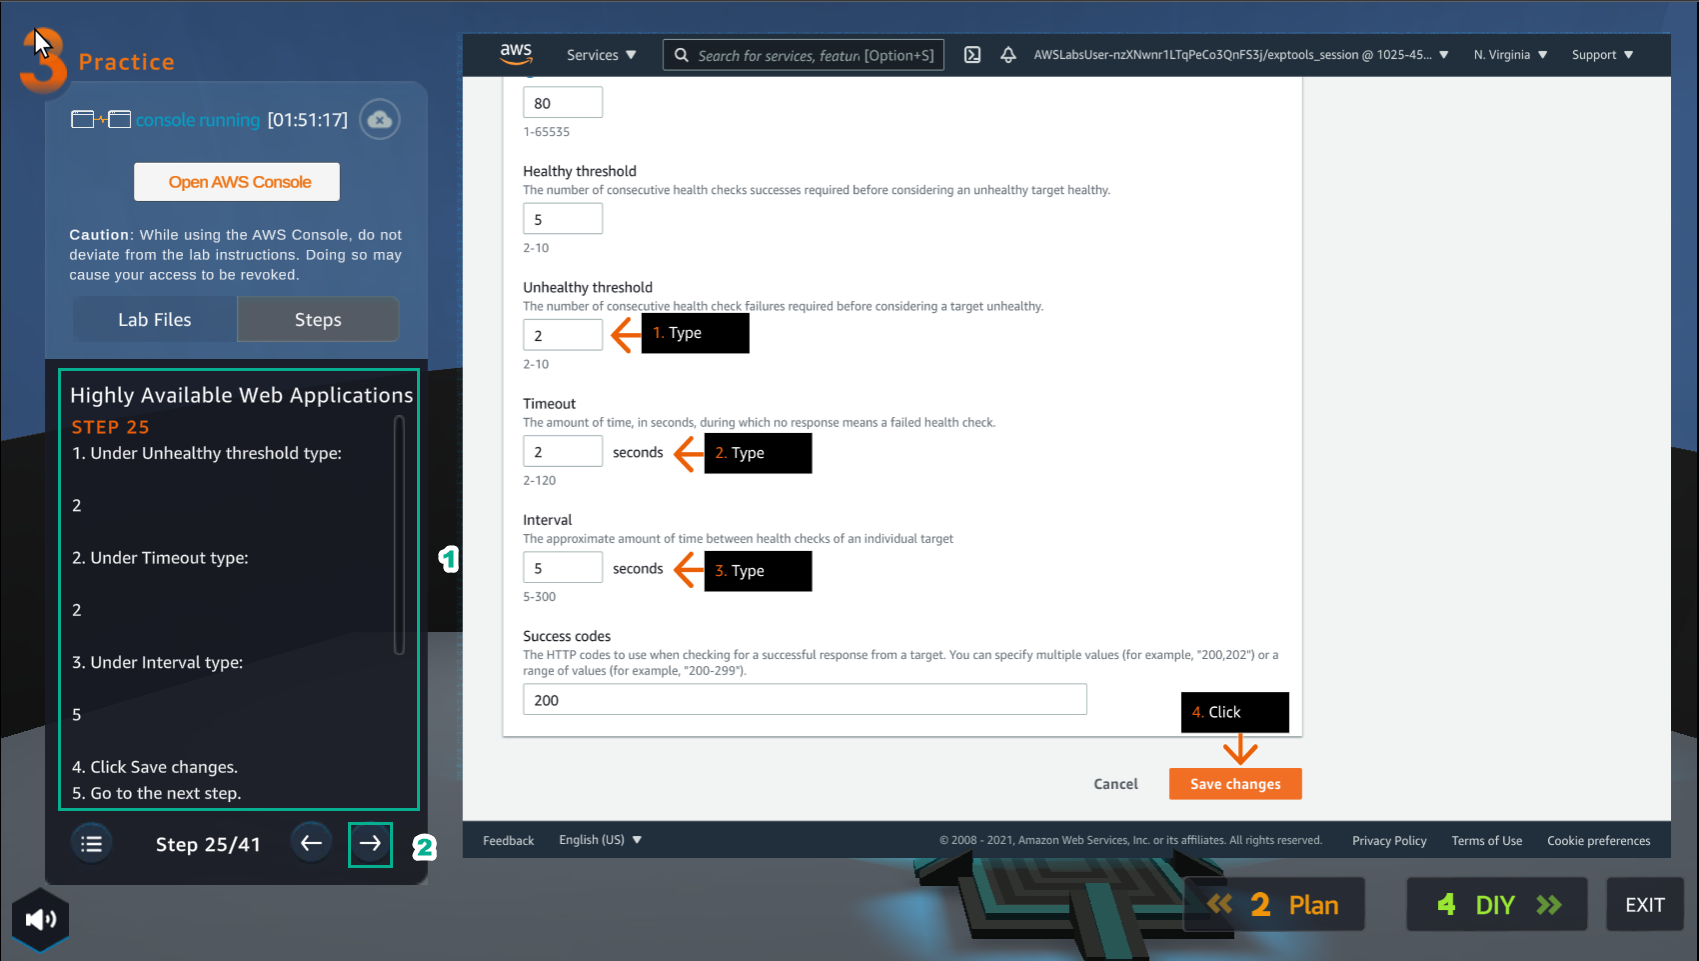
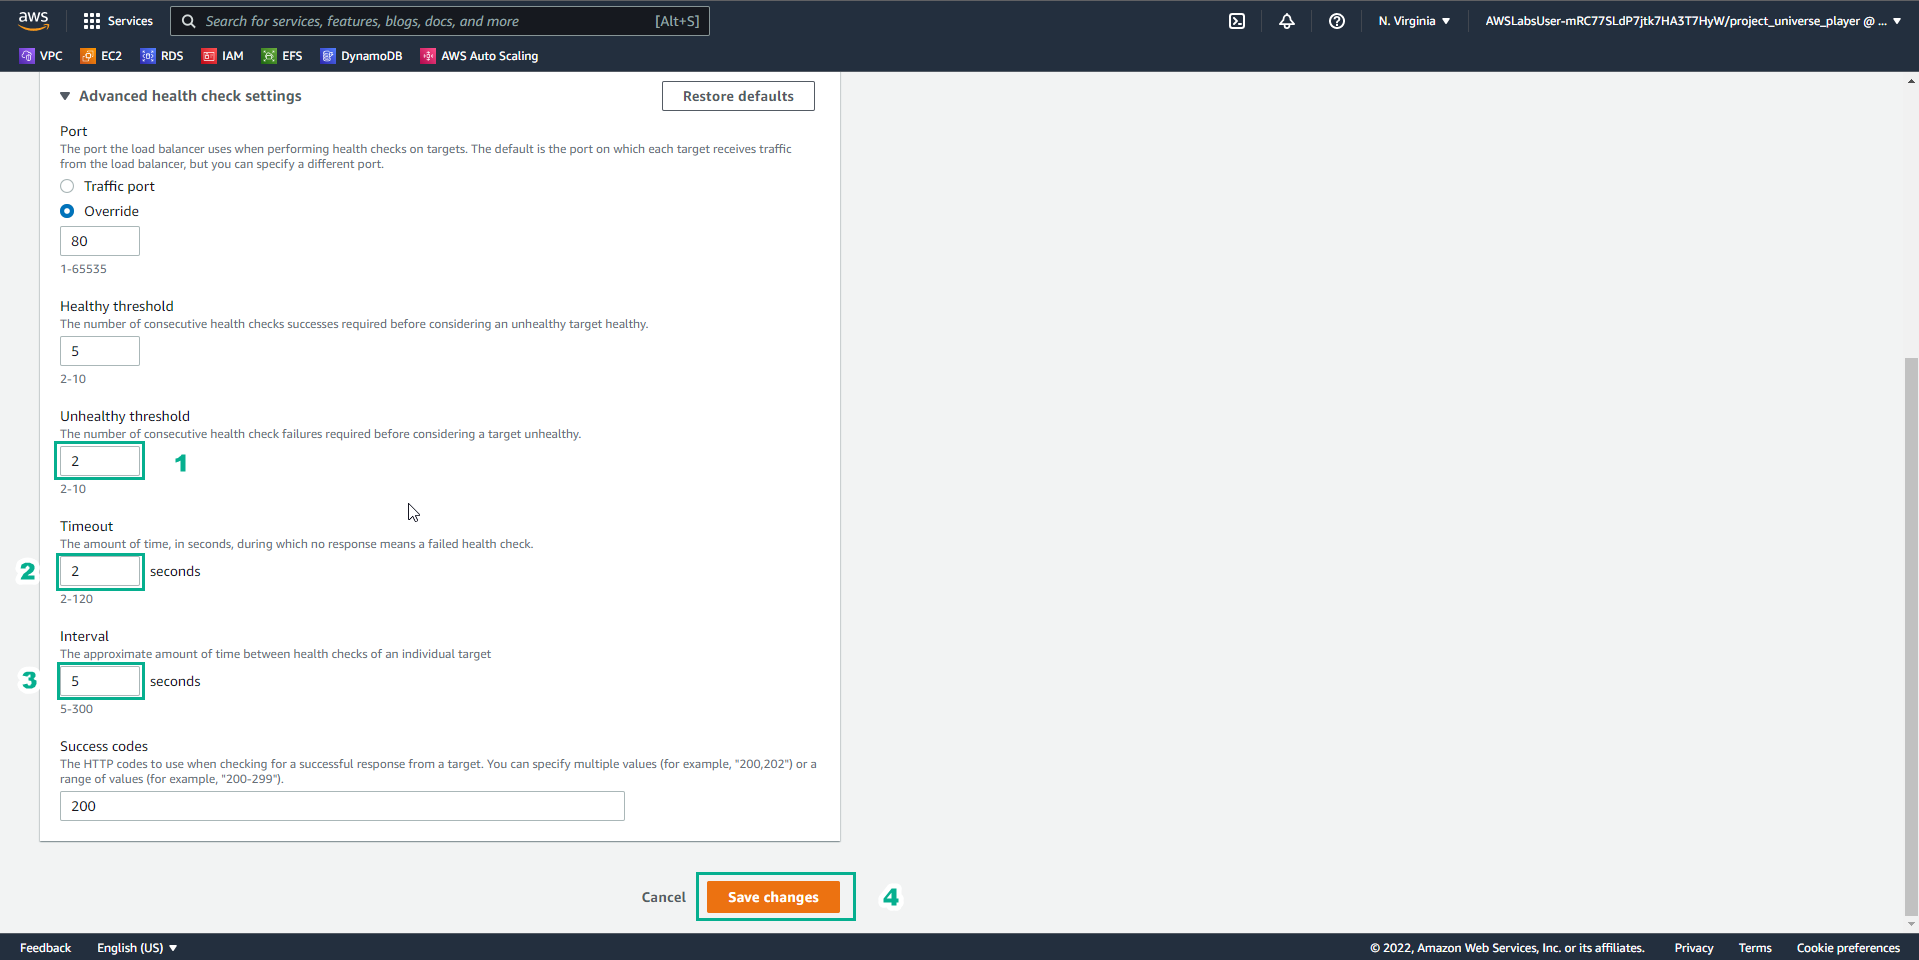
- In the Advanced health check settings interface
- Port, enter
80 - Healthy threshold, enter
5 - Unhealthy threshold, enter
2 - Timeout, enter
2 - Interval, enter
5 - Success code, enter
200 - Select Save changes
- In the Practice interface
- Read step 26 of Highly Available Web Applications
- Read CONCEPT
- Select the arrow to the right to see the next steps
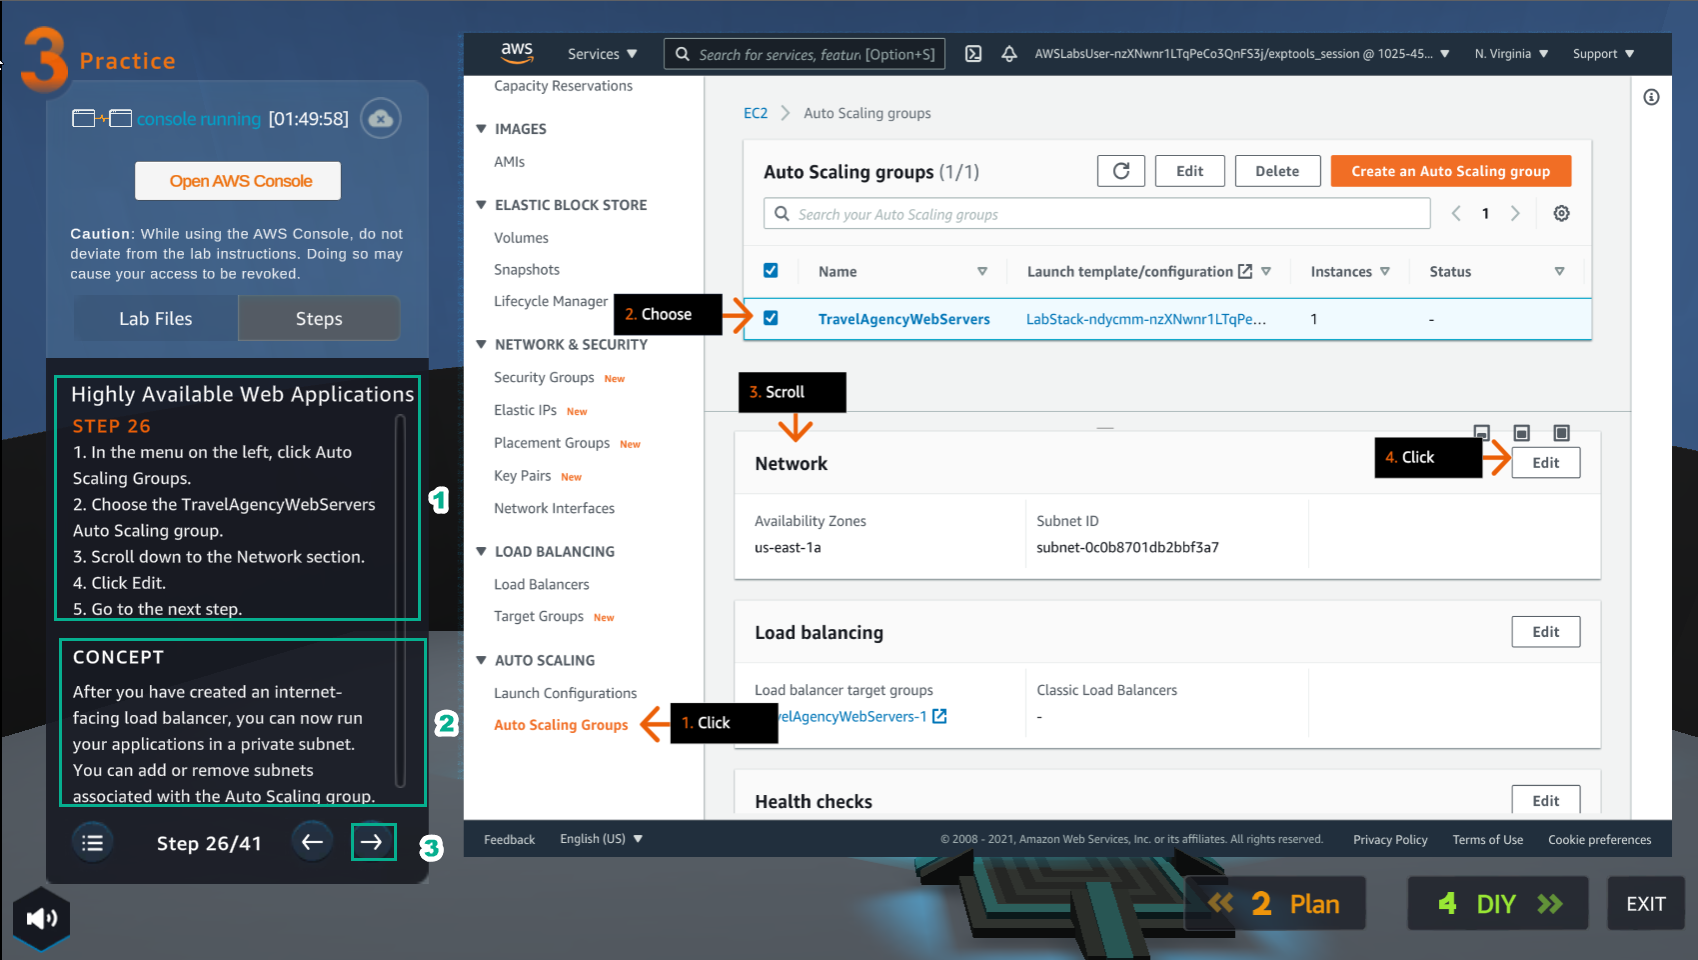
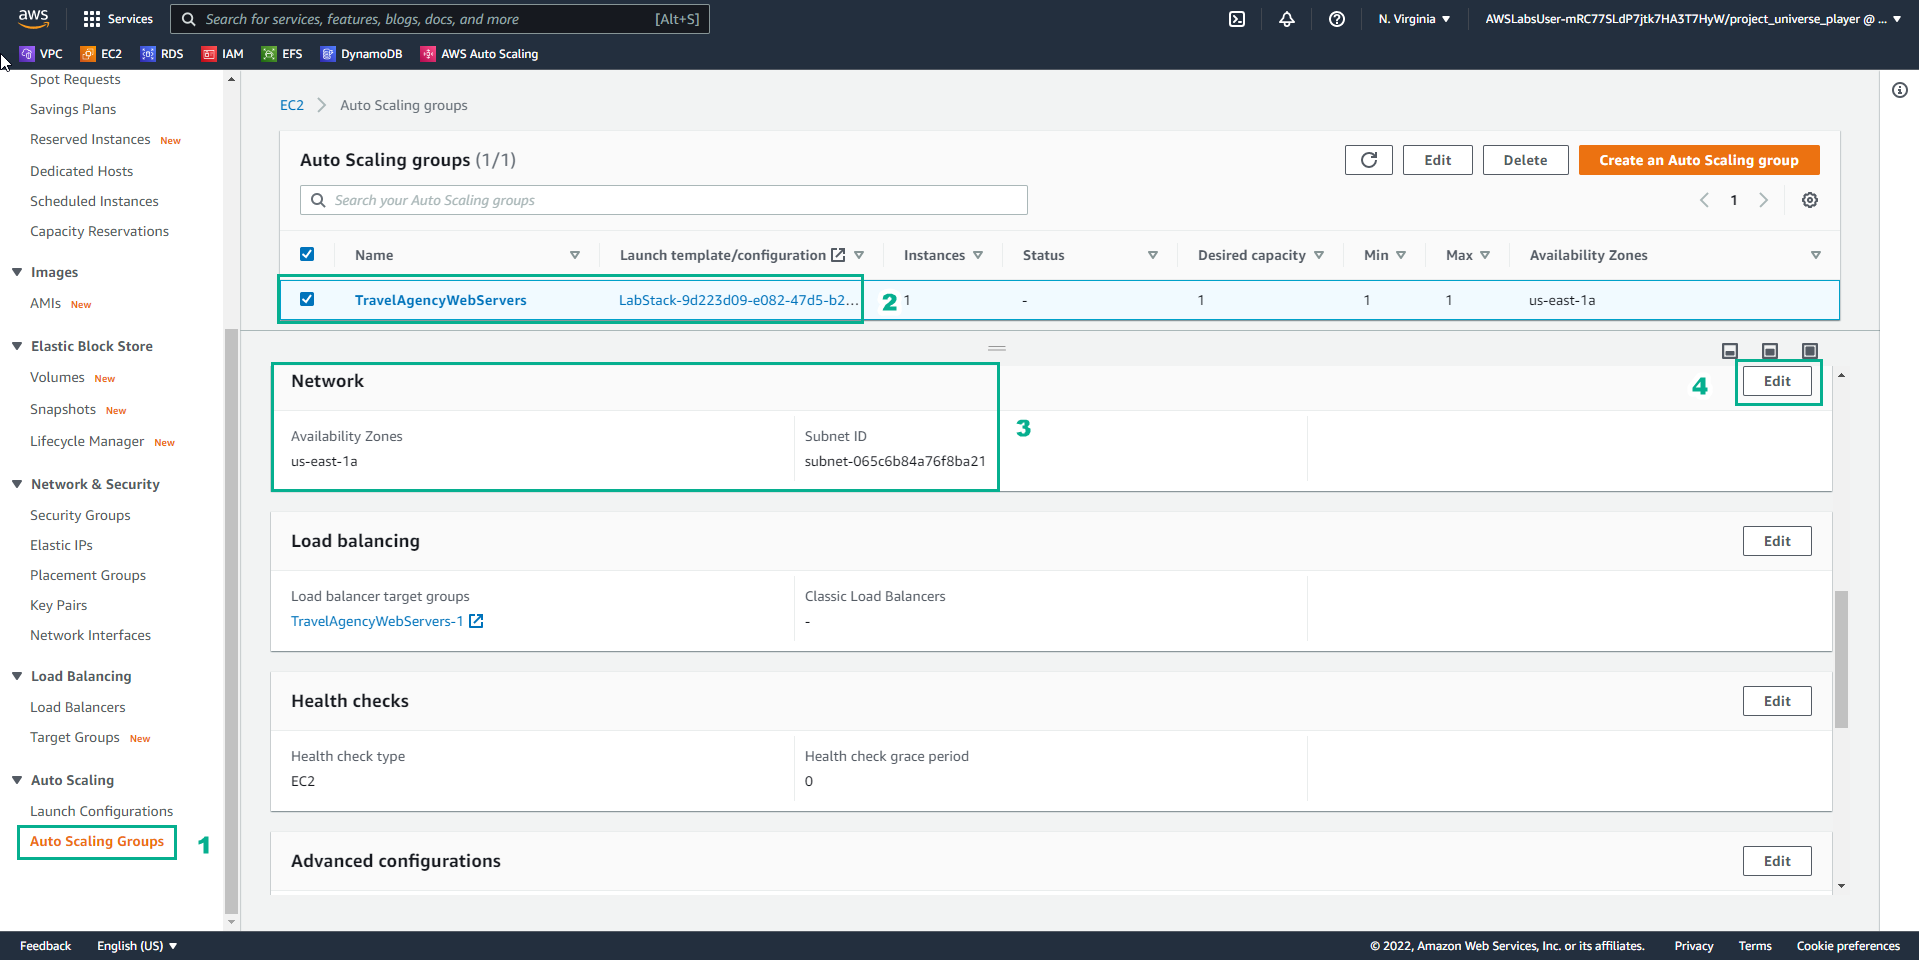
- In the VPC interface
- Select Auto Scaling Groups
- Select TravelAgencyWebServers Auto Scaling group
- In Network, select Edit
- In the Practice interface
- Read step 10 of Highly Available Web Applications
- Read CONCEPT
- Select the arrow to the right to see the next steps
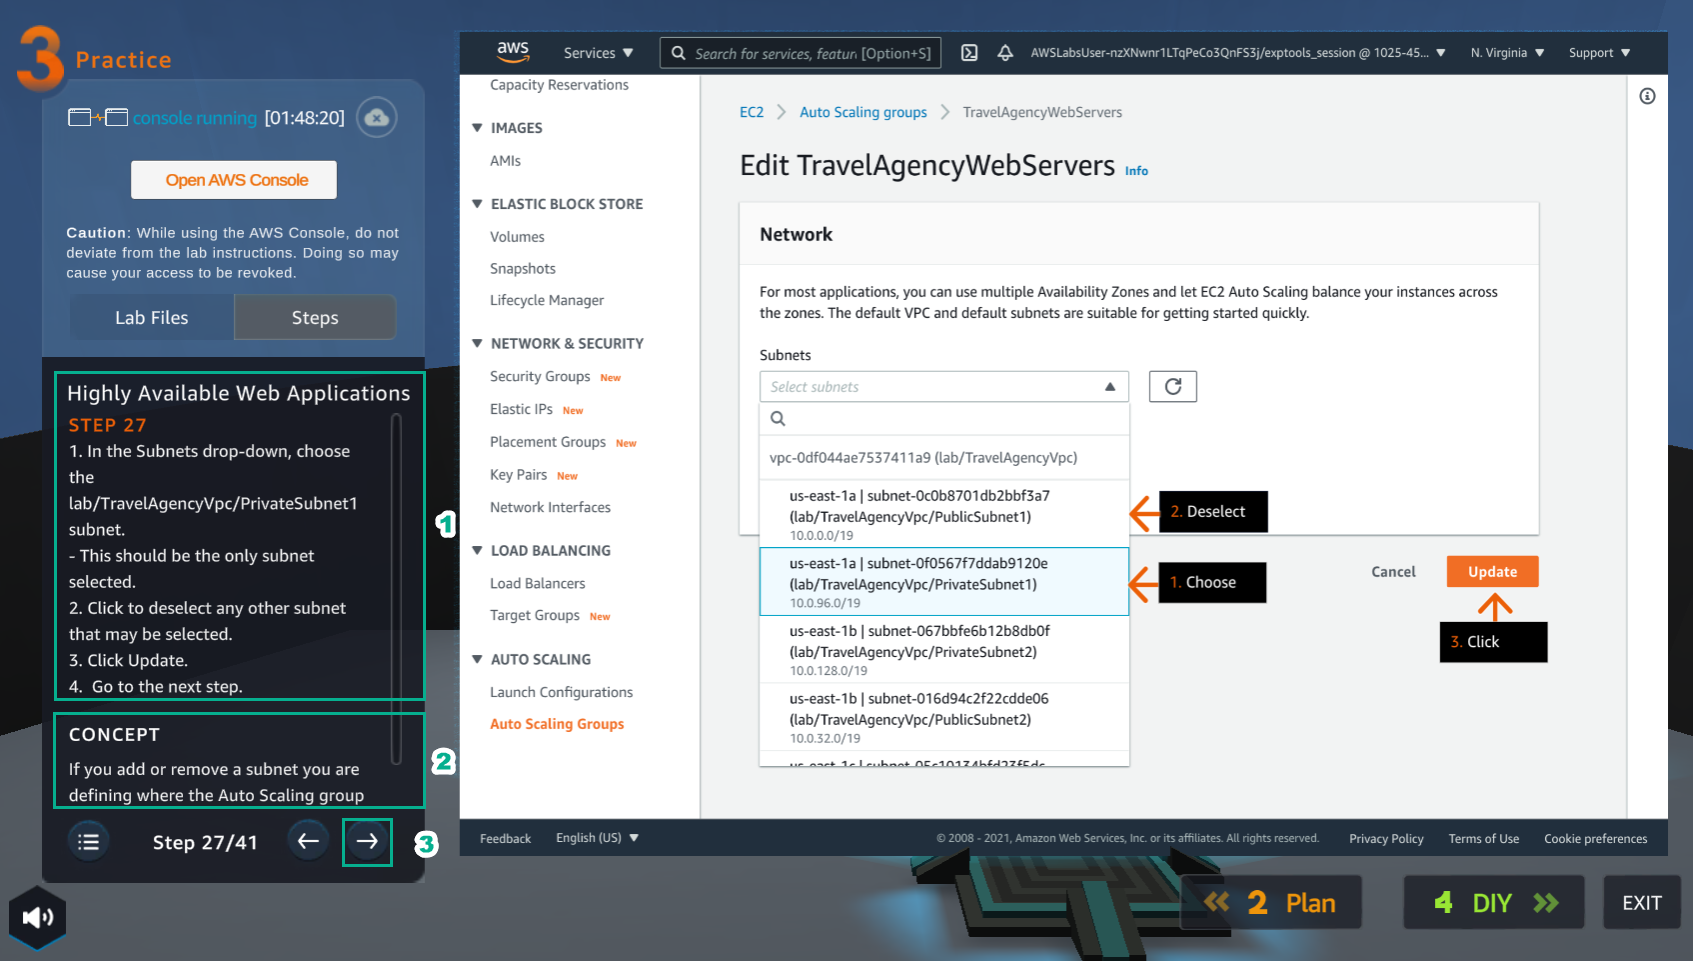
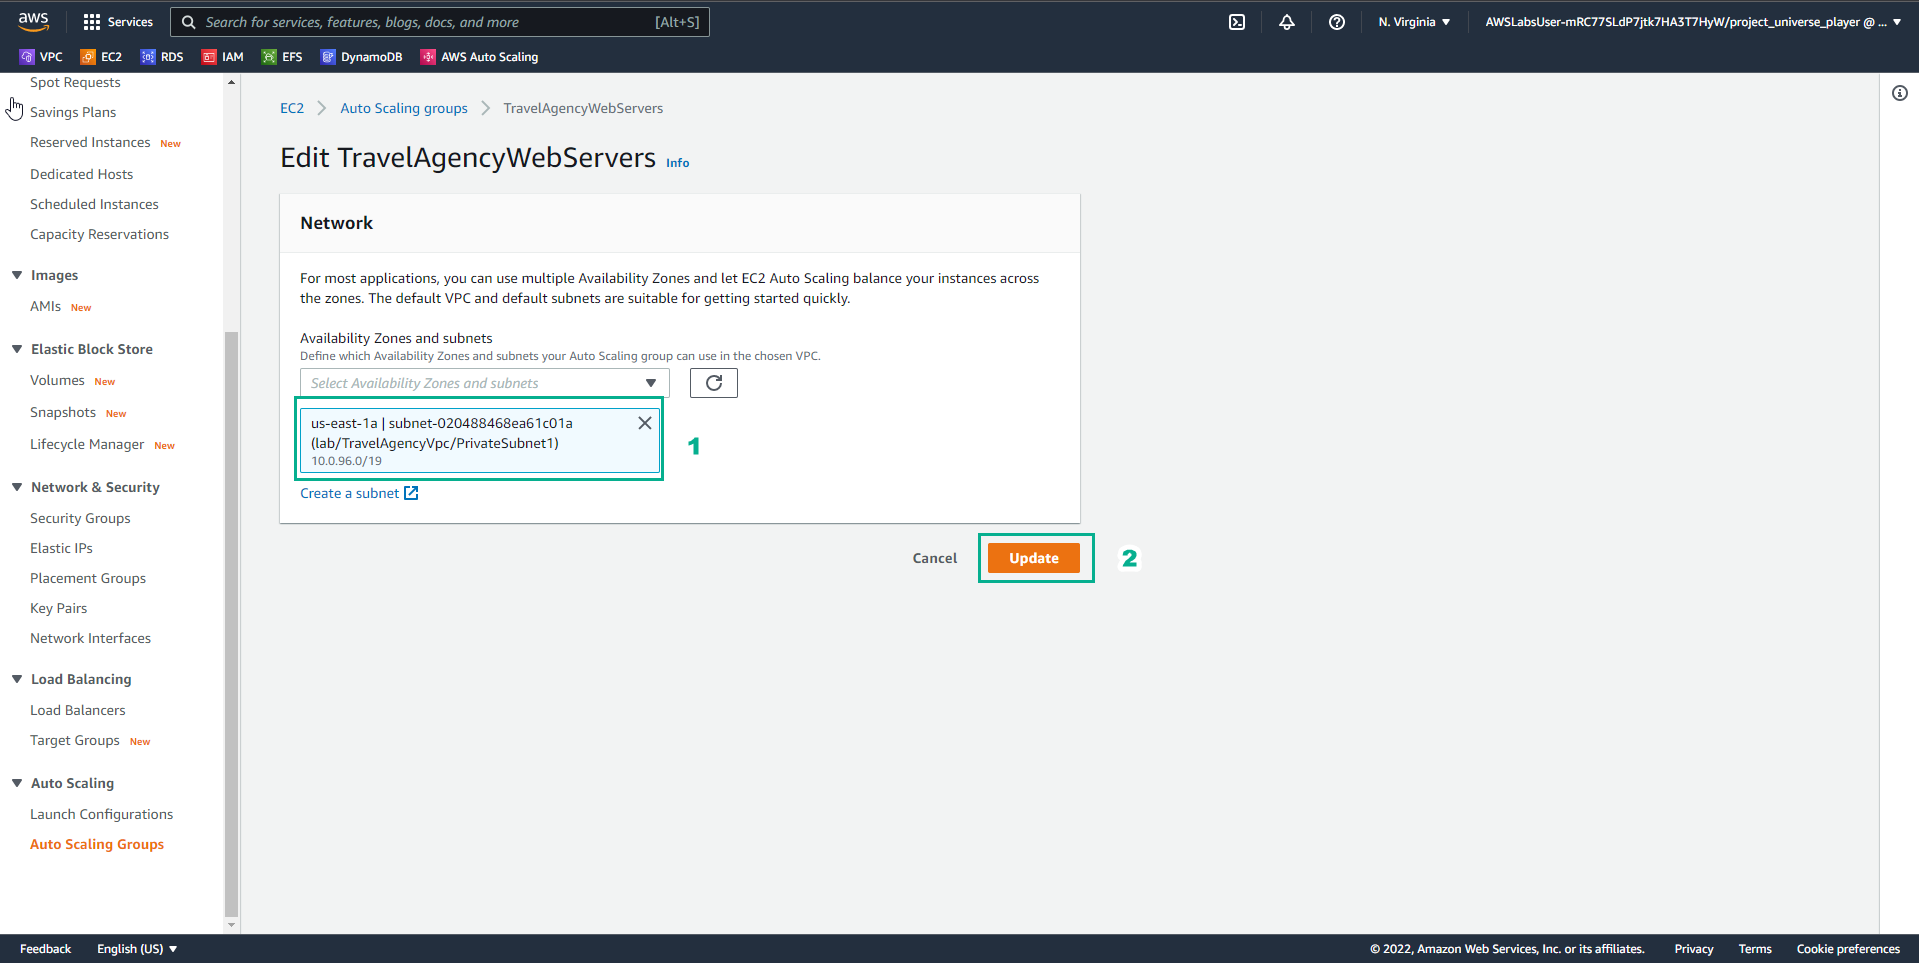
- In the Edit TravelAgencyWebServers interface
- Select lab/TravelAgencyVpc/PrivateSubnet1 subnet
- Uncheck lab/TravelAgencyVpc/PublicSubnet1 subnet
- Select Update
- In the Practice interface
- Read step 28 of Highly Available Web Applications
- Read CONCEPT
- Select the arrow to the right to see the next steps
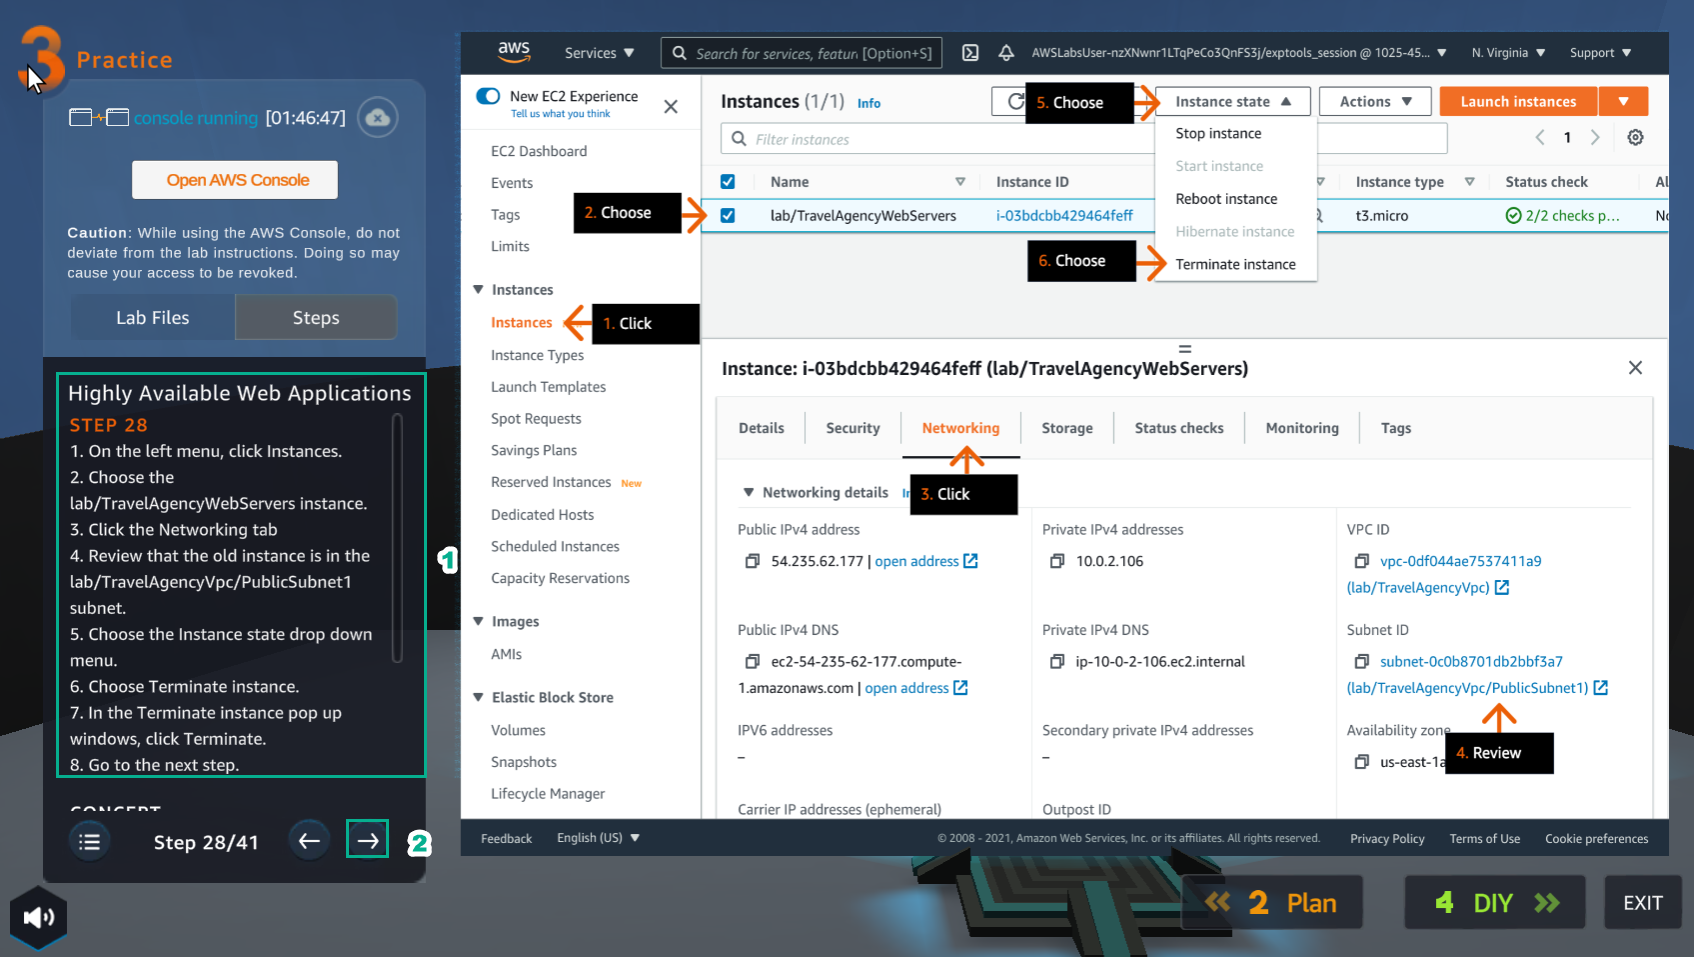
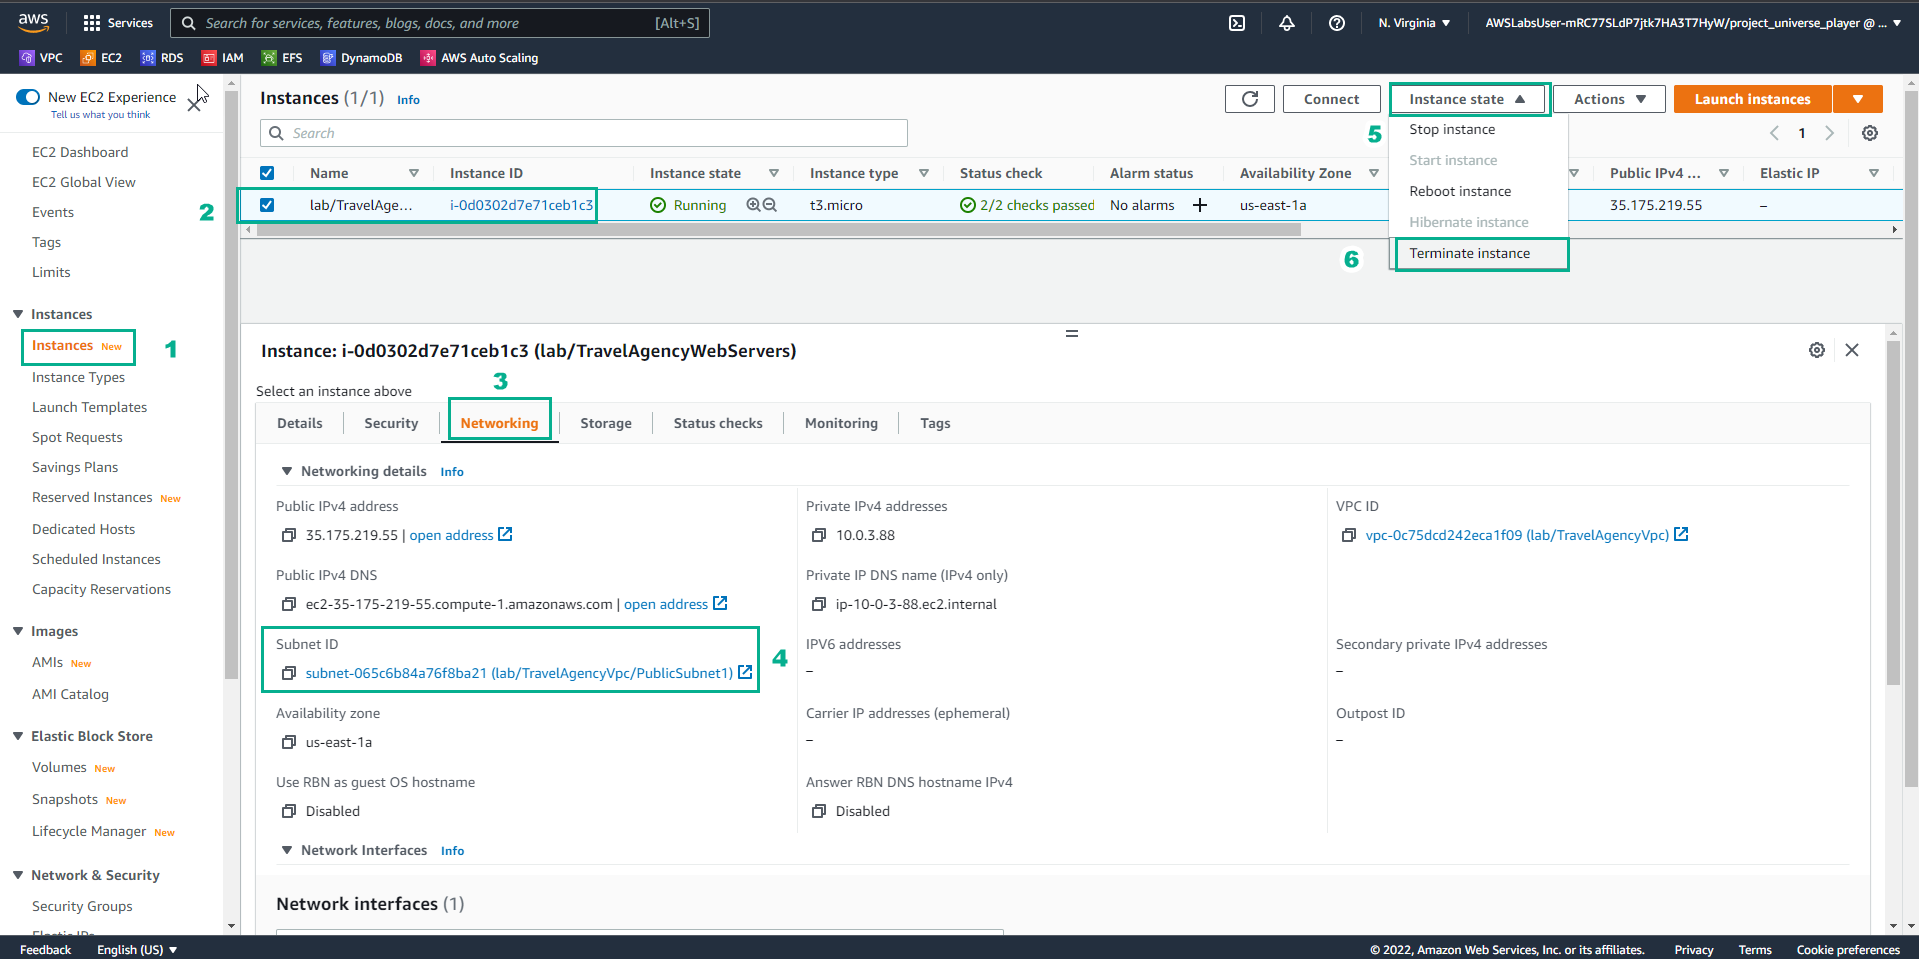
- In the EC2 interface
- Select Instances
- Select lab/TravelAgencyWebServers instance
- Select Networking
- View Subnet ID
- Select instance state
- Select Terminate instance
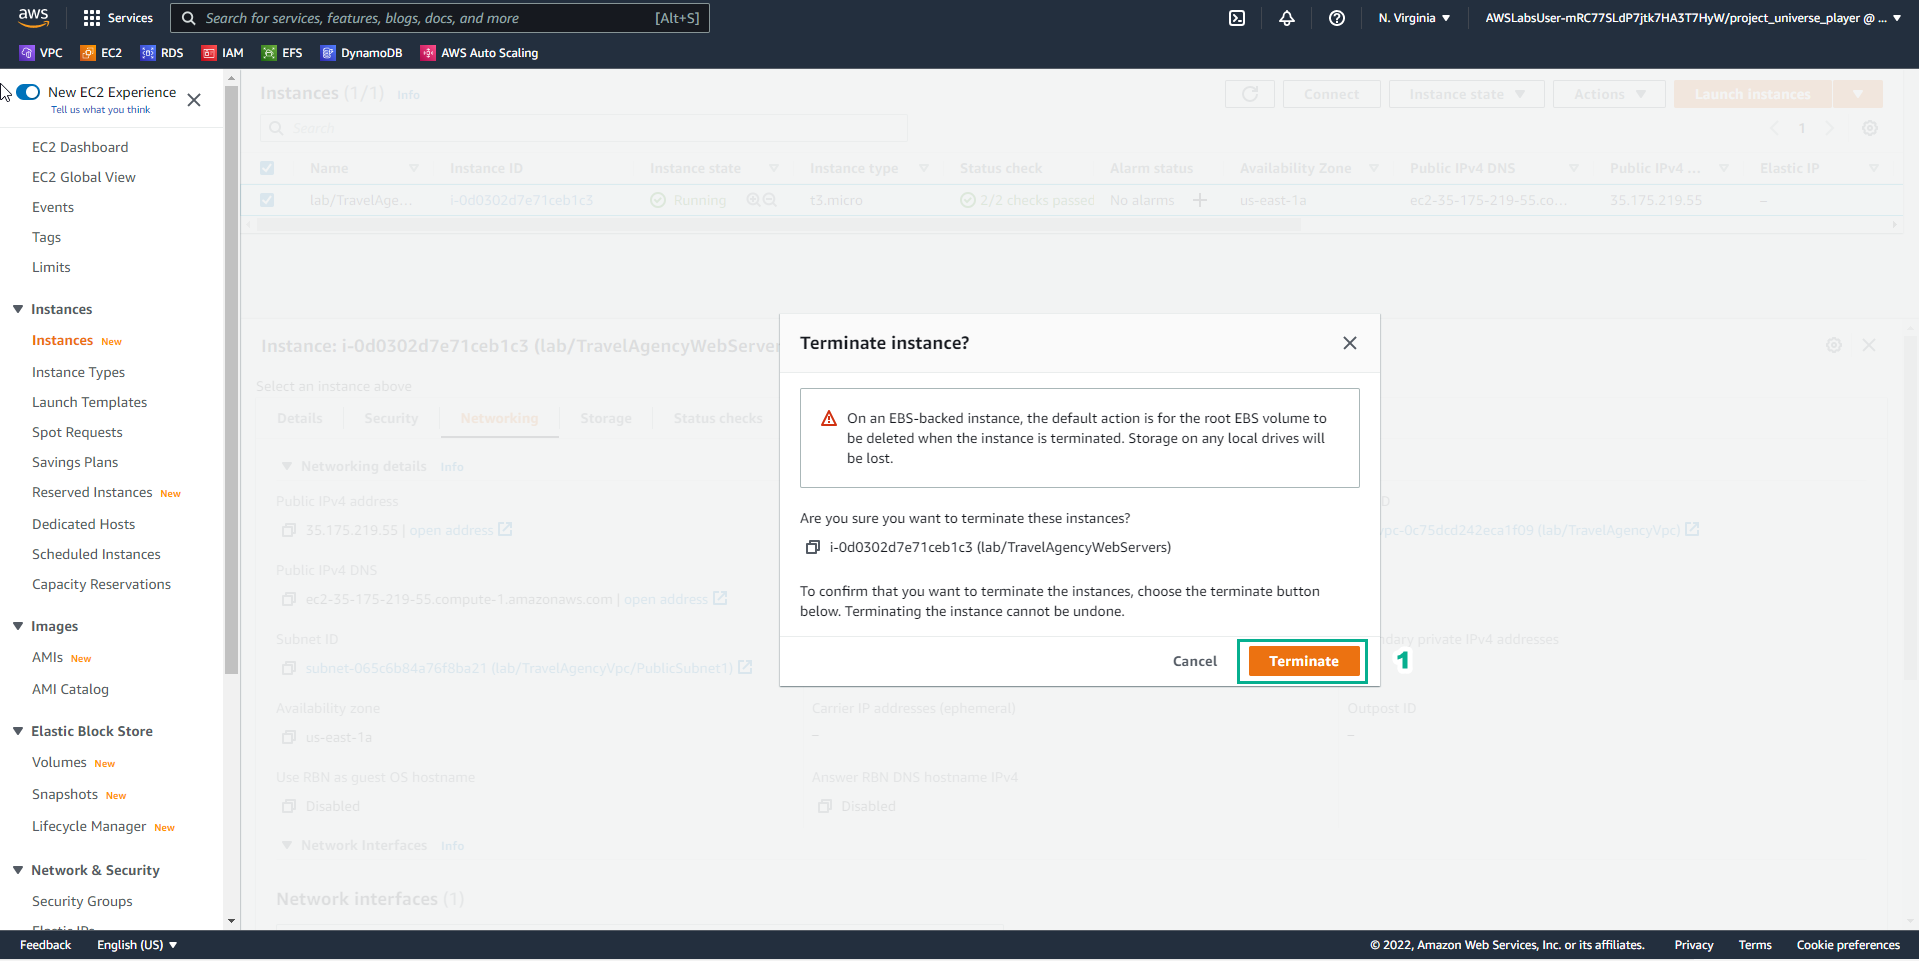
- In the Terminate instance interface
- Select Terminate
- In the Practice interface
- Read step 29 of Highly Available Web Applications
- Read CONCEPT
- Select the arrow to the right to see the next steps
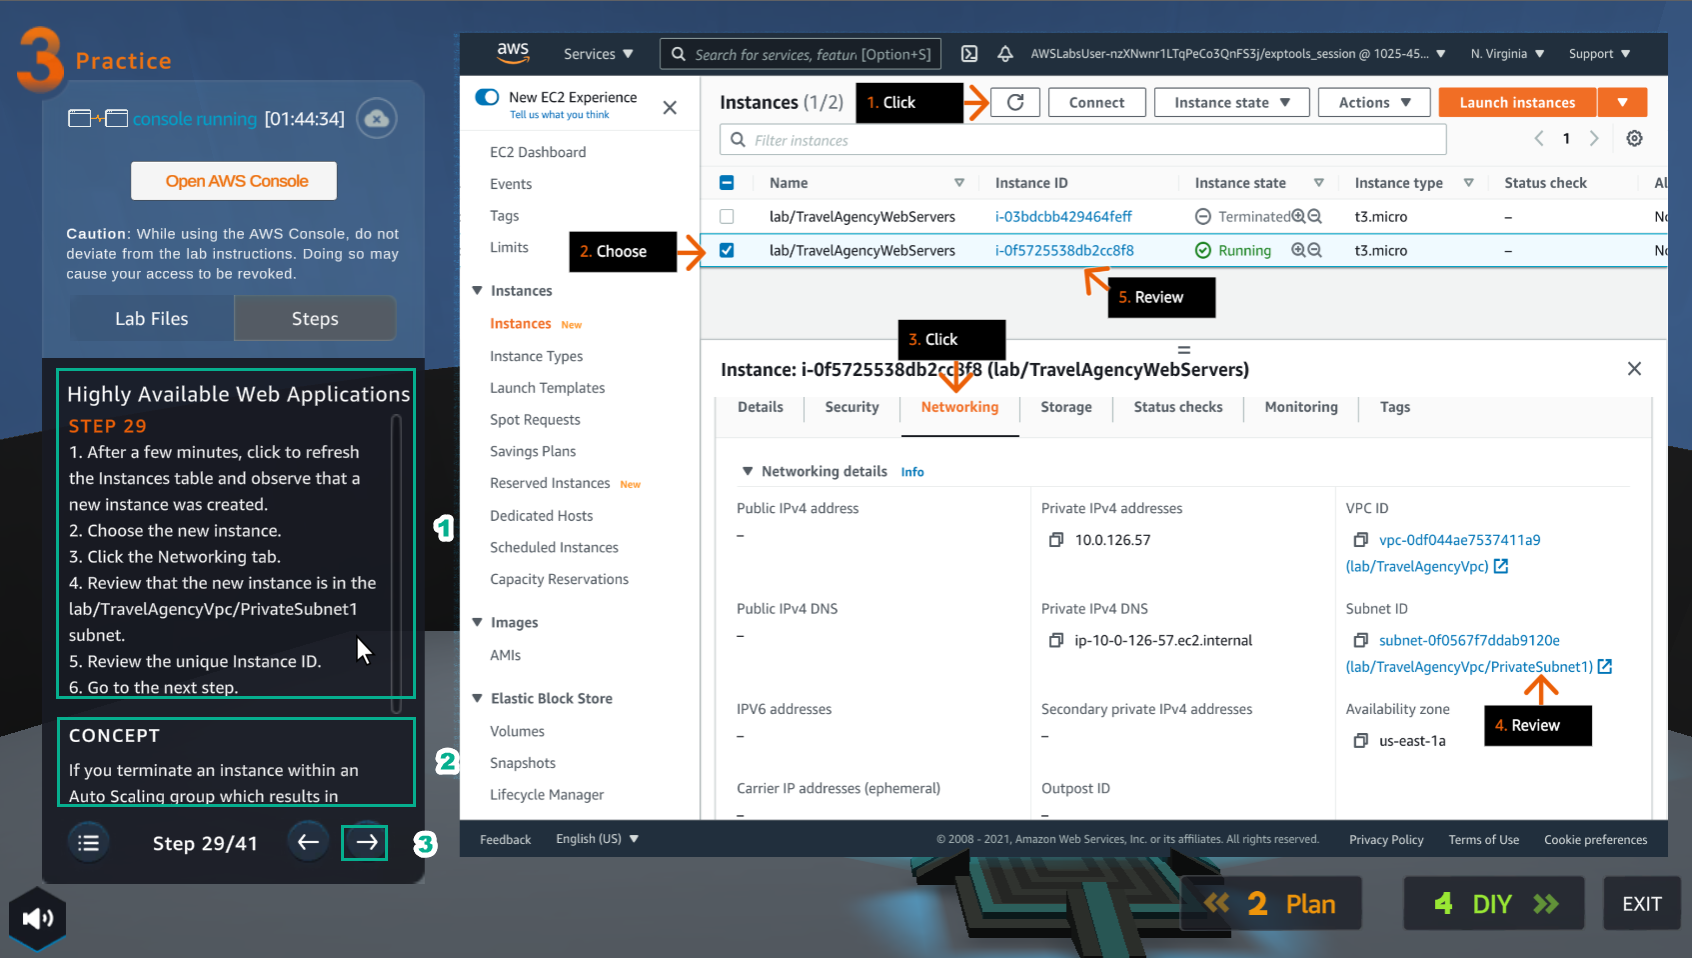
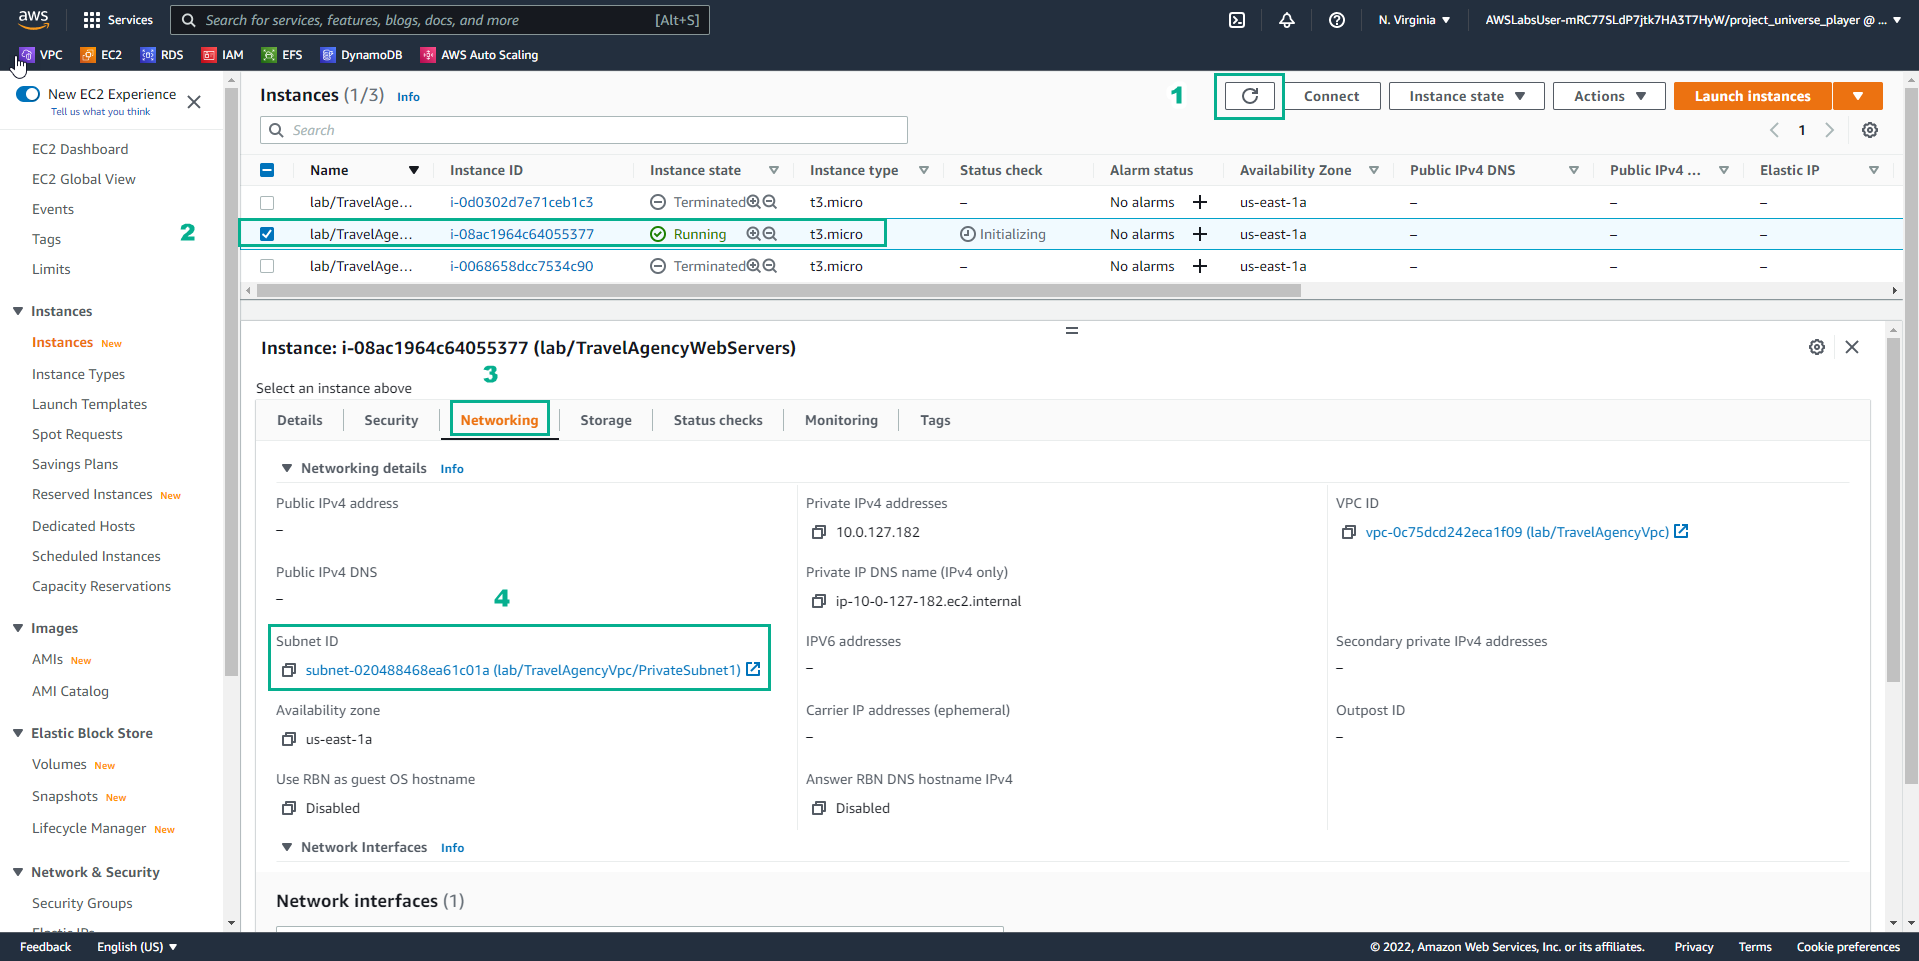
- In the EC2 interface
- Select refresh
- Select new instance
- Select Networking
- View Subnet ID
- In the Practice interface
- Read step 30 of Highly Available Web Applications
- Read CONCEPT
- Select the arrow to the right to see the next steps
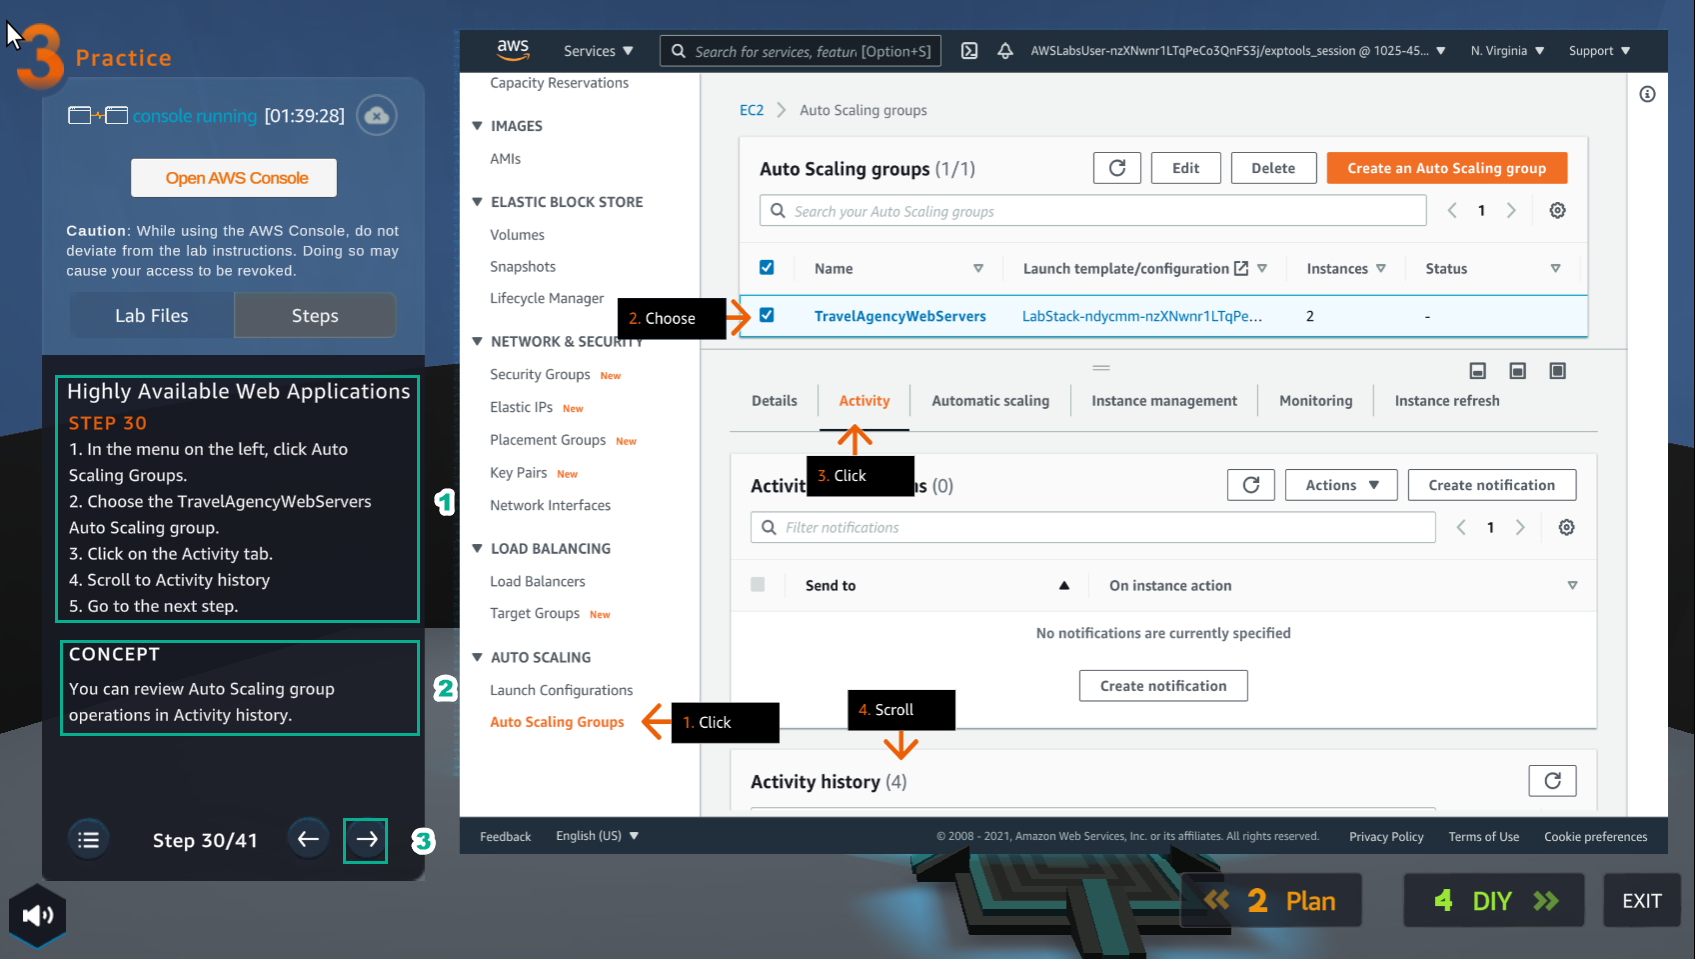
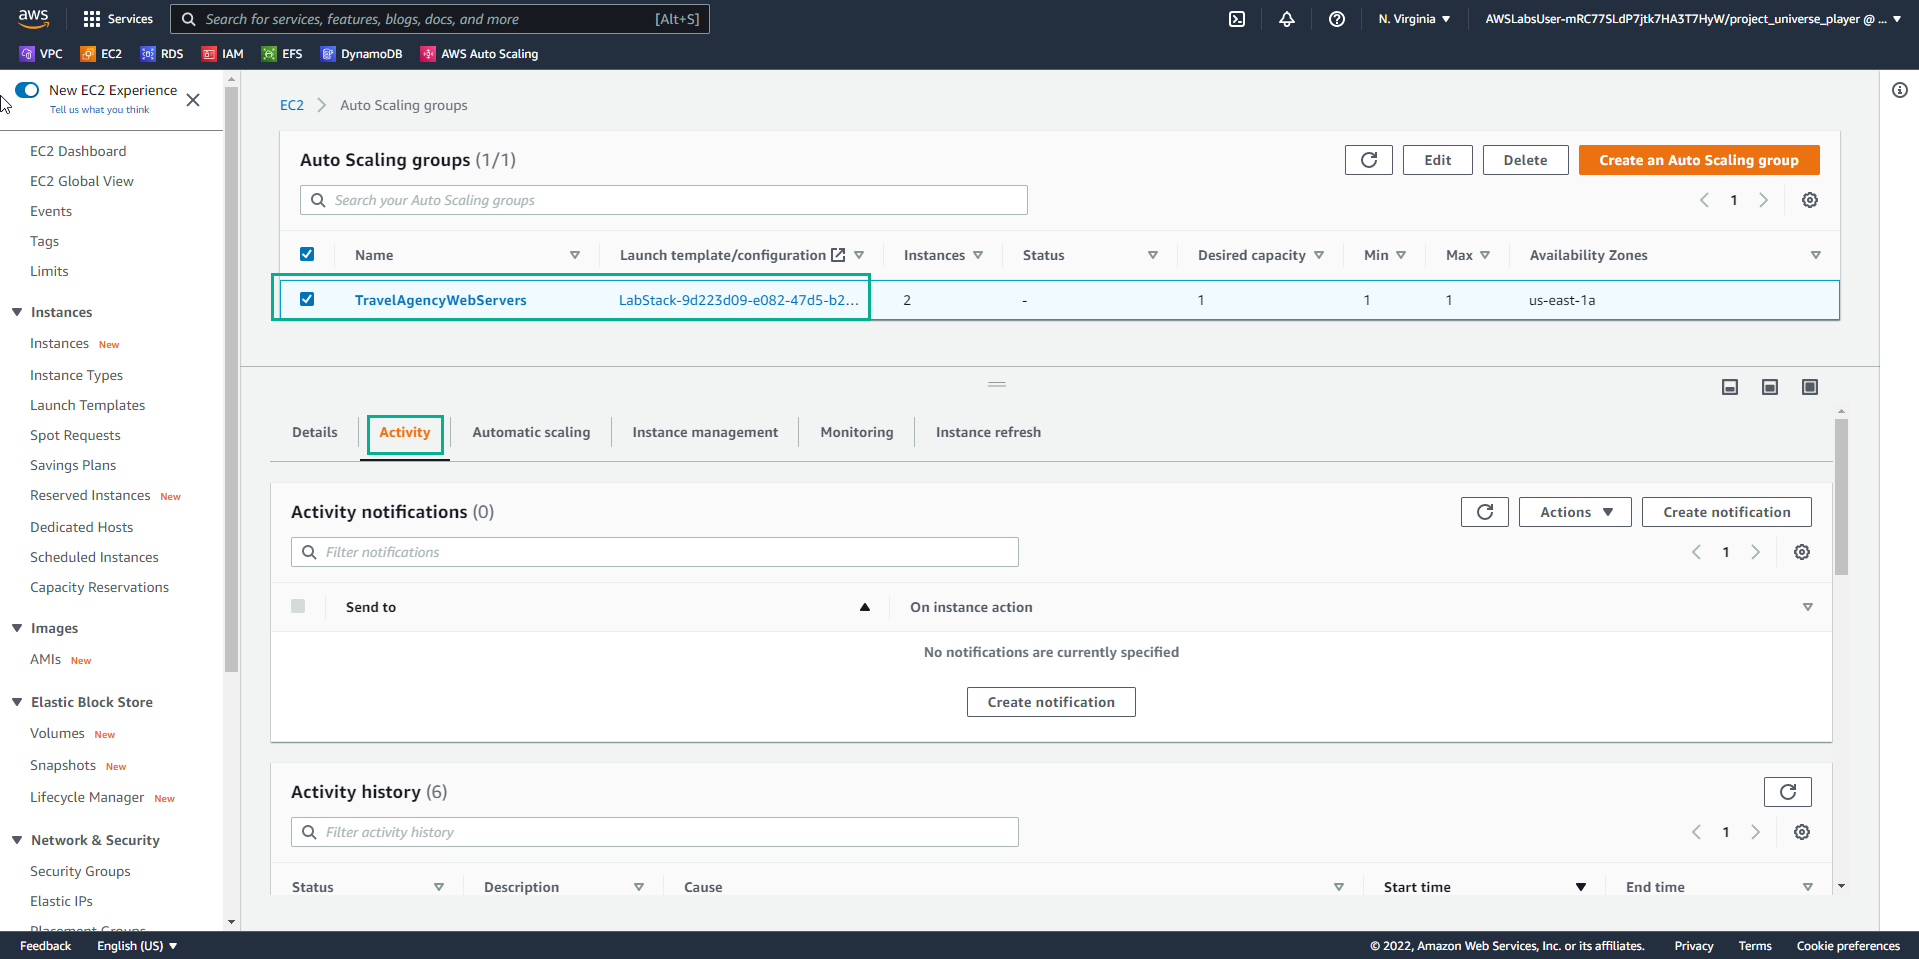
- In the VPC interface
- Select Auto Scaling Groups
- Select TravelAgencyWebServers Auto Scaling group
- Select Activity
- View Activity history
- In the Practice interface
- Read step 31 of Highly Available Web Applications
- Read CONCEPT
- Select the arrow to the right to see the next steps
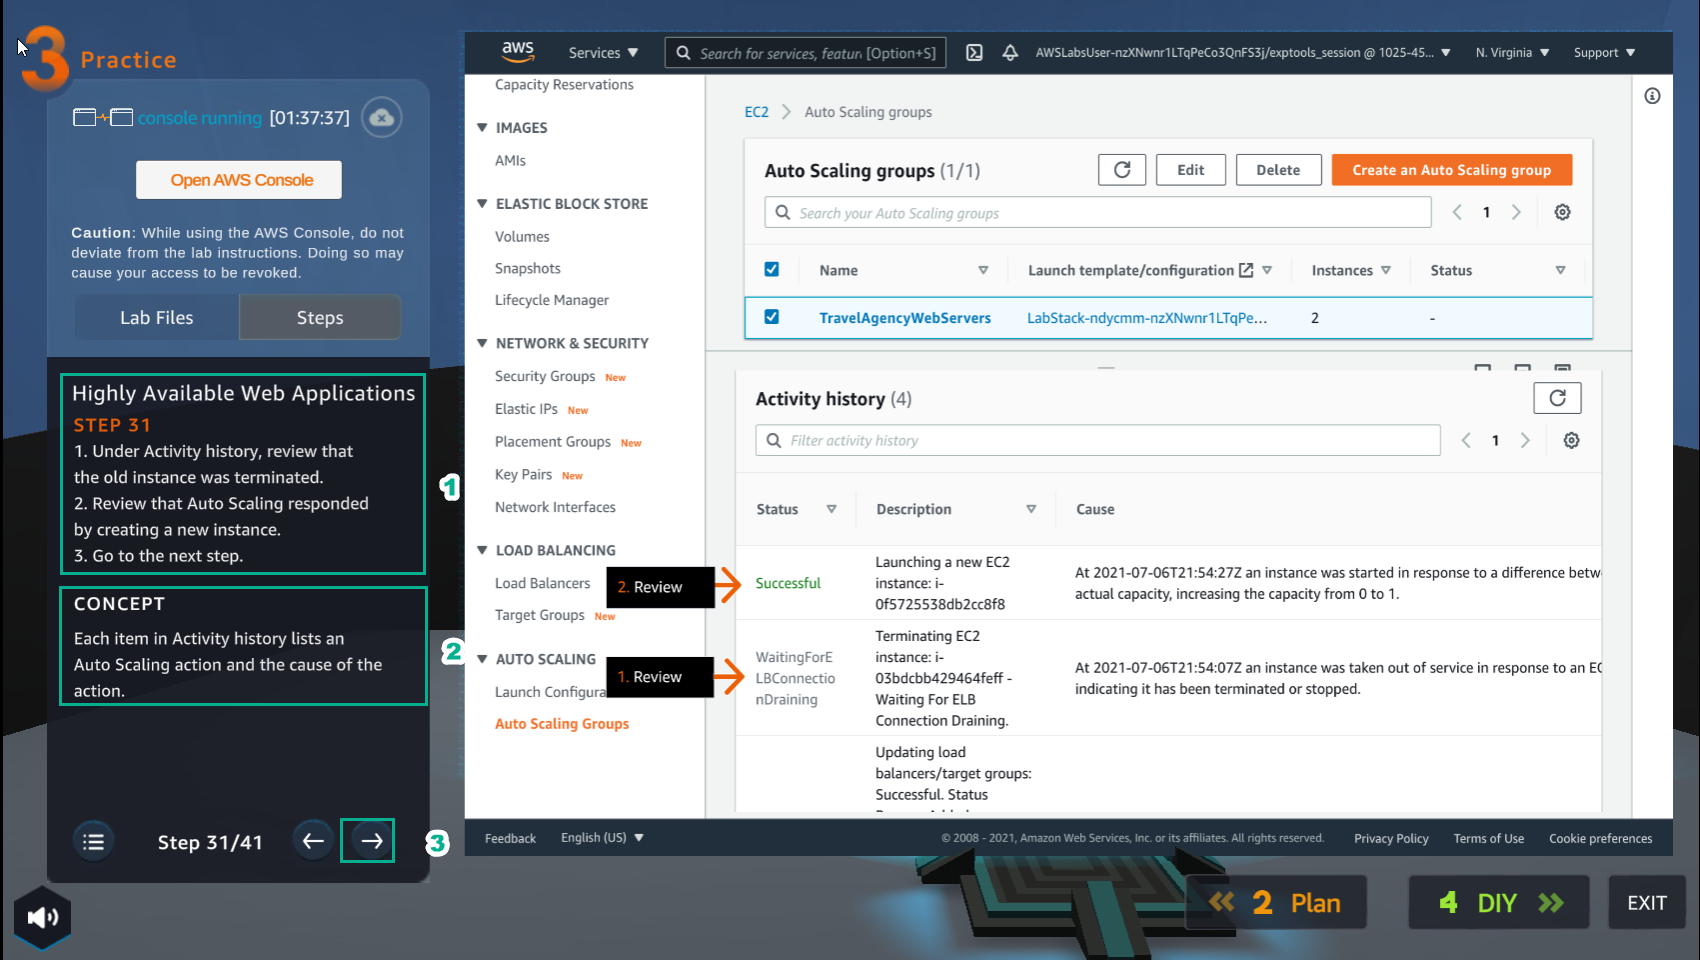
- In the Activity history interface
- View Status
- View Description

- In the Practice interface
- Read step 32 of Highly Available Web Applications
- Read CONCEPT
- Select the arrow to the right to see the next steps
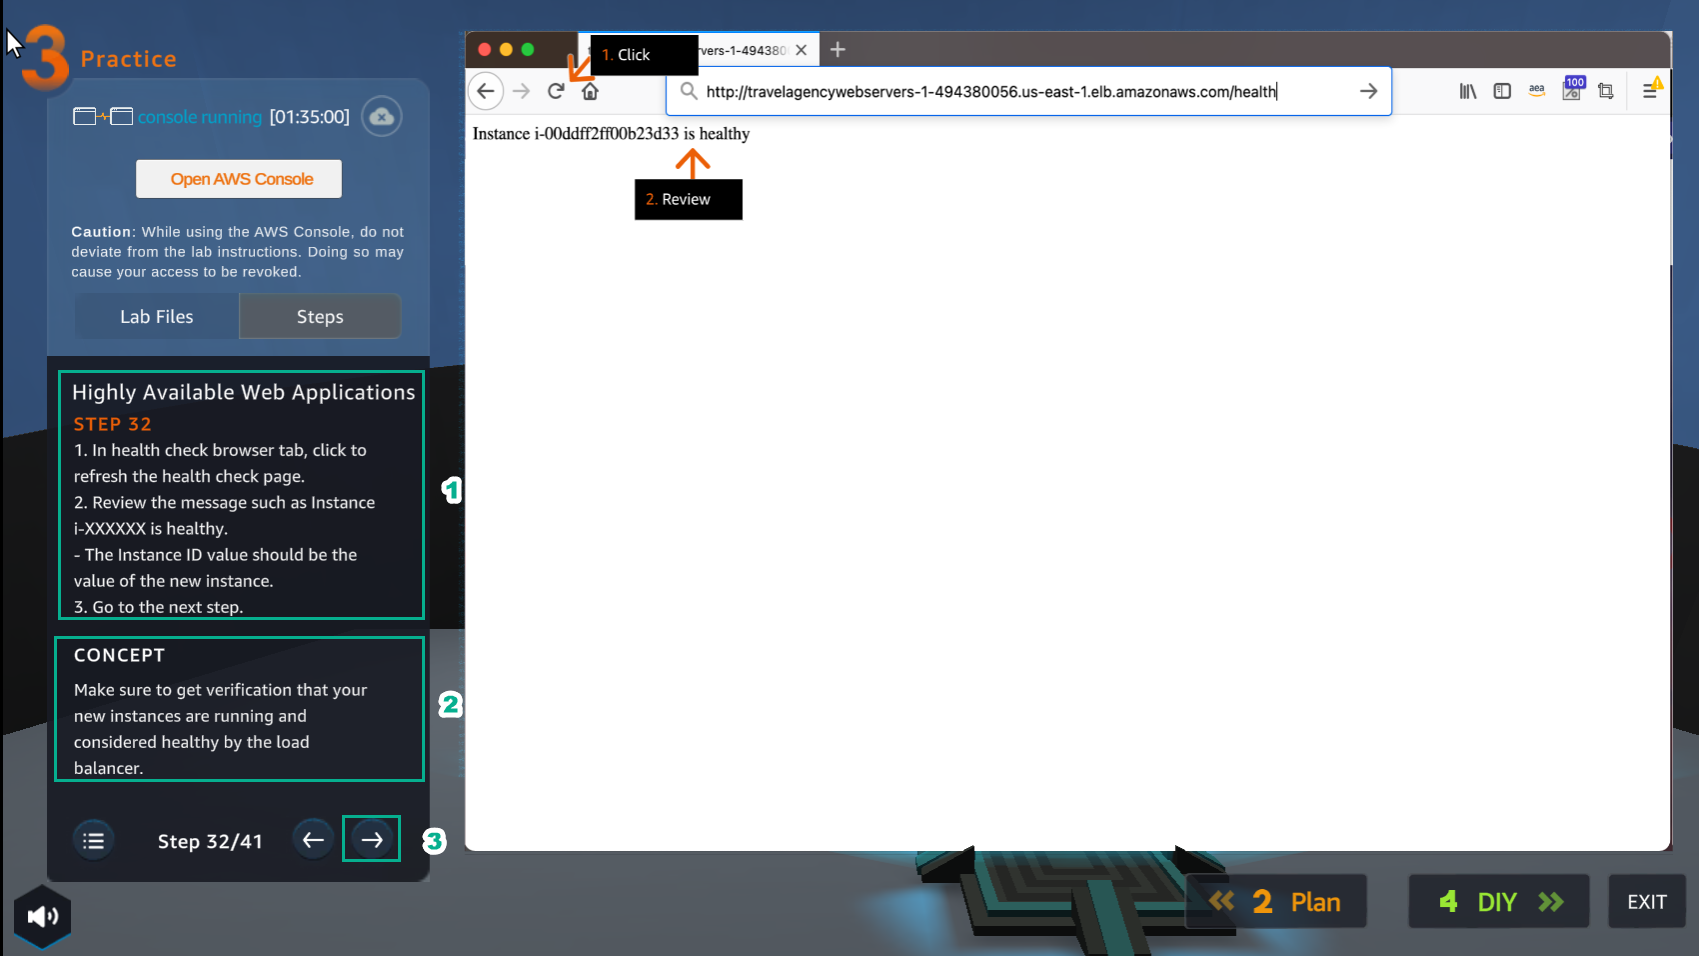
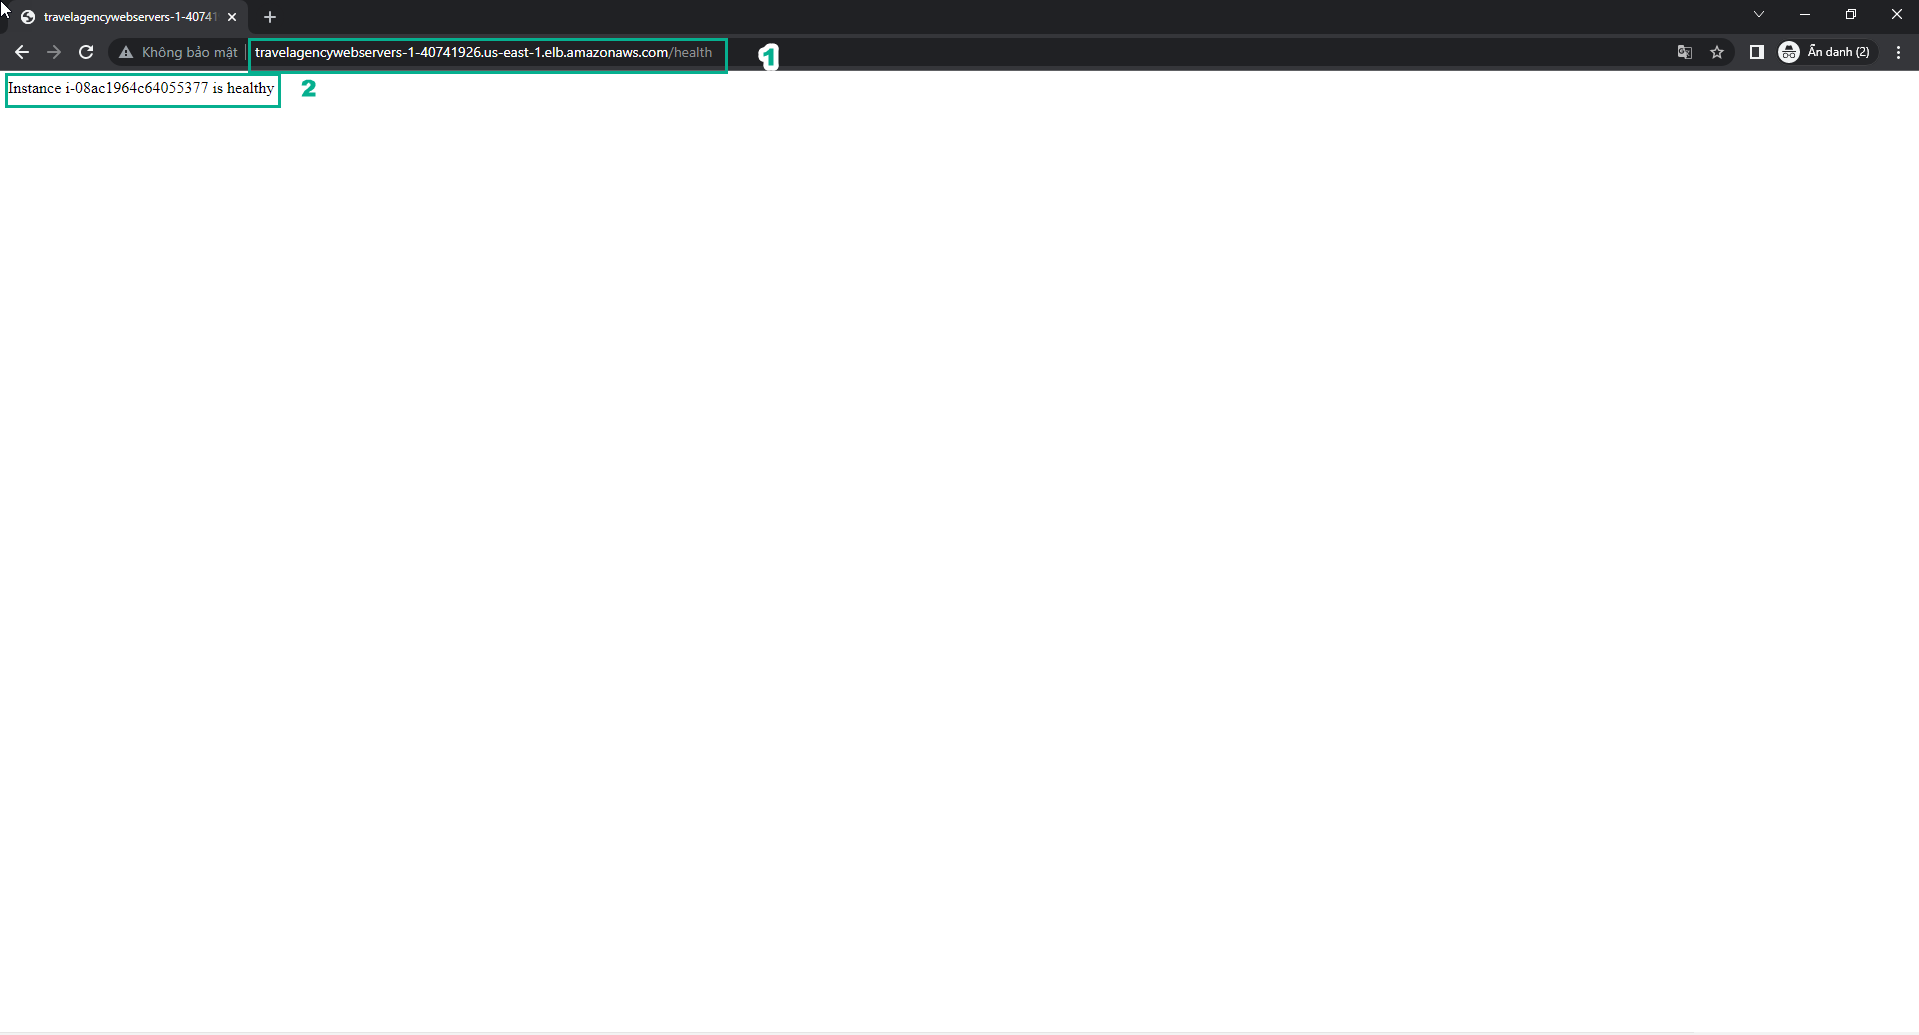
- In the browser health check
- Select refesh
- View the results
- In the Practice* interface
- Read step 33 of Highly Available Web Applications
- Read CONCEPT
- Select the arrow to the right to see the next steps
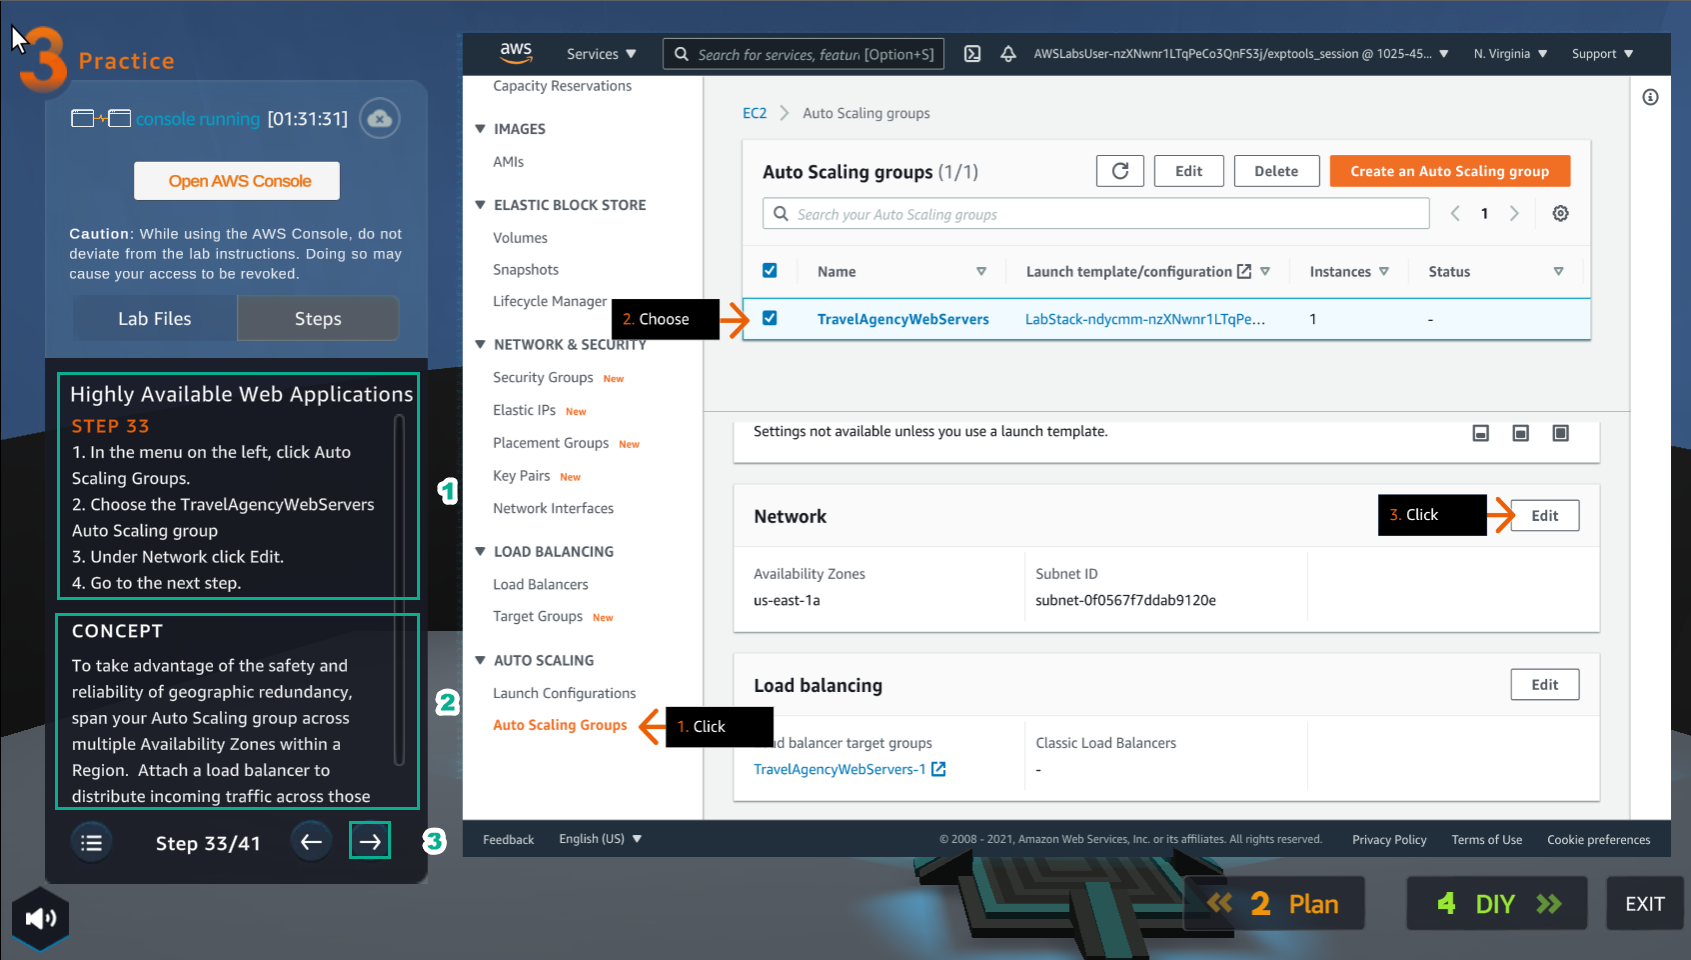
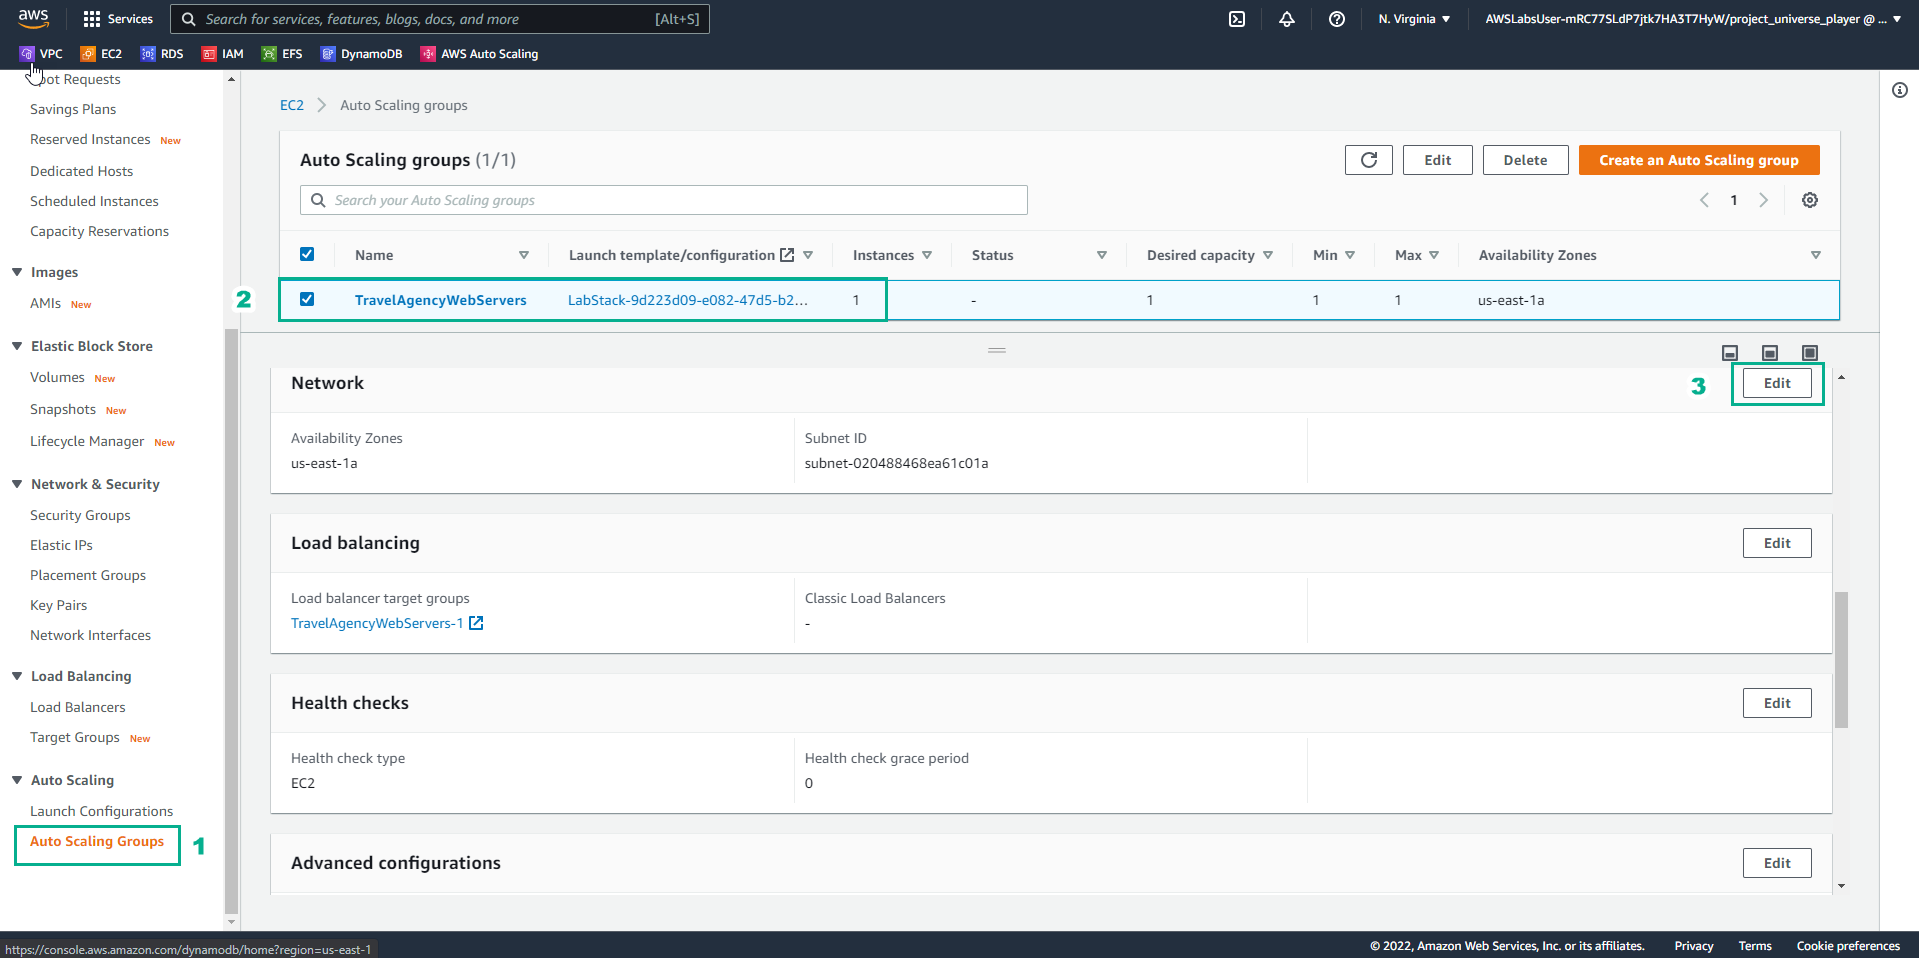
- In the VPC interface
- Select Auto Scaling Groups
- Select TravelAgencyWebServers Auto Scaling group
- In Network, select Edit
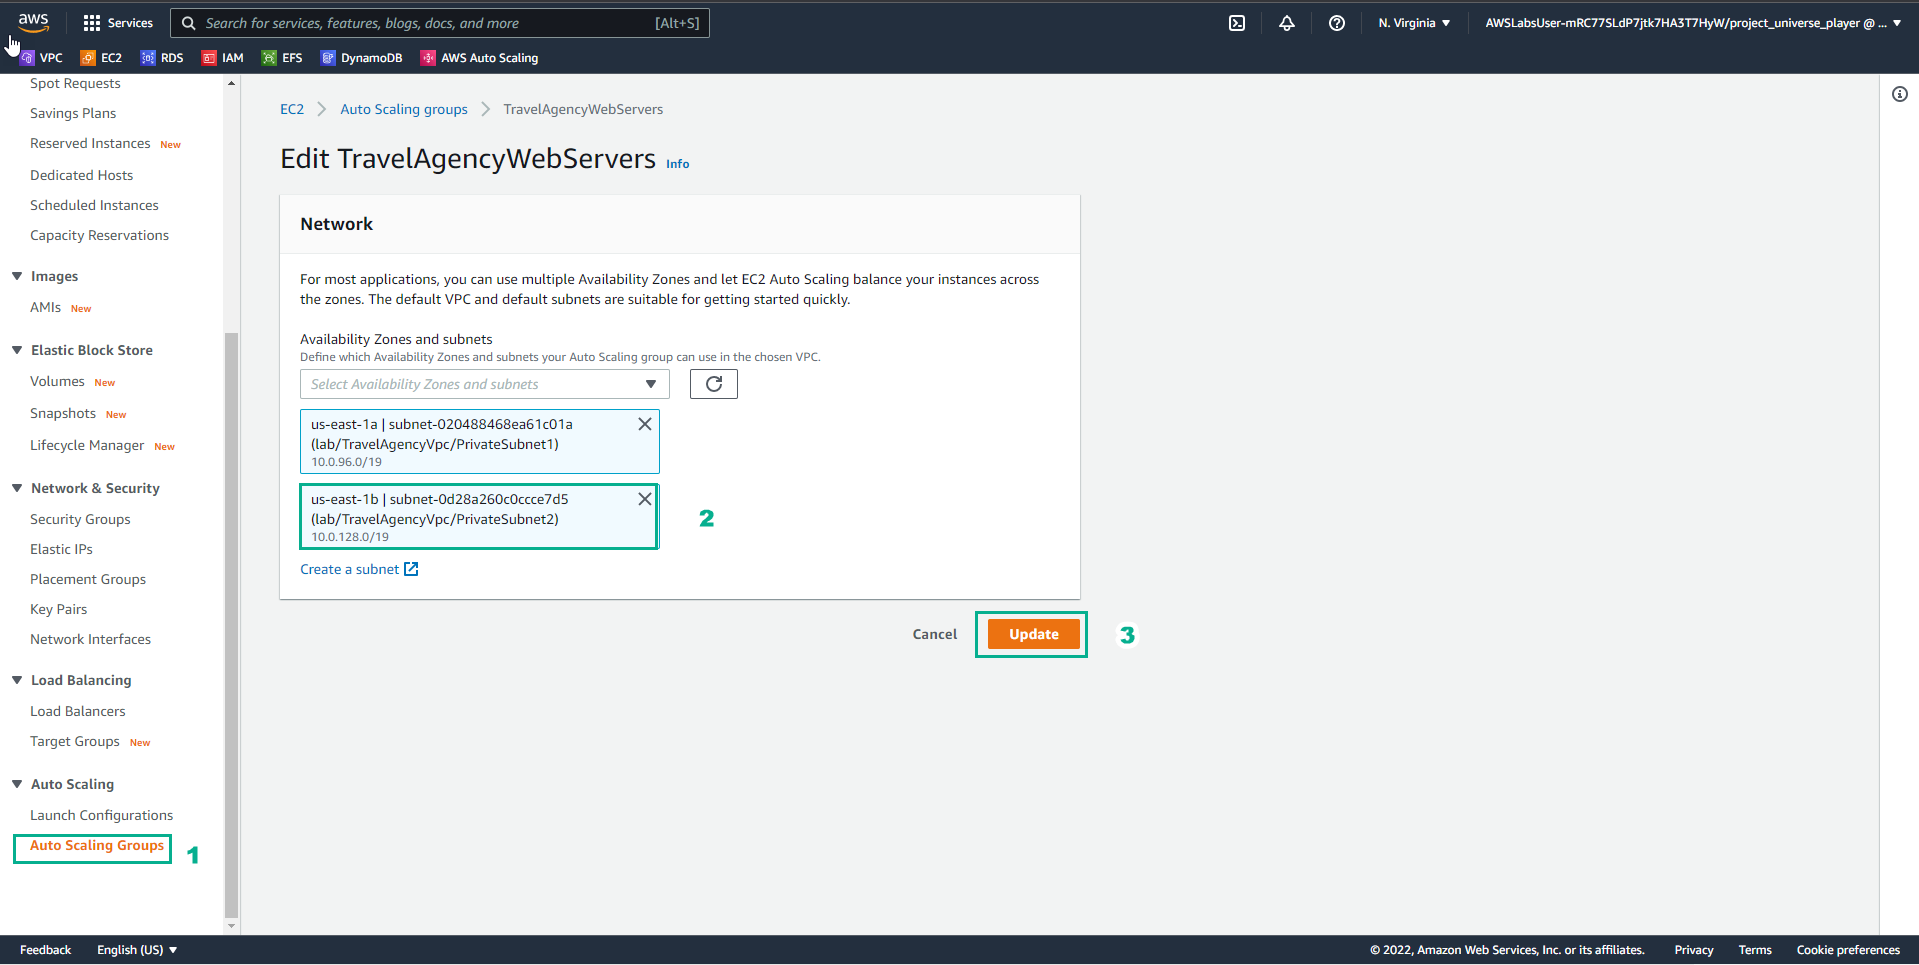
- In the Edit TravelAgencyWebServers interface
- Select lab/TravelAgency/Vpc/PrivateSubnet2
- Select Update
- In the Practice interface
- Read step 35 of Highly Available Web Applications
- Read CONCEPT
- Select the arrow to the right to see the next steps
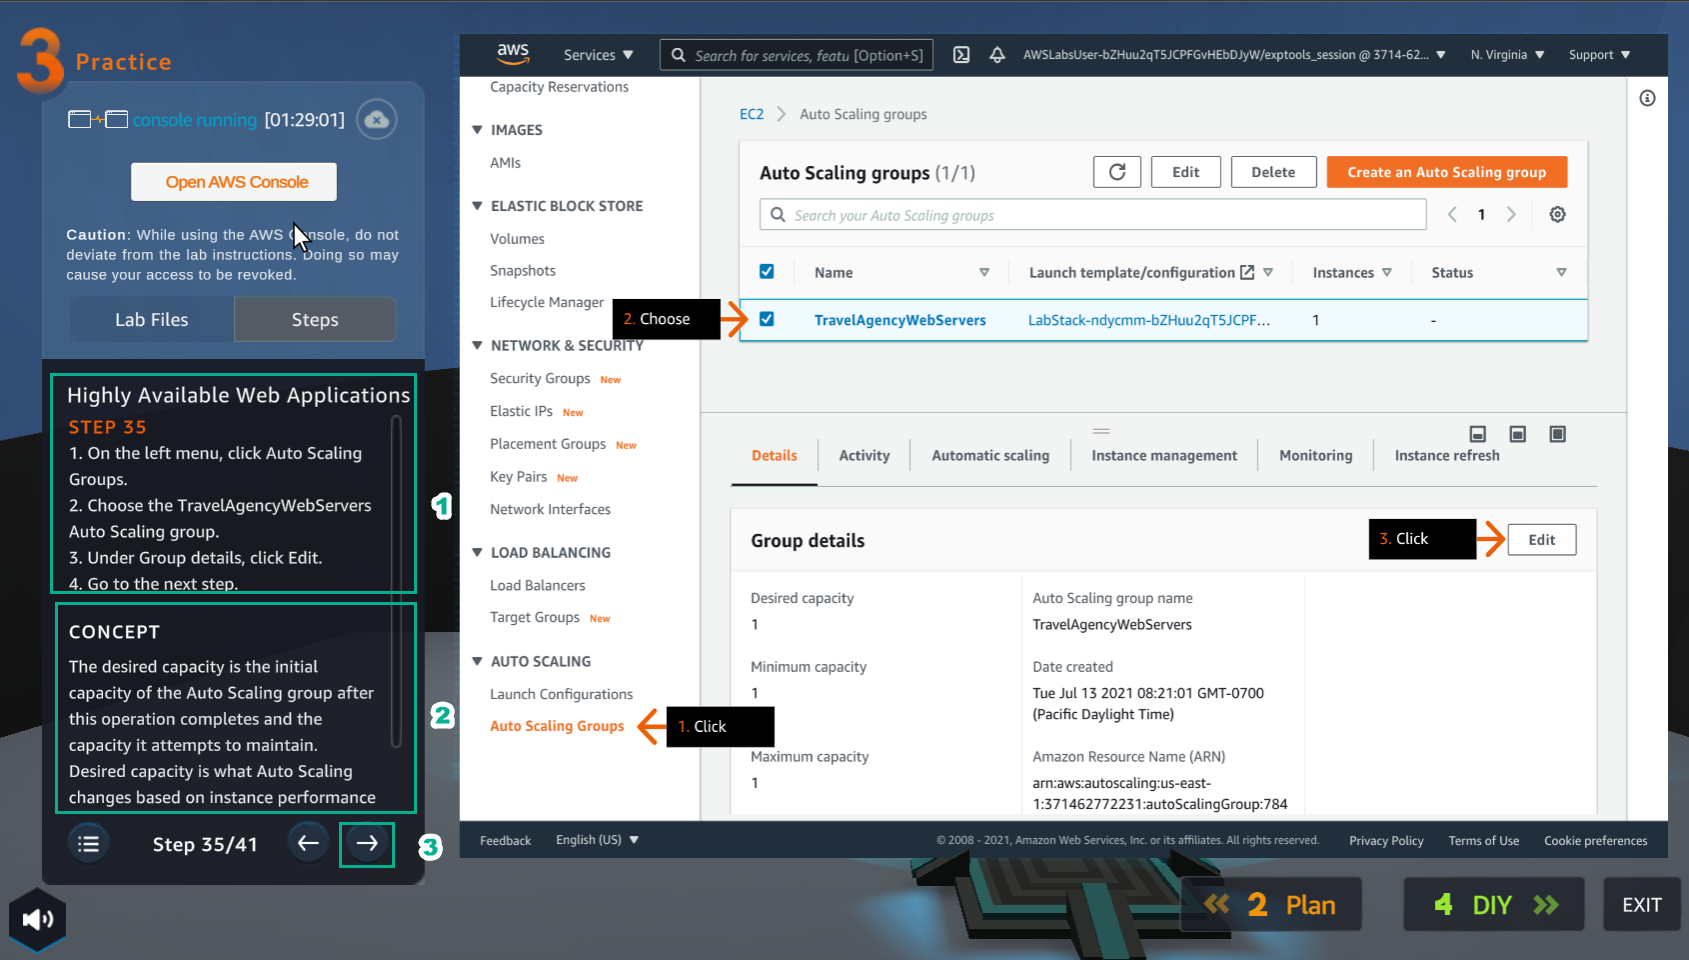
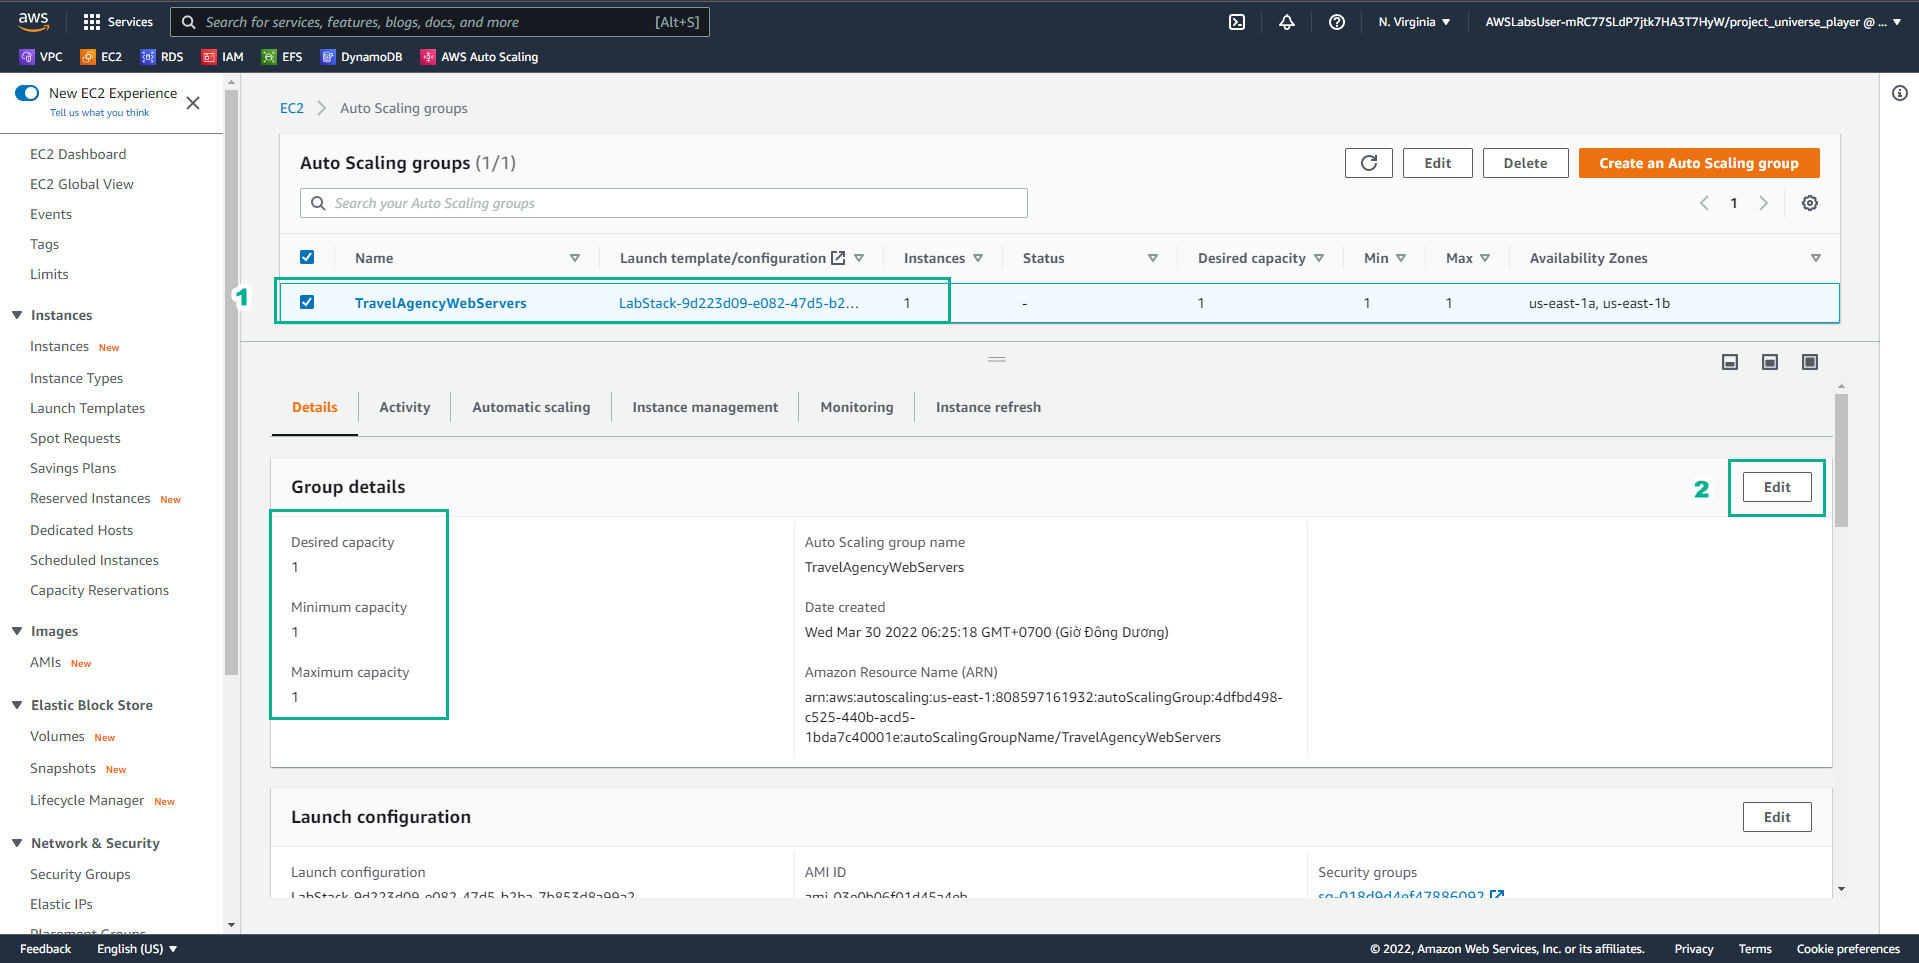
- In the VPC interface
- Select Auto Scaling Groups
- Select TravelAgencyWebServers Auto Scaling group
- In Group details, select Edit
- In the Practice interface
- Read step 36 of Highly Available Web Applications
- Read CONCEPT
- Select the arrow to the right to see the next steps
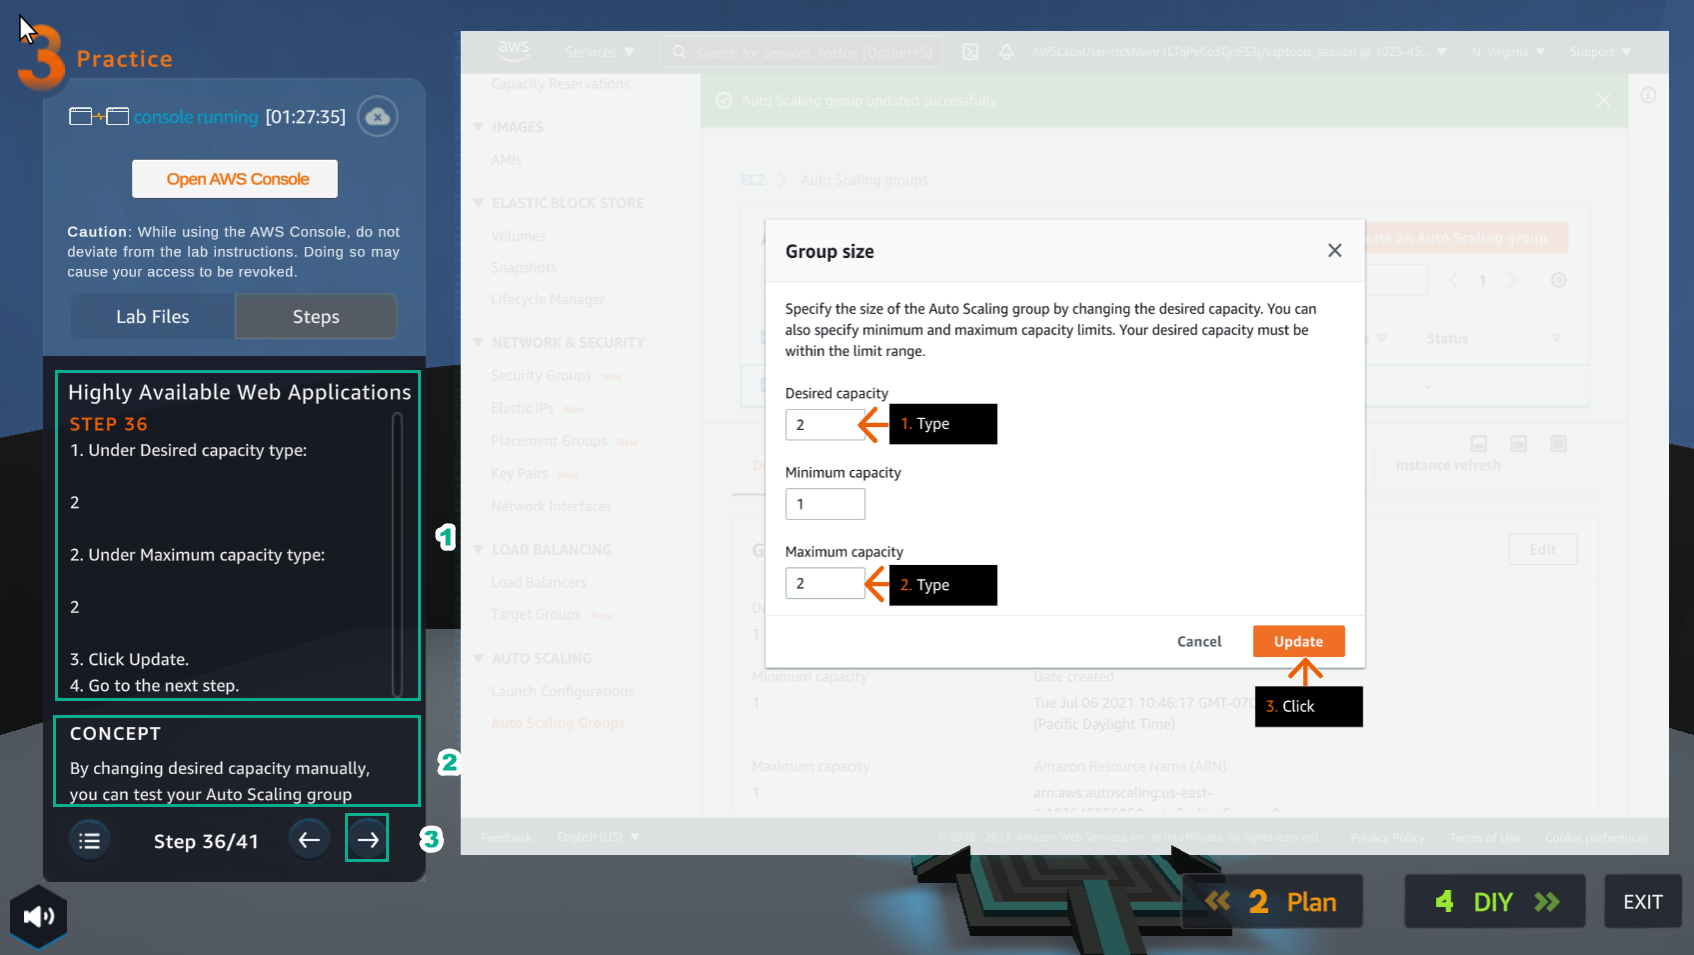
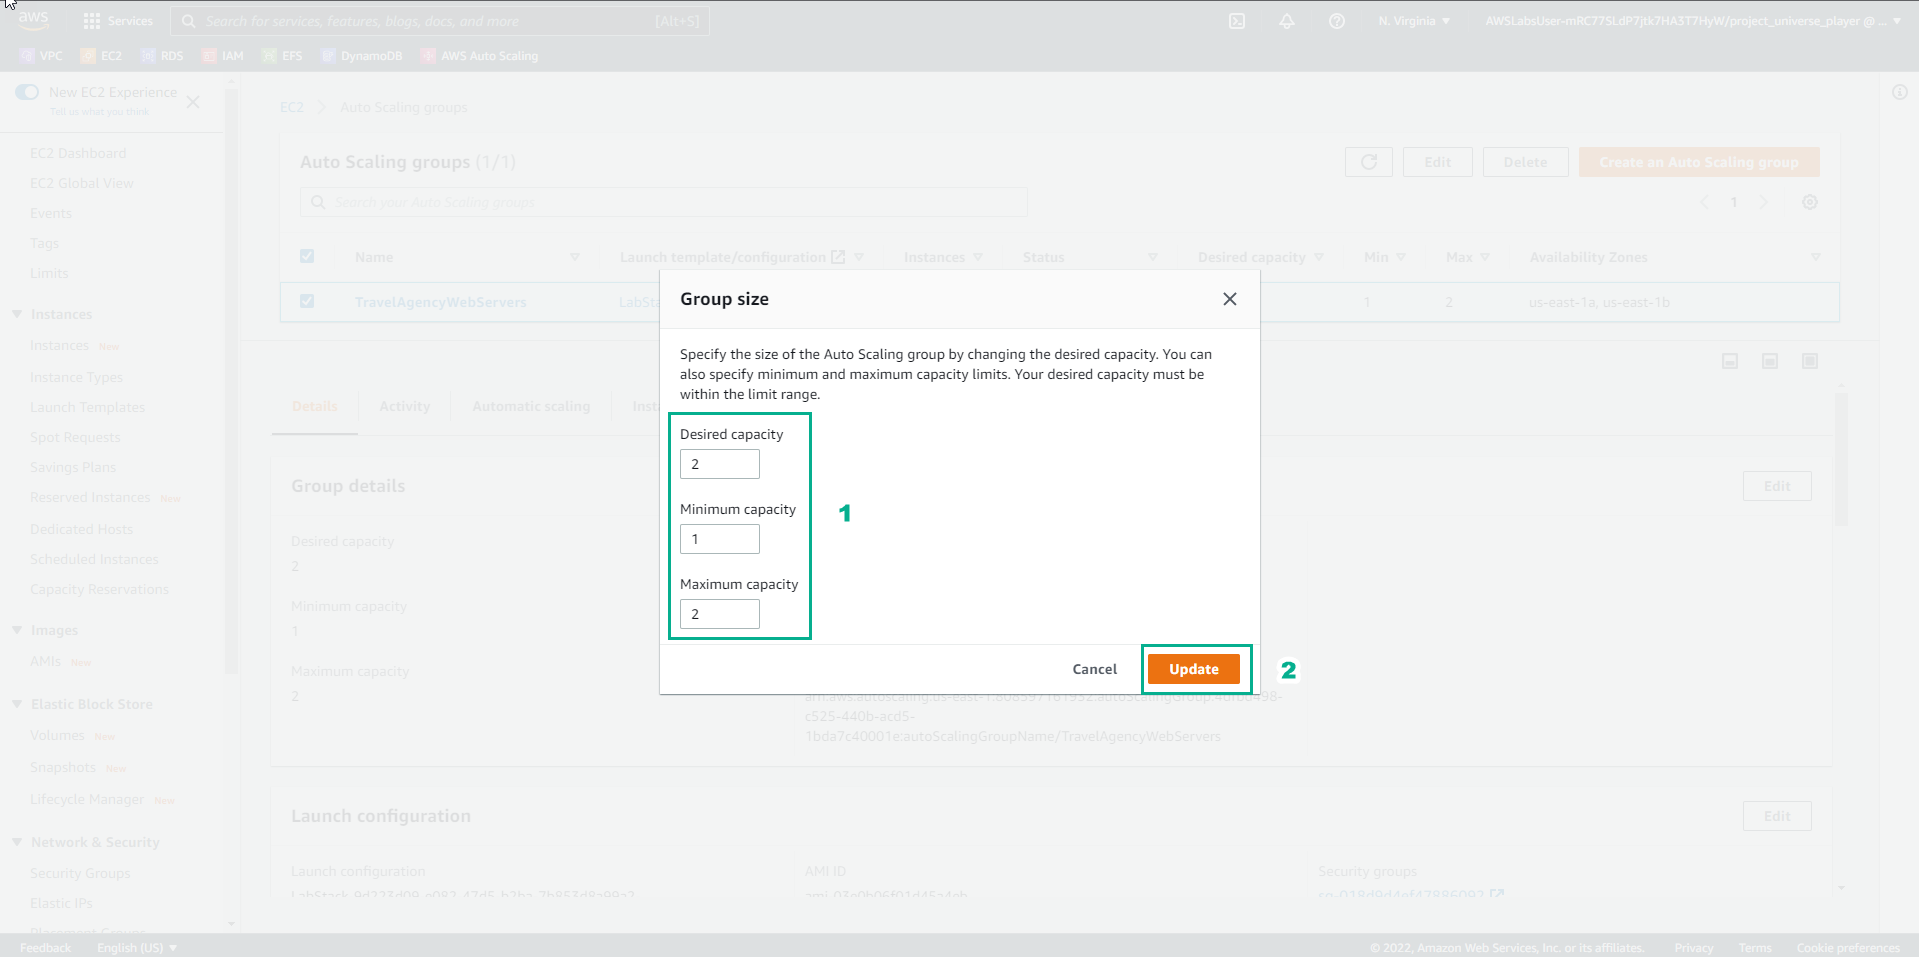
- In the Group size interface
- In Desired capacity, enter
2 - In Maximum capacity, enter
2 - Select Update
- In the Practice interface
- Read step 37 of Highly Available Web Applications
- Read CONCEPT
- Select the arrow to the right to see the next steps
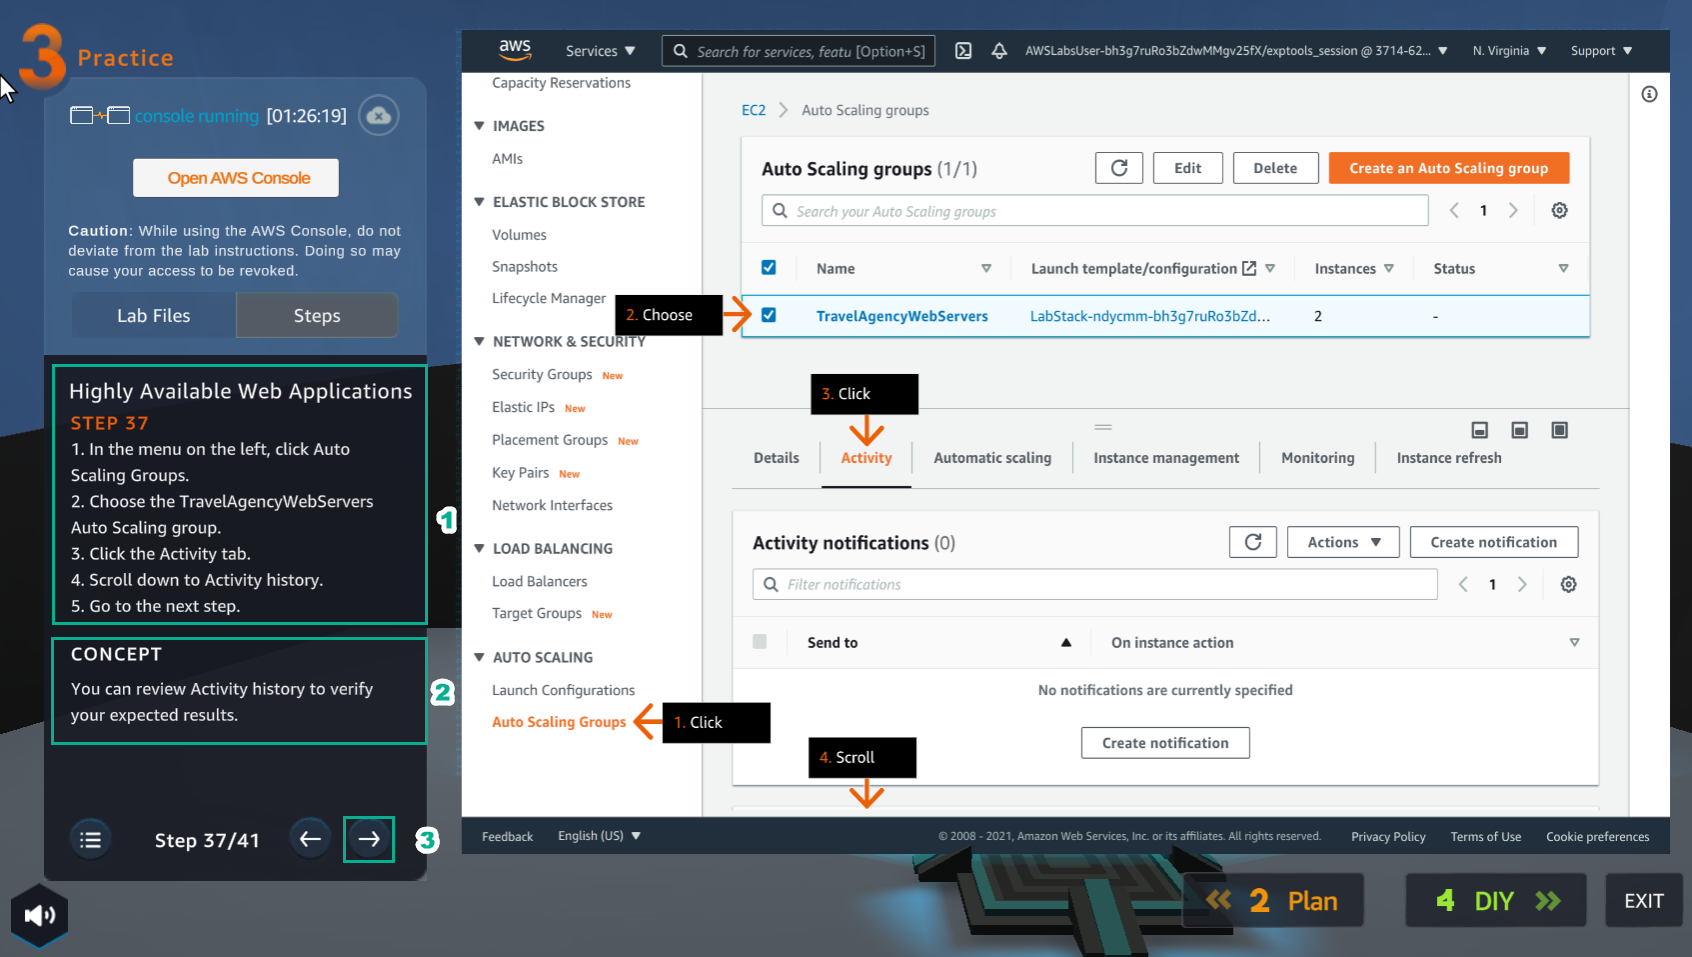
- In the EC2 interface
- Select Auto Scaling Groups
- Select TravelAgencyWebServers Auto Scaling group
- Select Activity
- Scroll down Activity history
- In the Practice interface
- Read step 38 of Highly Available Web Applications
- Read CONCEPT
- Select the arrow to the right to see the next steps
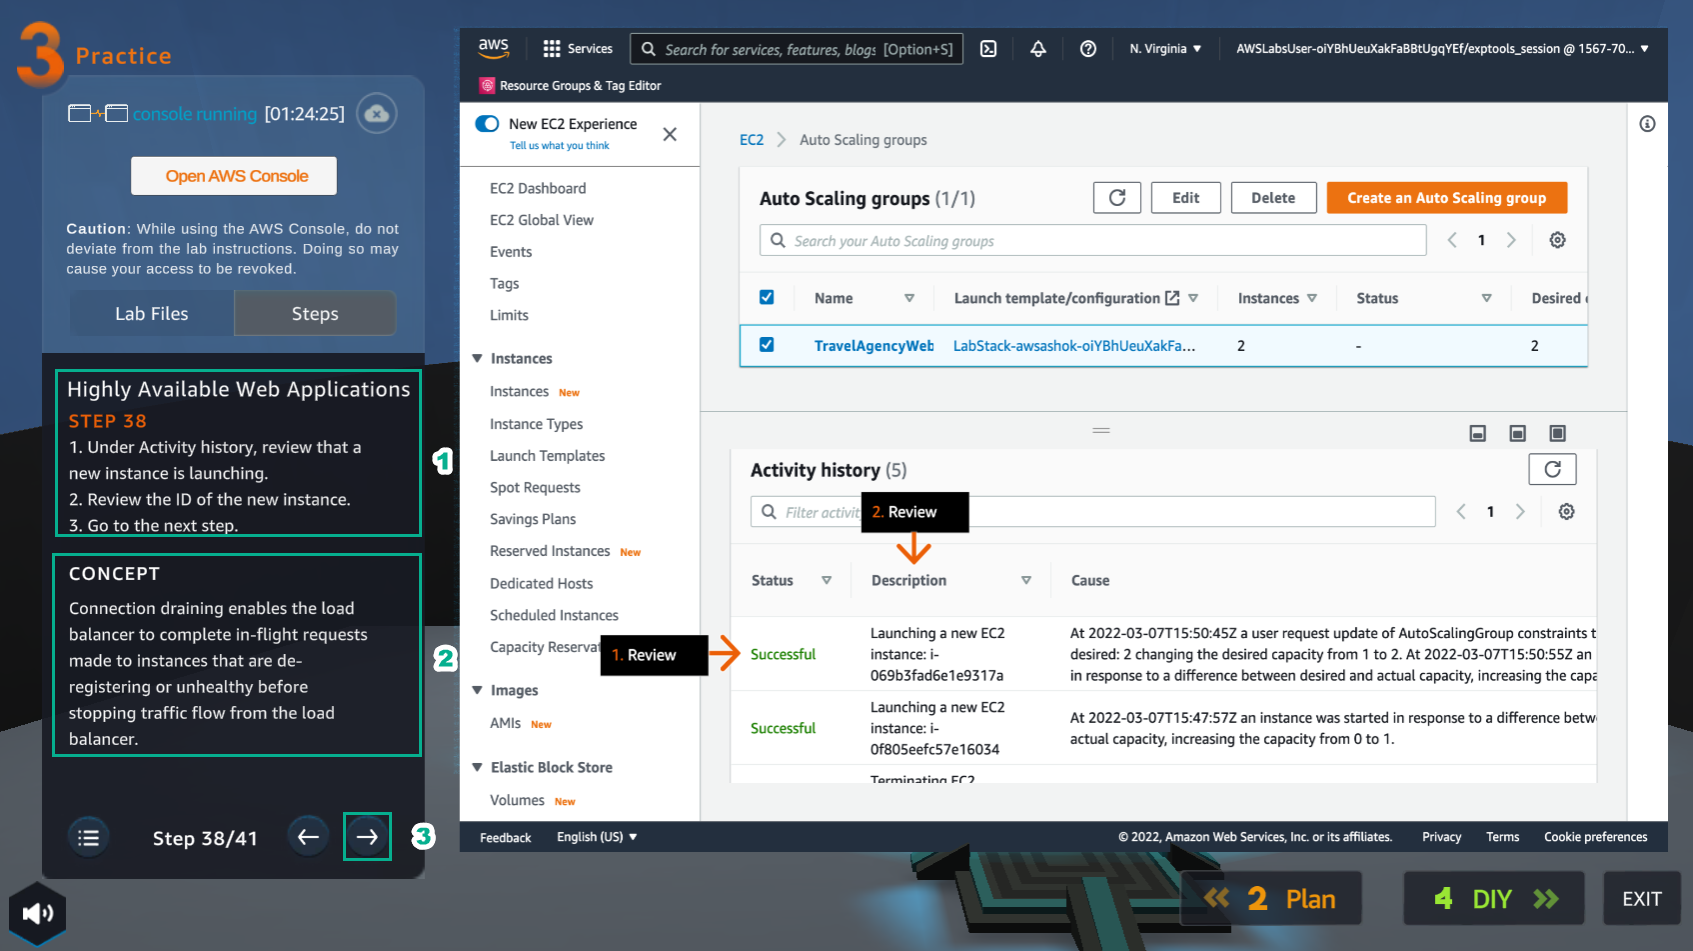
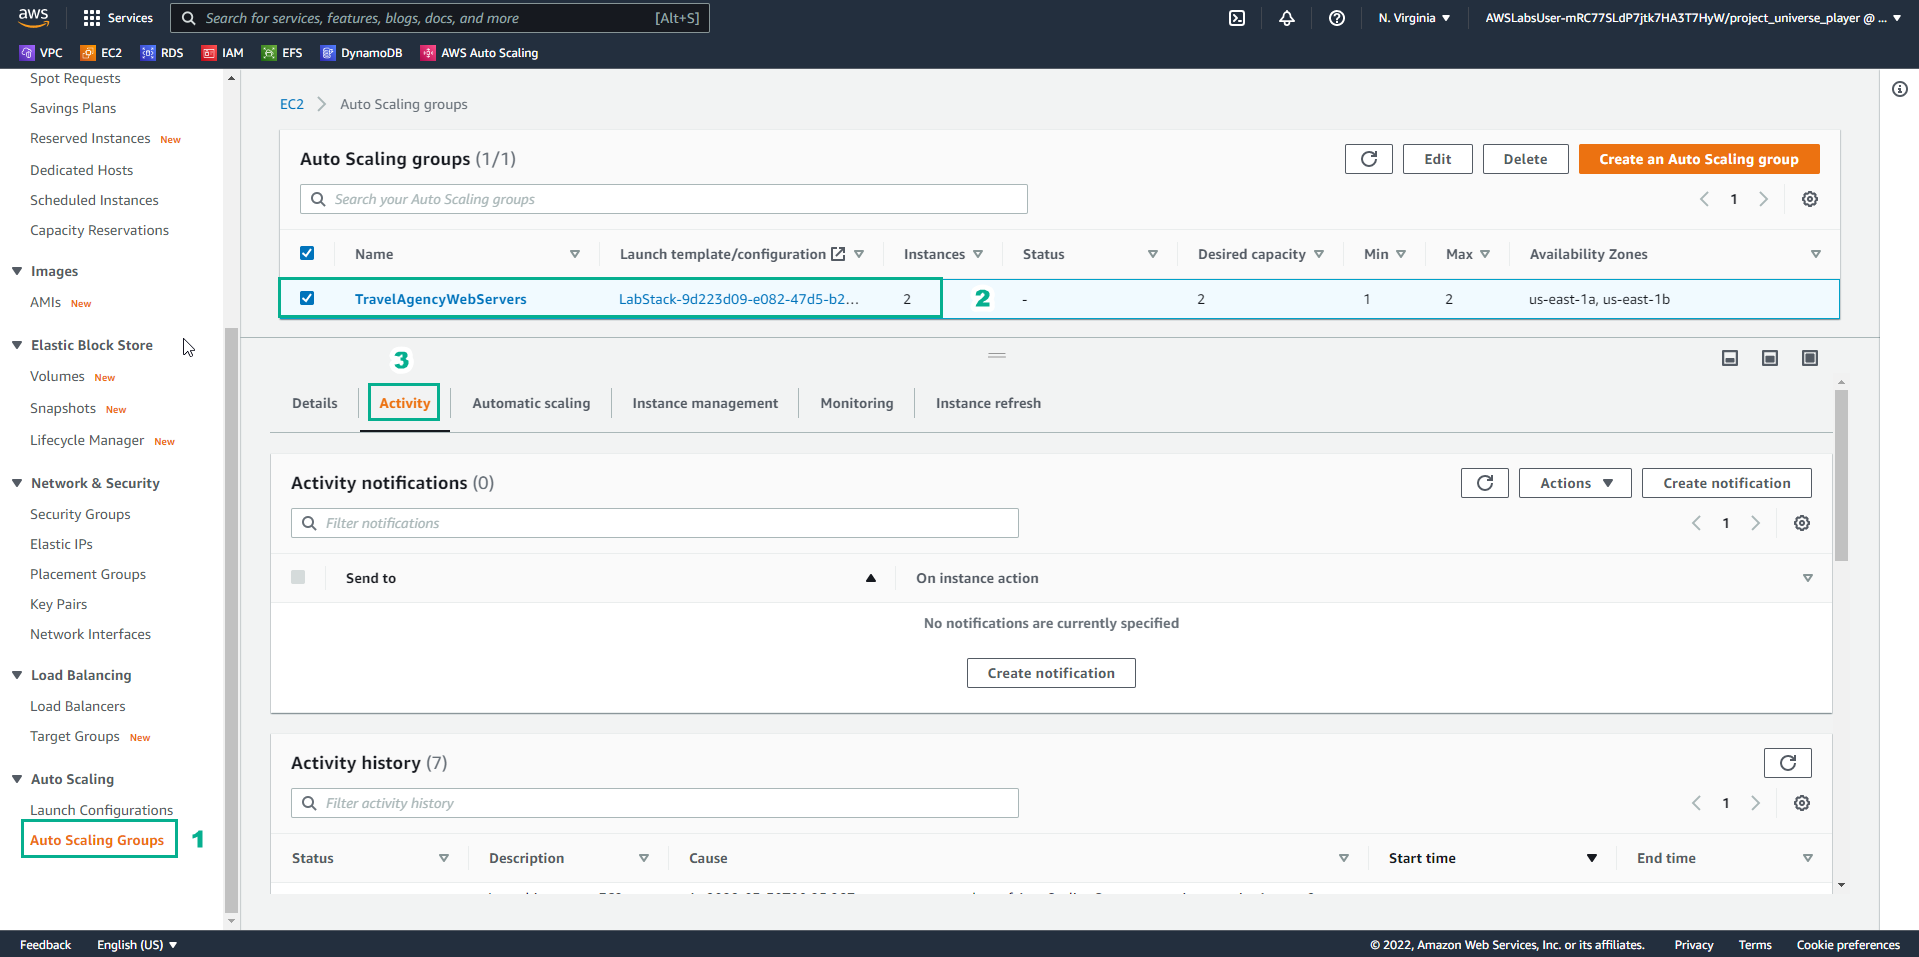
- In the Auto Scaling groups interface
- In Activity history, see Status and Description

- In the Practice interface
- Read step 39 of Highly Available Web Applications
- Read CONCEPT
- Select the arrow to the right to see the next steps
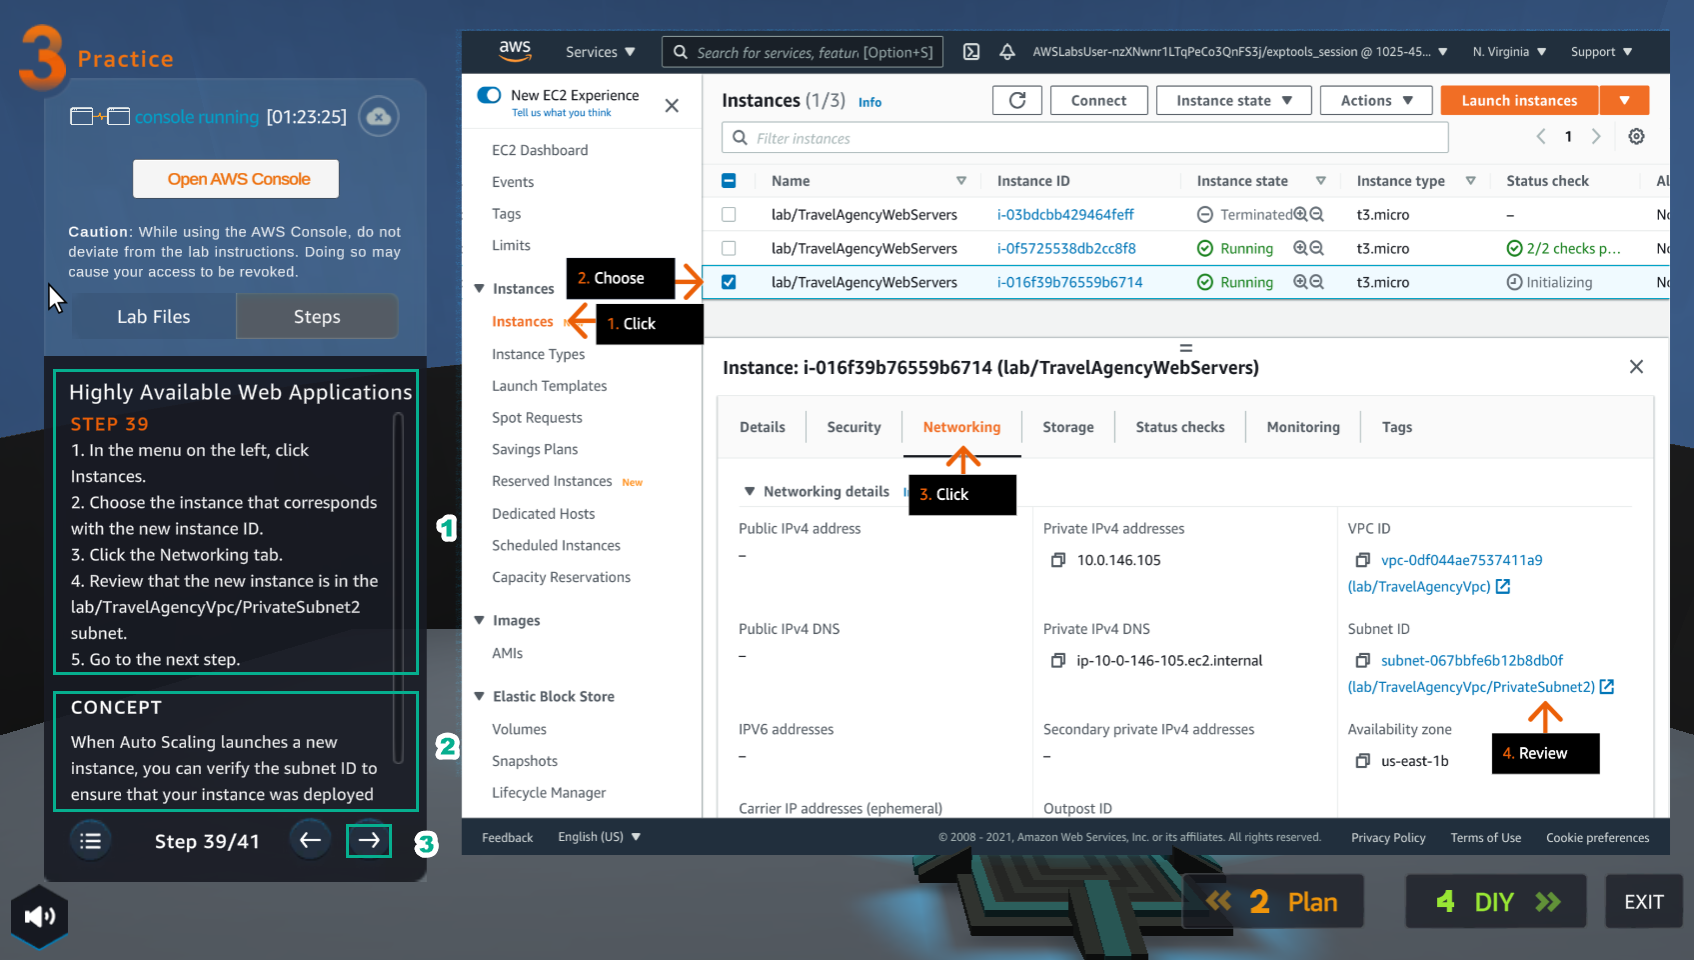
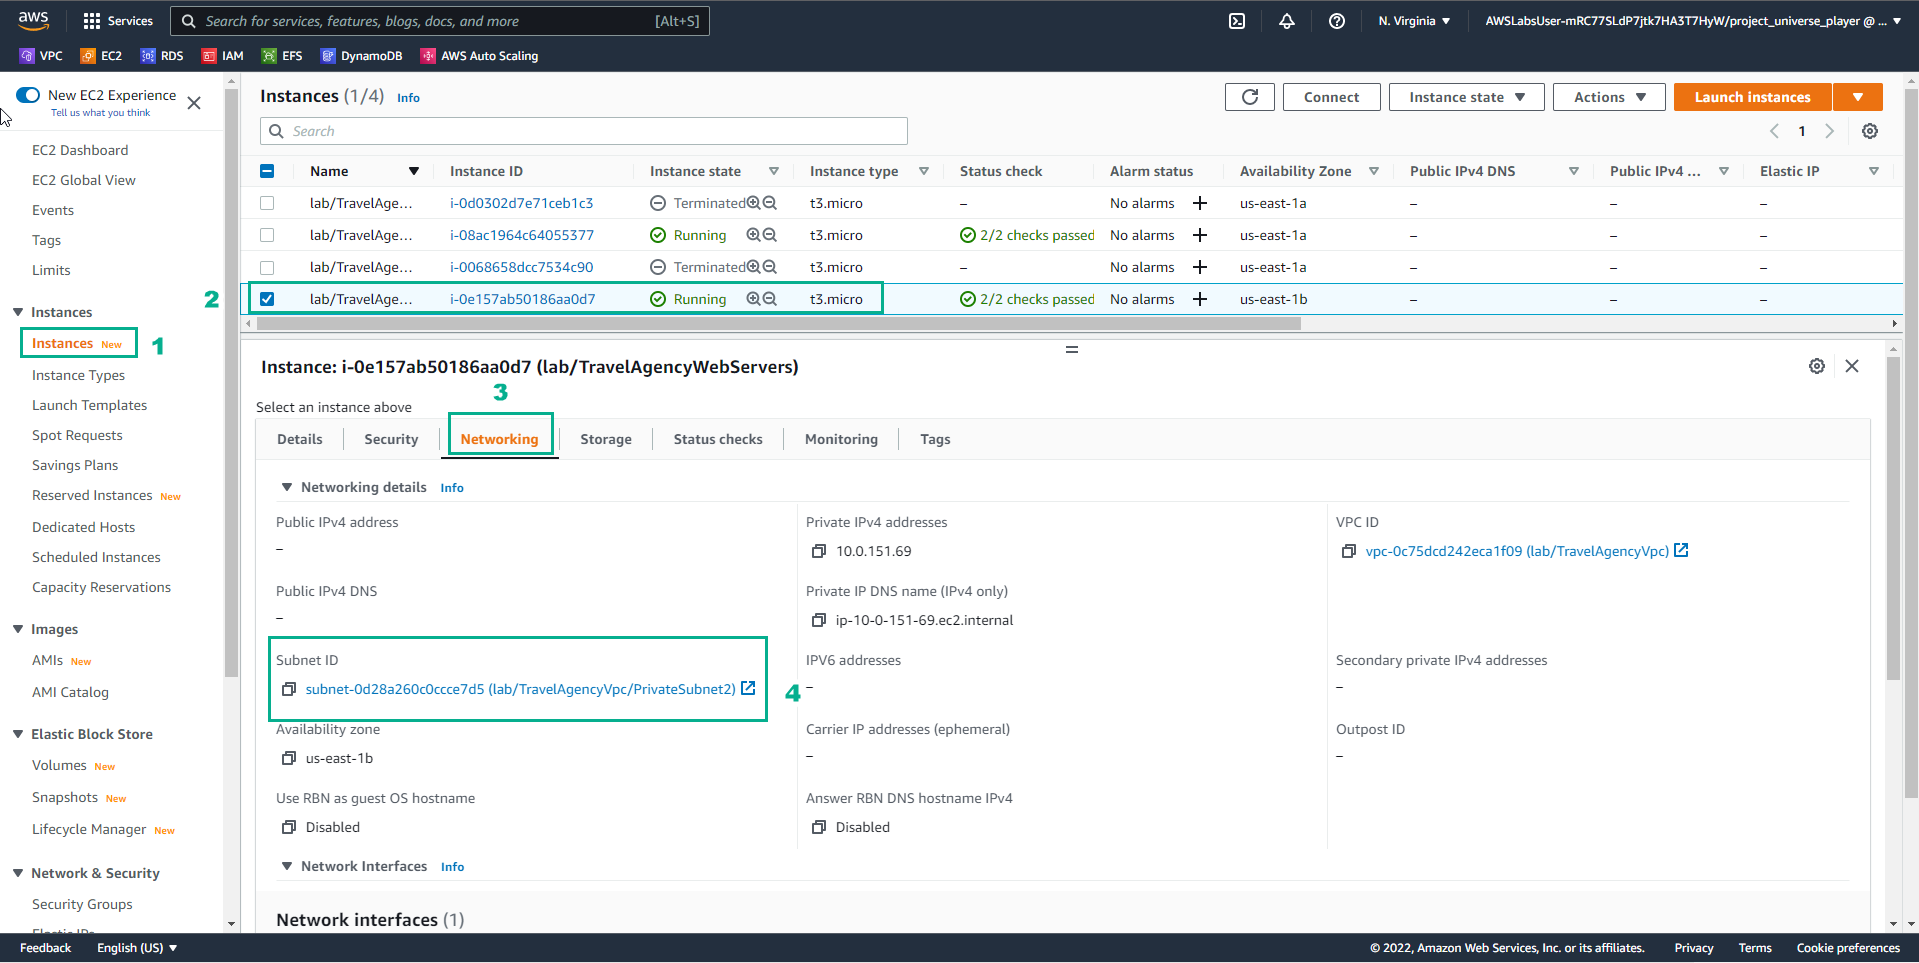
- In the EC2 interface
- Select Instances
- Select new instance ID
- Select Networking
- View Subnet ID
- In the Practice interface
- Read step 40 of Highly Available Web Applications
- Read CONCEPT
- Select the arrow to the right to see the next steps

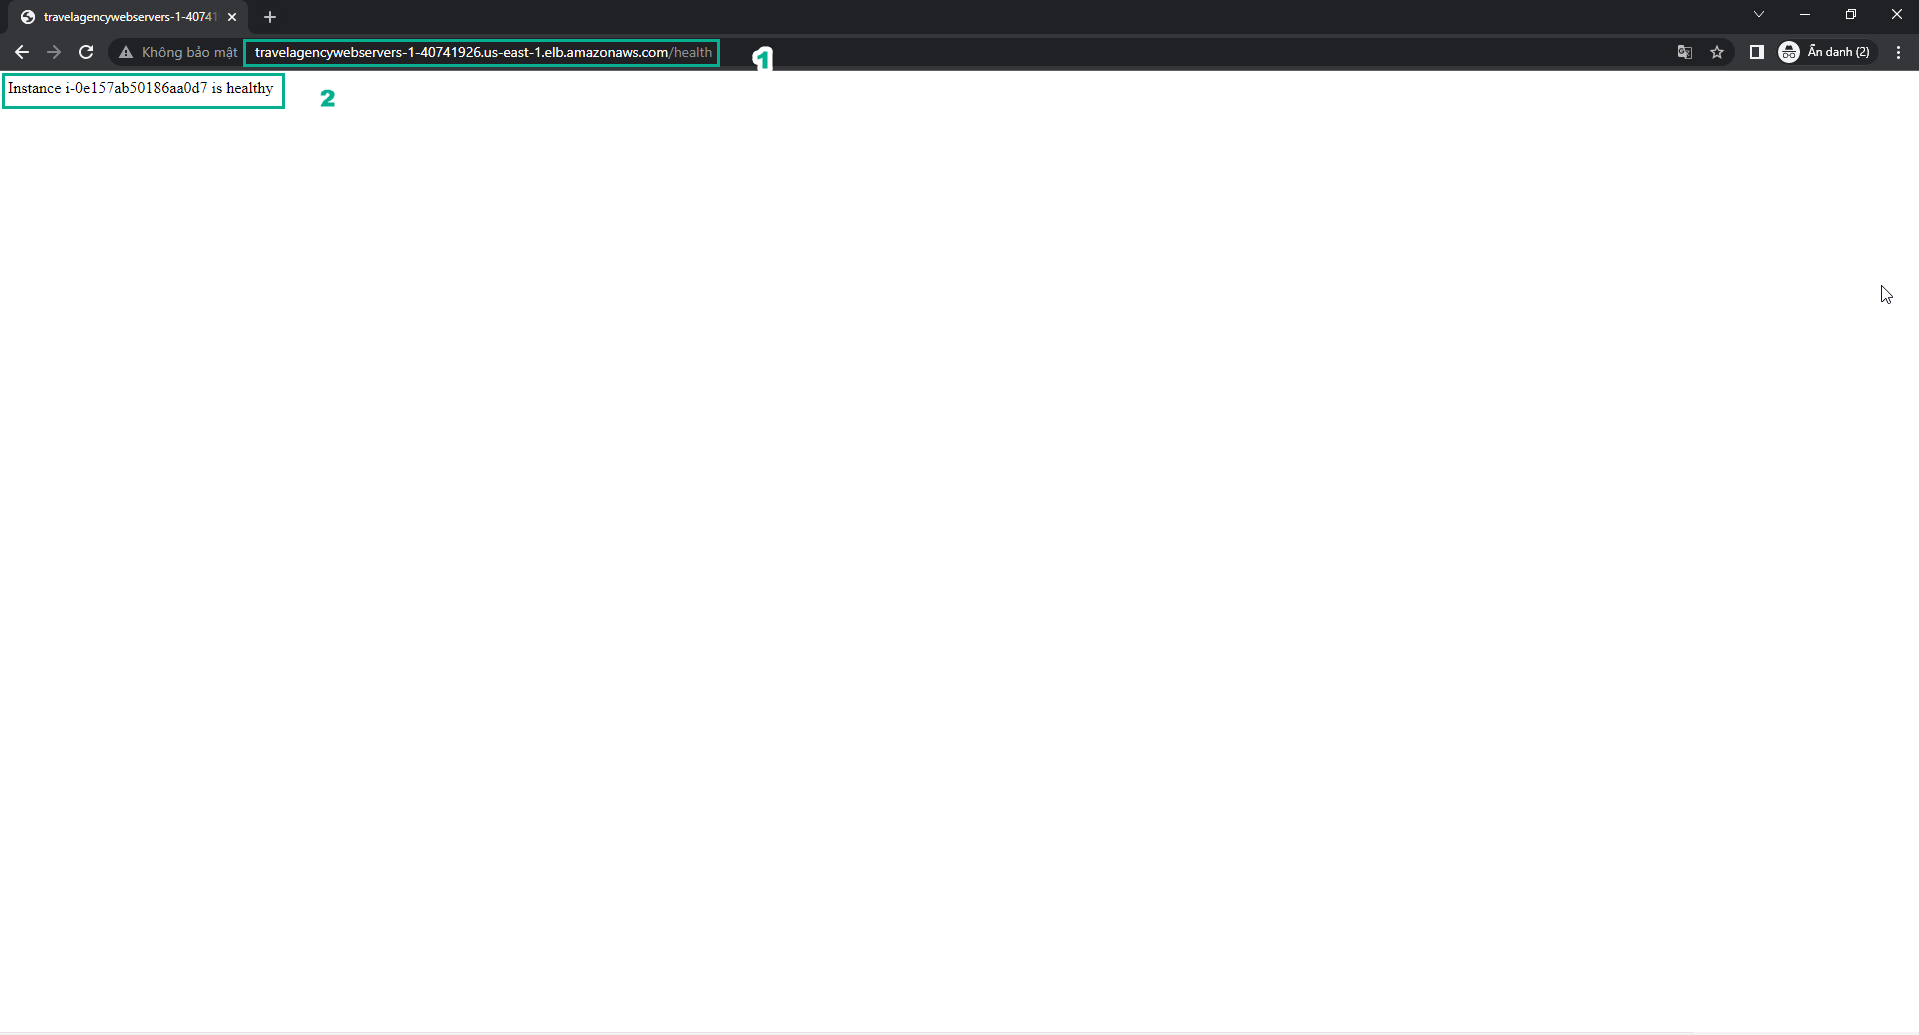
- In the browser health check
- Refresh
- View results
- Congratulations to the player on completing the lab